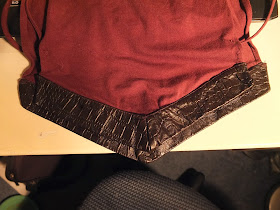
The first re-imaging born out of my collection of too-short things is this ... interesting shirt.
With bell sleeves, floral paneling, velvet trim, and faux leather accents, it had all the look of something a fairytale maiden would wear. It also had bizarre layers dangling from the front and back of the bodice, and strings that must have been intended to tie it all together. I couldn't figure it out. I tried it in a number of ways, and it was just too weird for me. With a bib in the front, and a cape in the back, I felt like a toddler with a superhero/princess fixation. Besides, it was too short, so I decided to turn it into something I wouldn't feel freakish wearing.
I started by removing the cape from the back. This was a relatively simple matter of opening up the seam, removing the dangling fabric flap, and then sewing it back up again.
Removing the bib from the front was more of a challenge. With all the different layers sewn together there, I was leery of trying to do any seam ripping, because I was pretty sure I wouldn't be able to put it back together again. So I settled for cutting off the bib, deliberately leaving about a half-inch of raw fabric as a sort of fringe.
Then it was time to take care of the length issue. Ripping out the bottom hem (which took longer than I could have ever imagined!) gave me an extra half-inch, but I still wanted more.
I had all that fabric with the nifty faux-leather trim left over from the flaps I removed, so, after a couple of positioning tests, I decided I would sew them side-by-side onto the bottom hem to add a bit of length and ornamentation to the front.
The flap that had originally been in front was slightly wider than the other one, so to help even out their widths, I folded one end of it over and clamped it in place with a binder clip. I would decide what to do with it permanently later.
Because I already had that raw-edged fringey look going on at the bodice, I planned to create a similar effect at the bottom and just let the existing bottom edge overlap the top edges of the new panels.
That turned out to be harder than I imagined. The existing bottom edge kept trying to curl up, while the top edges of the flaps curled down. I had gaping holes in my seam when I was done with the first pass.
I kept going back in and sewing more seams, trying to get all the fabric actually attached together, so by the end, it was a mess of overlapping seams—made worse by the fact that I only had black thread, which was really obvious.
To top it all off, the spot in the front where the two flaps met was uneven—one hung down lower than the other, and there was a gap between them where I'd wanted the appearance of a continuous line. So more corrections ensued.
Now, while I still wasn't certain I loved the front, I knew the back needed some work, so I turned my attentions rearward. The back bottom hem had just a single raw edge, and the places on each side where the leather flaps abruptly ended looked unfinished.
I had run out of faux leather, but still had some knit fabric left over from the old flaps which already had a hem, so I sewed it underneath the existing edge, tapering from a high point in the center (which I actually measured, hence the ruler in the previous photo), to finally meet the edges of the leather at the left and right sides.
I learned my lesson when sewing the flaps to the front, and this time taped everything down as well as pinning it, so it would stay in place while I stitched. It worked—I had no holes this time, but it still didn't look good. In fact, the new underlayer was almost completely hidden, but fortunately I hadn't cut the newest panels before I sewed them in, so there was still more fabric hidden on the inside of the shirt.
I simply let that fabric fall down so it dangled below the new bottom hem, ultimately achieving a riot of intersecting lines and layers. It's not what I'd call neat or tidy, but it's good enough, I think, for the back of a shirt. The only pictures I have of the back all turned out crappy, so I'm not going to bother to try and fit one in here.
 Speaking of crappy, in trying the shirt on one more time, I was convinced the front looked too sloppy to wear.
At that point, I got the idea of hiding some of my mistakes by stitching the string tie that I'd removed from the back flap over the front seam, and tying a bow in the front to cover the still-imperfect join between the two halves. That was an instant improvement, and I was satisfied enough to consider the work done.
You might be wondering about the part I folded with a binder clip. Well, after removing the clip, it still stayed folded, so I decided just to leave it as is until the need arises to change it.
My boyfriend suggested I could wear this shirt to a Renaissance fair, but I say, why save for tomorrow what you can wear today? So I paired it with a short tan skirt and some brown boots (leather + laces to reflect the materials on the shirt) and wore it to work.


No comments:
Post a Comment