Friday, September 29, 2017

If the shoe's fixed, wear it!


It feels like it was just a few months ago that I lost my reliable old brown flats to the ravages of old age. That was a shock to me, since I can't even remember the last time I didn't have a basic pair of chocolate brown flat shoes at my disposal. Fortunately, I never had to resort to painting shoes on my feet, because shortly after I got rid of my old ones, a friend offloaded her old ones on me! Hers were not in quite as terrible shape as mine, so once again, I was ready to rock the brown at a moment's notice.

When I actually did (September 6, I remember it well), it was a mistake. The shoes that had felt comfortable when I tried them on proved much too small once I got them to the office. I walked in them to a meeting across campus and back again, and by the end of my journey, I had a blister on one heel and a gaping wound on the other. In addition, one of the heel covers was completely missing, which caused me to slip and slide around on the terrazzo floors as though they were made of ice!

Before I wore these shoes again, I was going to have to whip them into shape! (And also, wait for my heels to heal!)

My first step was to make the shoes a little more comfy on my feet. I'm usually loath to make a permanent destructive alteration to any still-usable item of apparel, but these shoes were in too bad of a shape even to donate, so I figured that whatever I did, it would be better than consigning them directly to the landfill.

So, using a pair of heavy-duty wire cutters, I snipped a few notches into the tops of the heels. I hoped this would loosen them enough that they wouldn't mutilate my oversized feet. 
This did help. They no longer cut into my heels when I wear them...now they just slide off with every step. I can never win!

Next, I had to fix the matter of the missing heel cover—which is not its official name. Apparently the rubber pieces that cover the bottom of the heel are called "lifts." Learn something new every day!
Ebay is my usual source for high heel tips. I can buy a bag of a dozen for a couple of bucks and repair untold numbers of shoes! However, when it came to replacing the sole of this wider-heeled shoe, eBay let me down. The best I could find was pre-cut rubber sheets suitable for one or two men's shoes, for no less than 3-4 dollars! What!? For just a few more dollars, I could replace the shoes entirely! Not a worthwhile expense.

I decided instead I would have to get crafty. All I needed was a sheet of some plastic or rubber material, a couple of millimeters thick and a few centimeters wide on each side. What did I have lying around that could meet those criteria? Hmmm, how about the sole of another shoe?

Fortunately, a different friend had also recently unloaded a pair of shoes on me, and those shoes, being not even close to my size and even more beat-up than the first pair, had gone straight into the shoe-recycling bag (a store near my house has a shoe recycling bin, which I fortunately had not had time to visit recently). I fished them out and set to work detaching the heel lift.

I wedged a flat-head screwdriver into the gap between the rubber and the rest of the heel, and the rubber peeled right off! It was easy, perhaps because the fibrous material comprising the next layer of the heel was dry and crumbly with age. 

The lift had been affixed with 4 short nails, so I levered those out with my wire cutters and set them aside.

I scraped off as much of the residual heel material as I could, then laid my shoe onto the now-detached rubber heel lift. I tried to align their curved edges so I'd have to do as little shaping as possible.

I traced around the shape of my shoe's heel, then I cut the rubber, again using the wire cutters. This was a little harder because I couldn't get them easily around the curves, but I couldn't think of any other cutting tool that would do a faster or neater job. 

I decided I would use a combination of glue and shoe nails to attach the lift to its new home. The heel was made of plastic, and many portions of it were hollowed out, so I marked 4 spots on the lift that would line up with non-hollow areas on the heel—these were where the nails would go. Then I used E6000 to glue the lift onto the heel.

I braced the shoe on an old block of wood I found in the shed, and hammered in the nails, which was very challenging since my fingertips were bigger than the nails! 
Somehow, I managed without smashing any fingers, but alas, the nailheads never really sunk into the rubber the way I had hoped. I guess the plastic of the heels was too tough for the nails to really dig into. 

 Once the glue had dried, I added one more finishing touch—some color. The insides of the shoes were a pale cream color, and somehow, they had started to turn over and show on the outside. 
Using a brown Sharpie, I colored these visible parts to make them less noticeable while the shoe was being worn.

And success! I wore the newly repaired shoes for a full day at work, and I'm pleased to say that they did not give me any blisters.
Fini-toe!
On the downside, however, at some point around lunchtime, the heel lift fell off the other shoe and vanished, basically leaving me back at square one, slip-sliding around on raw plastic for the remainder of the afternoon. And thus, I had another opportunity to perfect my cobbling skills!

I co-opted the other heel lift from the extra pair of shoes in much the same way as the first. The shape came out a little more off-kilter thanks to my lazy wire-cutter technique, and I probably would have taken the time to smooth the rubber into a neater shape if these shoes hadn't already been on their last legs.

Unlike last time, I didn't bother to nail on the new heel lift, just coated it liberally with E6000 and let it dry. This glue-only fix did indeed hold up to real-life usage, as I wore them all day today without a hitch. They even stayed on despite being used to pedal my bicycle, which I suspect was their downfall the last time I wore them.

Lessons learned from my first foray into the art of cobbling:

  • New shoe-repair rubber is ridiculously expensive—but old worn-out shoes are a perfect source for this material. Next time you're tempted to throw away a pair of shoes, maybe keep them with your craft supplies instead!
  • Shoe nails don't work on the type of plastic used in cheap heels.
  • Using wire cutters to shape the rubber for shoe soles is a terrible idea. What is a better tool? I'm not exactly sure yet, but I might try a utility knife next time around.
  • While shoe-stretching only works on real leather, it is possible to make a too-small pair of synthetics larger (if you don't mind damaging them) by cutting them at strategic points.

Thursday, September 28, 2017

Leafy Greens


Yesterday it hit a high of 87 degrees, which was the kind of glorious weather I don't expect to see much more of this year. Of course, I keep saying that. But this time, it's the last few days of September, and it's a lot more likely to be true.

So with that in mind, let's enjoy one last ode to summer with a light and bright, green leafy dress!

This dress has been worn once since I got it at the thrift store over the summer. Although I really love the fit and the pattern, its neckline originally stymied me, as it had those annoying little short ties that are meant to make a cute bow at the bottom of the neck, but more often than not just stick straight up and make you look like you never learned to tie a knot.

Rather than having a lopsided bow ruin my day, I crossed the two ties over each other and hand-stitched them back along the neckline, for a lower-maintenance, but still frilly look. Can you tell that the neckline was altered? I kind of like it this way!

Feeling a bit lazy after all that work, but wanting to wear shoes that were distinctive in some way, I decided on these flatform sandals, which are low enough to be comfortable but high enough to be interesting, in spite of being beige.

So long, summer!... For real, this time?

Tuesday, September 19, 2017

It's Flowtime


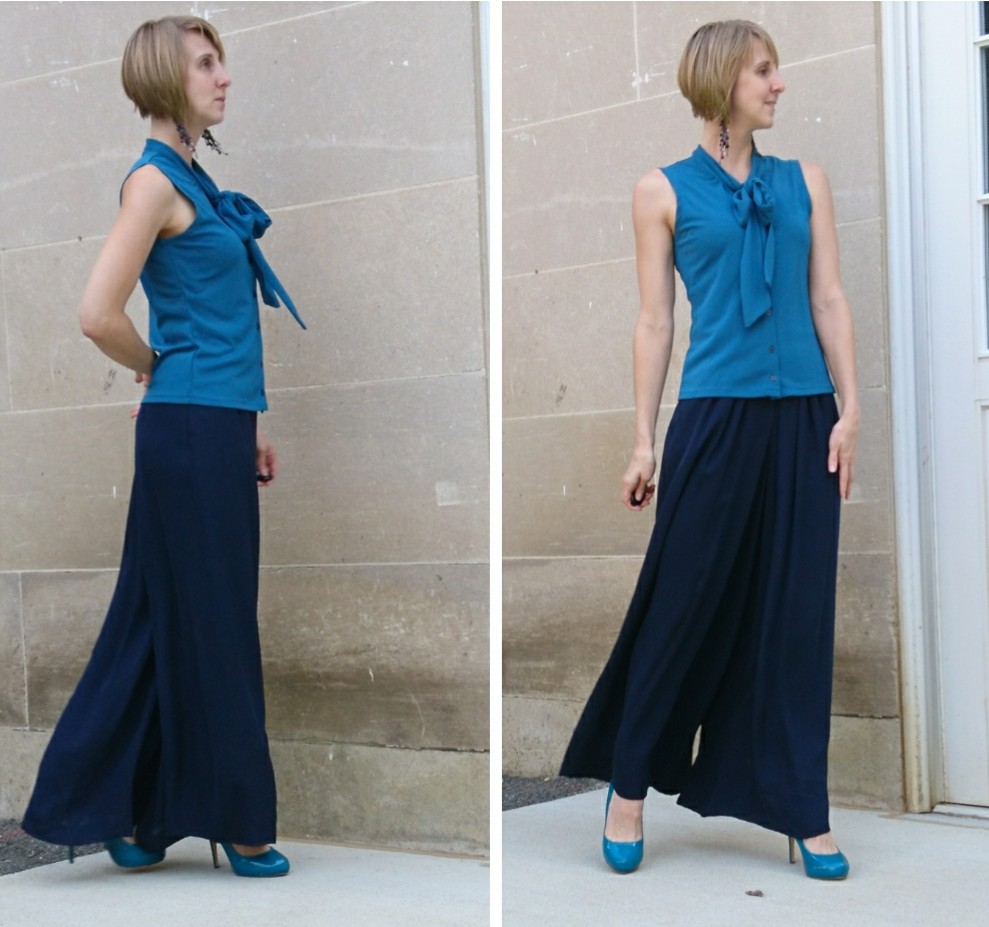
I've been on a rather unsuccessful search for wide-legged pants since the beginning of the year, but every pair I acquire has something wrong with it. There were pants that weren't wide enough (such as the dramatic looking flares I ordered from China, only to find they hardly flared at all—when will I learn!?). There were multitudes of pants that weren't long enough (including the ones with butterflies, which I ruined by trying to raise the crotch so I could wear them lower). There were pants that were too thin and clingy (I sent them back), pants that were too flashy (I'll find a way to wear them in spite of being bright orange and covered with sparkles!), and there were these.


These were probably the most successful purchase yet. They are long, long, long enough to wear with high heels, and they're a color that actually coordinates with real clothes. However, after all my complaining about wide-leg pants not being long enough, these ones might actually be too long! I kept getting the heel of my shoe caught in the fabric, and running the hems over with my wheeled office chair. I ended up taking my shoes off and sitting on my feet for most of the day. While I firmly believe that, just like flared pants, wide-leg pants only look good if they skim the ground, I may have to accept that ground-skimming clothing of any type (including maxi skirts) is just not appropriate for an environment in which you spend a good portion of the day rolling back and forth on a chair.

Execution challenges aside, I'm pleased with this outfit. Every element is perfectly coordinated in teal and navy. I feel like a winding river in my aquatic colors and graceful, flowy fabrics. Even my earrings get into the flow, cascading to my shoulders like beaded waterfalls!

Friday, September 15, 2017

Spring Ahead


Fall is just digging its traitorous nails into a perfectly good summer, but the Unfashionista is paying that no mind...she's already looking forward to spring!

Since that last unseasonably cold day in August, we've had a few days where the weather just squeaked past 80 degrees—today being one of them. So I took my chances on shivering in my office all morning, and wore my thinnest, most sleeveless, most vernally colored lavender dress with a tulip hem!


I happened to have a new floral statement necklace and earring set I bought recently on eBay, and since there was a bit of green in the necklace, I took that as my cue to wear bright mint-green sandals. The overall look is the pastel version of my favorite grapevine color scheme!

Tuesday, August 29, 2017

Black Olive

Here's a color combination I don't think I've ever tried before: olive green and black.

I'm glad I was able to inject some novelty into my outfit somehow, because overall, today was a sad day for an Unfashionista—drab, grey, rainy, and ... not even 70 degrees! In August! What is this world coming to? These last few days of August have all been unseasonably cool, and today's weather just takes the cake.

But I digress. Novelty. I was talking about novelty.

The olive sweater is by no means novel; I think I've had it for around a year or maybe even two, but I hardly ever wear it, because it's so boxy and baggy; it generally has the effect of making me look like a huge hulking blob. I kept it out this summer when I put most of my cool-weather clothes away, because I thought I might like it better paired with shorts. I never got around to wearing it that way, but when I looked at today's bleak forecast, I realized it was time. Since I don't wear shorts at work (except that one time), I decided I'd wear it with a short skirt instead, which amounts to basically the same thing, but is for some reason more office-appropriate.

It was just my luck that I had recently purchased a new pair of olive green shoes that would coordinate perfectly with my olive drab cardigan. What's the difference between olive green and olive drab? Well, as with most color words, it is frequently up to the person who uses them, but in my book, olive drab is just a desaturated (i.e. grayish) version of olive green. The shoes just barely squeak by as "green" instead of "drab."

Once I had decided on what to wear, the next step was to make it all actually wearable! As is common in my fashion life, what started out as simply assembling an ensemble morphed into a sewing extravaganza. First I decided I could fix the boxy-and-baggy problem of the sweater by giving it a more tailored shape. So under my sewing machine it went. I freehanded a couple of generous curves into the side seams, and ended up with a slightly more fitted version of the original. I took before and after pictures, but the difference is so subtle even I can't see it. Oh well, at least I feel better about wearing this sweater!

Second, the black-and-beige lace top needed some refinement. It was originally a too-short dress, which I wore once as a dress and regretted all evening, then started wearing with the bottom folded under as a top. Finally I decided to make the change permanent and cut it to shirt length sometime over last winter. It has a slippery beige liner and a tight lace outer layer, and I found after a couple of wears that the liner would always start peeking out the bottom as the outer layer rode up. So my final alteration to this top, made last night, was to tack the two layers together at the side seams, to hopefully prevent any further wardrobe malfunctions.

My final additions to the ensemble were a pair of earrings—a brighter green than olive, I'm counting on them to add sparkle and lightness to the somewhat dreary look—and a headband.

 
In case you didn't notice in my last post, I changed up my haircut again—to my shortest bob yet!—and that means it's time for me to start experimenting with new ways to decorate my hair. I found that with my last hairstyle, which I started blunt-cutting myself around March of last year, the most flattering look was to just leave it alone (though occasionally I had some luck with spiral curls, that never happened unless I had an event to attend and a lot of time on my hands in the preceding hours). But now that it's shorter, rounder, and just plain different, it may lend itself better to ornamentation...and dare I say... a new dye job?

Sunday, August 27, 2017

Perfectly Practical


Remember that outfit—the one that was dark and melodramatic and which I almost wore to work but decided it was inappropriate? I was able to work it into my life successfully less than a week later—today!

The fun thing about this outfit is it takes two different garments with a mandala print and a grey-on-grey color scheme, and joins them together! That's really all you need to know about this look, but if you're interested in stories, I can tell you tales about how every garment got to where it is now!

The top is an oldie but goodie, having been a part of my wardrobe since I apparently thought military fatigues would be a good thing to wear to the office. The top was originally a baggy, flowy affair, which might work for some occasions but certainly didn't look great over this skirt, and since I knew I was going to wear them together, I took some time to take in the sides and make it more fitted. Easy fix!

BeforeAfter

The skirt is actually a skort (it has built-in shorts underneath), which, combined with its stretchy, synthetic fabric, makes it quite the athletic piece of apparel. My boyfriend got it for me at Costco, and I originally thought it would be a nice casual-and-comfortable-but-nice-looking piece that I could wear for traveling or for low-intensity activity. What I neglected to realize at that time was that I never engage in the kind of activity that's low-intensity enough to wear a skirt (even a skort) but high-intensity enough to warrant the kind of fit and fabric that this skirt has. As you know, I've never preferred to go around in public in my workout clothes unless absolutely necessary (despite the popularity of athleisure), so the skirt sat in no-man's land at the back of my gym clothing drawer for most of the summer. Finally, I decided today would be a good day. I planned to be out most of the morning running errands (one of which I would travel to by bike, and one of which would involve loading stuff into a vehicle), so a somewhat cute, but still practical outfit seemed like a good choice.

In the morning, I wore sneakers, but in the afternoon, I just couldn't resist any more and broke out my furry pool slides, which I've been jonesing to wear ever since I learned they were trendy in the spring. They might be a little too black to really look perfect with all the greys, but they're furry sandals! Sporty looking skirt and top, combined with the "fashion" version of locker room shoes? That seems good enough for an Unfashionista to wear to brunch!

Tuesday, August 22, 2017

So Long, Summer

 
I get a little maudlin when I sense the approach of autumn. The first evening I hear cicadas singing, the first morning I wake up to a chill in the air, the first day the high drops out of the 80's... these all strike a chord of melancholy in my heart...and drive me to melodramatic gestures like, on the final day that the temperature is predicted to top 85 (today, with a forecast high of 93), insisting on going "sleeveless, short, and sandaled." In other words, wearing all my most summery styles of clothing at once, to make the most of the (probably) last really hot day of the year. I came really close to getting even more over-the-top; I had planned on dressing in downright funereal hues as well, in a statement of mourning. But the world was spared my melodrama, because I decided the black-and-grey outfit I had chosen was inappropriate for the office. You'll just have to wait for another day to see the darkly monochromatic concoction I cooked up.

Instead, I wore this dress. As far as office-appropriateness goes, the dress toes the line, with its narrow straps and dangerously short skirt. But its ladylike floral pattern gives it a hint of the classic and demure...and hey! It's the last day of heat! It's my last chance!

In the spirit of milking every last summery drop out of my outfit, I decided to wear the most brightly colored sandals I could get away with. That ended up being fuchsia platform wedges. Although I've historically been wary of wearing high heels with short flared skirts (this short flared skirt in particular!), I've discovered that part of the reason they look so weird together is they make your legs look strangely long. Flat shoes can mitigate this, but they're not the only option!

Style Tip  If your short skirt looks weird combined with your tall shoes, visually cut your legs off at the ankle with an ankle strap, to get your proportions back to a better balance.

Once I had chosen the perfect shoe, I picked some pink jewelry to match it, and then it was off to work in the sweltering heat!