Wednesday, October 28, 2015

Thar she blows!

I have a very large stash of unflattering T-shirts I've acquired (for free) over the years that I just can't bear to get rid of. However, it's been very hard for me to decide what to do with any of them. In the past, I've taken them in at the sides to make them a little more attractive on me, or tried (and mostly failed) to turn them into tank tops. But even when it works, I don't feel very stylish. With this refashion, I took the T-shirt transformation to another level.

I started with a pink T-shirt I got from a friend. Even though the fit was better than your average free T-shirt, I don't have any ties to Rock Creek Sports Club, so I really didn't want to walk around wearing their logo. I decided I would replace the logo with something that makes me happy...a whale! (Does anyone else see the irony in replacing a gym logo with a gigantic animal synonymous with fat?)

I began by turning the shirt inside-out and freehanding a whale shape around the logo (fortunately I could still see the logo from the inside).

Then I cut out the shape.

For the inner layer (the actual meat of the reverse-appliqué), I decided to use my Drupalcon Denver shirt. Sorry, Drupal shirt, but I only used the sleeves, so maybe I'll still turn you into a tank top later!

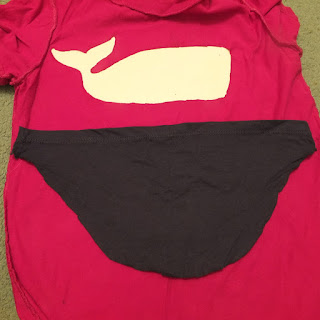
I cut out a rough outline around the shape of the whale, and then things got messy.

I needed a good way to keep the fabric stable and in the correct shape while I was sewing, so my answer was to glue the appliqué to a piece of paper before attaching it to the shirt. My success with this was very limited.

The fabric came detached from the paper as I sewed, and wrinkled, so it took several tries before all of the appliqué was sewn on without gaps and lumps.

To make the shirt look a little cuter, fit a little less tight around the shoulders, and make the raw edges of the appliqué fit in better, I cut out a wider neckline.

Then, still feeling the shirt needed a little something, I added a spray in the shape of a heart, using the same paper-backed sewing technique as last time. This was a total failure (when will I learn!?), and I ended up having to hand-sew the heart on because there were so many gaps in my machine-sewn seam.

But once I finally finished, it didn't look too bad! A friend even told me should would never have guessed it wasn't store-bought.

If I were to do this project again, I would sew the two pieces of fabric together first before doing any cutting, which I hope would prevent the numerous gaps and wrinkles I kept accidentally sewing into the seam.

For the whale tee's maiden voyage, I tried to keep a maritime theme. I wore white sailor pants, navy (get it!?) blue boots (also happened to match the color of the whale), and my seascape earrings.


Tuesday, October 27, 2015

The tunic strikes again


This slinky tan top with the carved hem (the same one I featured in my last post) is one of my favorite eBay lot pieces. It is the only tunic-length top I have that works with a skirt as well as with pants. For this outfit, I wanted to see how it would pair with an especially full skirt.

As it turned out, the length was just right, but the skirt caused the shirt to flare out above the waist, making me look especially wide. A skinny belt over the waist solved that problem.

I then debated whether I should wear light colored shoes to go with the tunic or black ones to go with the skirt. Ultimately I decided on black because ... Style Tip Wearing shoes that are the same color as your bottoms, even if there is a gap between them, unifies your lower half and makes you look taller!

Saturday, October 17, 2015

Keep it up

Since I decided that over-the-knee socks are cool, I've acquired 4 pairs and worn most of them a few times. I still like the look, but I have a major problem with them: they're always falling down!

Once upon a time, I read about a potential solution: body adhesive, which is basically just a glue you apply directly to your skin that helps clothing stay put. I found some "It-Stays" body adhesive on Amazon and put it in my cart, but the prices kept going up and up and up, and I just wasn't excited about spending 9-ish dollars on 2 ounces of product that may not even work.

Five months after originally adding it to my wishlist, I still hadn't made the purchase, and I started thinking about alternative methods of sock fixation. I've had some luck with safety-pinning rubber bands to the insides of my fabric thigh-high boots, but they tend to leave painful indentations around my legs. 

So when I stumbled across a can of all-purpose spray adhesive in my craft supplies (the one I've been using ever since for all sorts of fashion DIYs), I wondered if it might just do the trick.

Now the first caveat is the can of spray adhesive is covered with warnings, including "May cause eye, skin and upper respiratory irritation." and "Avoid skin or eye contact." That might be enough to scare off anyone with a little sense, but I've failed to avoid skin contact with plenty of chemicals, and none of them have killed me or even irritated my skin, so I decided to give it a shot anyway. I started with a little patch test around my ankle. I sprayed the glue on and left it all day, and did not see any sign of irritation.

So the next time I wore thigh-high socks, I sprayed a little ring of adhesive right above my knee, waited for it to get tacky, and then pulled on my sock. I didn't wear any adhesive on the other leg, and sure enough, by the time I got to the bus stop, the unglued sock had slipped below my knee, but the glued one was still riding high! So while at the office, I sprayed up the other leg in a similar fashion.

At the end of the day, here's how my socks looked. Pretty pristine, eh?

The downside (in addition to the inherent health risks which I've already shrugged off) of using spray adhesive to hold up my socks was that it just kept on holding. Long after the socks were removed, I still had patches of glue on my legs. The body adhesive is said to wash off with soap and water, but soap did nothing for the spray adhesive I tried. Even rubbing it with nail polish remover proved ineffective. Eventually I discovered that Oops!, a stronger removal product, had a much better effect, and that WD-40, while it didn't remove all the adhesive, at least removed some and left my skin somewhat slippery to cancel out the effects of the remaining goop.

So, you can get whole household-sized bottles of all of these products for under 4 dollars, or you can pay 9 and up for 2 ounces of the official stuff. The choice is yours.

I actually conducted this experiment early last spring, but waited to post it because I wanted to try other strategies. I'm thinking of looking around at the craft shops for maybe a slightly more washable glue, and also of trying a simple sugar-water mixture, since that stuff washes off easily, but we all know how sticky it is when dry! I haven't gotten around to that, but since sock season is here again, I expect the time will be soon. I'll be sure to share any solutions that work!

Friday, October 16, 2015

Vestoration

Even from the eBay picture, I could tell this dress was a little wonky (what's with the bulgy lines where there should just be a straight one?), but I let my love for the contrasting stripe of green win out over my skepticism.

My skepticism was correct, though; there was nothing wearable about this dress. It had an unflattering U-shaped hem leading into side vents, and the front looked like it had just been sewn together in a couple of places as an afterthought. I suspect that it had started out as a vest and the original owner had tried unsuccessfully to convert it to a dress. 

I converted it back. It was a simple matter of removing 5 lines of stitches from the front, and then I had an open-front vest!

I wore it over my sequined white dress (because all-over sequins can be a little too much for the office) paired with white shoes and greenish lucite heels.

 
My photographer spoke disparagingly of the vest as a "smock" (I'm surprised he was willing to take my picture at all, considering how much he apparently hated the outfit), but I still like it. I might do something about the U-shaped hem, though. Although splitting the front made it less obvious, I'm still not a fan.
 

Wednesday, October 7, 2015

Back to bombshell

Since I moved to an apartment on the 1st, my clothing collection has been neither here nor there. That is to say, bits of it have been here, bits of it have been there, and I can't find any of it anywhere. Fortunately, after 5 days of hard work, I've gotten it into some semblance of order. That is to say, I now mostly know which bits are here and which bits are there, so today I was able to assemble my first blogworthy outfit since the ides of September (Don't let last week's posts fool you; both of those were outfits from early September that I'd just been too busy to share)!


I started with this Betsey Johnson lace-up front dress that I got at the thrift store for a steal last spring. Betsey Johnson sometimes has a very Bettie Paige aesthetic ... Or maybe I'm just conflating their names ... but in any case, I decided to take the punkish pinup-girl as inspiration (highly toned down for the office!) for today's outfit.

I added a new pair of red faux-suede platform pumps with a slightly flared sassy heel and wore them over rose-patterned lace tights. Since roses were now the theme of the day, I put on a pair of red rose earrings. For my finishing touch, I twisted up my hair into a product-free, quick-and-easy modern take on victory rolls!