Sunday, December 29, 2013

How to make boot shafts smaller

I buy a lot of shoes from ShoeDazzle, and every time I get boots from that site, I kick myself. I make sure I'm wearing the boots while I do it, too. You'd think I'd learn, but every time — every time! — the boot shafts are much too wide. Although shoe companies make shoes in different foot sizes, I guess it's not economical to make boots for different calf sizes, so they just make them big enough so almost anyone can fit into them. Although more expensive boots tend to fit better, the cheaper ones are always gigantic.

But don't worry, the Unfashionista would never stoop to buying expensive clothes! If my cheap boots are too big, I will make them smaller!

Normally when I get clothes that are too big, I take in the seam on the sides with my trusty sewing machine, and boom! Done in 60 seconds! I tried that with these boots, and my sewing machine jammed so badly that it was 2 weeks before I dared touch it again. Obviously trying to sew up 2 thick layers in such proximity to the rigid parts of a boot was just too much for my machine. I was going to have to get creative.

Fortunately, I had just purchased a staple gun a few months ago, inspiring me to try a new, more industrial, method of tailoring my shoes. It works the same way as taking in a seam on any fabric garment—the only difference is that the material of the boot is thicker. Let the tutorial begin!

Here's what you'll need.

A staple gun, a pair of needlenose pliers, and (optionally), a pair of those pliers that have curved jaws (hey, I'm an unfashionista, not a mechanic—I have no idea what their proper name is!)
 
 
Step one is to mark where on the boot you want to make the new seam. I put it on and pinched the fabric on either side of the back seam. Your new seam may not be in the back, but you do want to use an existing seam, so that you don't end up with an extra one when you're finished. I pinched just enough fabric so that there wasn't any slack around my leg, then stuck a pin in to mark the spot. These pins are only markers, so they don't have to actually go all the way through. You could use a pen if you are feeling particularly confident or working with a washable material.

Next, take off the boot, then pinch the fabric exactly where you have the pin. In the next step, you're going to move the markers from the outside of the boot to the inside.

This is an inside view. I am pinching the boot where the marker was, then I've stuck a new pin on the inside to mark where the pinch is.

Do the same for all the markers until you have a nice line of pins on the inside of the boot. This line marks where you will create the new back seam.

Next, place the boot on some kind of soft yet firm surface. You need something that's strong enough not to collapse under the pressure of the stapler, but soft enough that the staples will go into it easily. I've chosen to use the box the boots came in.

Pinch the fabric around the first marker so that the original seam forms the top of the fold. Press the folded fabric onto the stapling surface.

Bam! Staple away!

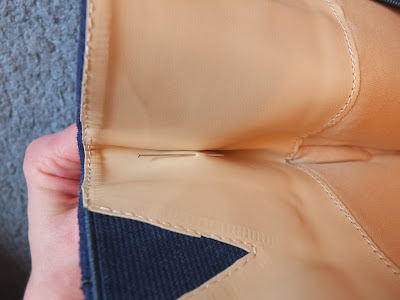
If you have done it correctly, your staple will have punctured both layers of fabric and will be sticking through on one side.  You can see the original seam very clearly in this shot.

Fold down the ends of the staple with the pliers. I like to start with the needle-nose pliers because they're more precise...

...Then finish up the job with the curved pliers. The rounded jaws leave a nice opening for the bulk of the fabric to fit into, enabling me to close the staple more tightly. 

When I was finished, the staples were spaced about this far apart. It doesn't seem to be necessary to put them closer than this, but you're certainly welcome to!
After all the markers have been replaced with staples, it's time for a fit test in the mirror! I haven't stapled the top of the boot, because it's lined with a glossy vinyl that's probably going to take more lasting damage if I do it wrong. I like the way it looks, though, so I'm going to got ahead and staple up the top as well.

Here's the finished product! I'll let you know how the stapling job holds up after I've given them a full-day trial.

A caveat: I'm pretty sure staples on the inside of your boots will snag pantyhose and other fabrics, and could potentially scrape your legs. So if you value what you put inside these boots, you might want to cover the staples with a bit of soft tape or something.

Monday, December 16, 2013

The tree was in the wood


When planning today's outfit, I wanted to make sure these unbelievably fab wood-grain boots took center stage and not the clothes. So I threw one piece of clothing after another on the floor next to them, looking for the perfect, understated complement.

I kept coming back to this brown sweater dress, but it's much too short to wear by itself to work. And though I tried brown and tan leggings in various shades, they were always too light in color and thus too eye-catching.

Finally I went with something that always gives me trepidations about wearing in public—loose pants under the dress. This look has the potential to be very frumpy indeed, but since the dress wasn't too loose, I think it passes muster.

I tied on a belt in a lighter shade to break up the monotonous expanse of dark brown. With all that brown going on, especially with the wood grain on the shoes, I reminded myself slightly of a dead tree in winter—so naturally I had to wear my brown leaf earrings!

The seller of the boots suggested, "Pair them with an all black outfit to make them stand out even more!" I think that's a great idea to try out next time!


I'm trying out a new Fashion site—Chictopia! Join and support your favorite UNfashionista!

Sunday, December 15, 2013

Hot on the tail of fashion

Animal faces on clothes really peaked last summer, and being an UNfashionista, I jumped on the train just as it was losing steam, acquiring 3 tacky cat shirts near the end of the summer!

No mind that I am about a year behind the cutting edge, I really love cats on clothes!

The first buy was Galacticat, which I'm sure you remember after its blazing public success in September.

The second was more of a blistering failure, when I forgot to specify my desired color (black) and ended up with a grey cat face on a grey background, which is so ugly I refuse to wear it and can't even imagine I'll get any money reselling it. 

The third was this marvelous huge sad cat T-shirt that I got for just 5 dollars in the men's department at Urban Outfitters. Yes, I felt like a true baller for shopping at such an above-my-station venue, and I felt like I had true balls for shopping in men's. Of course, I worried that the 5 dollar price tag indicates that this trend is already on the outs, but I see that they still have plenty of other tacky cat shirts on their website! Maybe if I'm lucky, it'll stay cool long enough for me to wear it next spring, after I've applied my magic scissors and made it a little more my style. (Stay tuned for that DIY.)

Saturday, December 14, 2013

The perils of dressing in the dark


I really wanted to wear these blue metallic shoes, as I've only worn them once and I've had them for a couple months.

Last night, though I tried several things (including an all-white ensemble, which I'll have to try sometime when I have better choices than a too-short blouse), I ultimately went with a comfy blue knit shirt and grey pants. The shirt went well with the shoes under the dim yellowish light of my bedroom at night.

Unfortunately, when I arrived in the office, the truth was revealed. The shoes have a hint of periwinkle, which is to say, they put out warm purplish reflections, which clashed with the straight subdued navy (which leans toward green if it leans at all) of my shirt.

I spent all day feeling mildly ashamed of my color choices.

I'm beginning to think I should invest in a very bright full-spectrum lamp just for picking out clothes at night. It wouldn't hurt to have it around for photography either.

Friday, December 13, 2013

The Hunt for Red


I've been trying hard to acquire a  pair of red shoes, because I just want them, that's why! Unfortunately, this has proved harder than you might imagine, as it took me several months of failures before I finally succeeded (read: gave up).

Burgundy rose-toed shoes (7$ at Goodwill) - I bought these way back in May, when I first got the inkling that I needed red shoes. I allowed myself to be satisfied with them for months, until I finally decided that burgundy is not red. And I needed to start shopping again.

Red peep-toe transparent sole wedges ($9.05 on Shoedazzle) - A whole lot of discounts conspired to get me these 49$ shoes for under 10. I was instantly in love with them—a bright wild red with see-through ombre platforms with a graceful curve in the back. Unfortunately, the love didn't transfer to real life, as they were too narrow to buy in my size, so I ended up with too-long shoes that always looked stupid on my feet. I wore them twice and then gave up, thinking I should sell them while they were still hot. Unfortunately it didn't work that way, and they're still siting in my eBay pile, waiting for a buyer.

Red suede-like ruffled pumps ($9.02 on eBay) -  I'm looking for fire-engine-red, ruby-red, scarlet, but apparently not "biking red", which I discovered as soon as I got these. They're not a bad pair of shoes, but they're so similar to the rose-toed shoes that I decided to let these go as they were in a better condition to sell, and the others seemed to match my clothes better. I only lost a dollar after reselling them on eBay.

Red loafer-style canvas wedges ($8.15 on eBay) - Even though these were obviously not red enough for my needs, I bid on them because I liked the two-tone thing, and I thought they were unique yet sneakily similar to the smoking slippers* that I've been seeing a lot. I also thought they'd make a nice casual shoe with a bit of lift, for when I want to wear longer jeans. Sadly, they crowd my toes a bit, which doesn't make them the walking shoes I had dreamed of. They're on my "To-sell" table as I type.

Red platform heels (17$ on eBay) - Yikes, I paid a lot for these! But I finally got a shade of red I can accept. It's just that now, I think I would have preferred a patent leather to a slightly worn-looking faux suede. Especially one with a wobbly heel. The seller gave me a partial refund, and I'm still trying to find a buyer to take these off my hands.

Red peep-toe velvet shoes (10$ at Rugged Wearhouse) - I know very well that peep toes look dumb on me, but when confronted with a 10$ pair in just the right shade and the raw desperation to get red shoes, I couldn't restrain myself. I regretted it as soon as I got home, but by then I had lost the receipt.
*The linguist in me would like to point you to a blog post I found about the definition and origin of the "smoking slipper." http://nancyfriedman.typepad.com/away_with_words/2012/11/fashion-word-watch-smoking-slipper.html