Tuesday, June 28, 2016

Unvestment


Another day, another play on the word "vest." The first time I wore this garment (I had received it as a dress that looked like it had formerly been a vest, and I remade it into a vest), it met with a lot of disapproval, and I wasn't really crazy about it myself. I played around with squaring off the bottom hem, but it never really worked...and besides, I already have several black vests in a variety of lengths, and didn't see that this one with green trim would really get much use. So I remade it again, in a process so simple, I can describe it in one sentence!

I took the open-front vest and closed the front again, took in the sides, and shortened it to make it a shirt! From vest to dress to vest to shirt...round and round it goes! I wonder if i will open up the front again somewhere down the line!

As it turns out, a black shirt with green trim doesn't really go with very much in my wardrobe, but I paired it with capri pants in a slightly different shade of green, for my signature monochrome (plus black!) look.

Original

 As a vest

As a shirt


Monday, June 20, 2016

Hat tricks

One of the things that I don't get to wear nearly enough of is funky hats. I don't often find a hat that I like in the price range I prefer (under 5$, thank you very much!), but when I do, I buy it. Even if it's a little too funky for my taste.

Case in point: This interesting porkpie-style navy blue felt hat with some, well, interesting ornamentation. By interesting, I mean this unfathomable combination of 80's, Aztec, and mariachi. In spite of its questionable trim, I loved its shape. It seemed like the perfect hat to wear on the back of my head like a halo, which has been one of my fashion goals for some time now.

With some trepidation, I removed the trim from the hat. This involved dipping parts of it in hot water to melt the glue holding on the rick-rack. I was worried I'd deform the hat, but fortunately it seemed to have no lasting detrimental effects.

After I was done, it was slightly hideous, but not so hideous that I couldn't fix it with a new hatband!

For this purpose, I decided to use a sheer green wire-edged ribbon that I'd been holding onto, unopened, ever since my wreath-making business never took off back in 2005.

I attached it with sparing use of hot glue, then decorated the back with a conservative little bow. I may want to add some frills and tails to this bow, because it doesn't really look like much when you're wearing it.


I decided to wear the hat as sun protection / a piece of flair to my brother's informal outdoor wedding on May 16. That wedding outfit was a sartorial challenge I'd rather forget, because the weather / the occasion dictated that I wear something modest and warm, (but not too warm), and the best I could come up with was this dowdy combination of long skirt and baggy sweater, which, combined with the hat, made me feel somewhat like the bird woman from Mary Poppins.

And, as you can see, for all my effort, I still failed to perch the hat quite on the back of my head like a halo, thus seeing all my aspirations come to naught!

Hats are both one of my great loves and one of my greatest Waterloos, as, having a rather small head and fine hair, I find almost all of them are too big for me. They never stay put in the best of conditions, but on windy days, they are all but useless. After over a month of feeling sad about the wedding hat that didn't quite live up to the hype (and a hat-wearing bike ride gone terribly wrong) I finally dreamt up a way to keep my hats on my head, no matter how jauntily I angle them.

The solution is a headband inside! Unlike a chin-tie, which is also very Mary Poppins (in case you haven't noticed, a lot of my fashion choices seem to come back to that movie), a headband would never give any hint of its existence. And unlike hat pins, which I also considered, a headband would not require an elaborate hairstyle underneath.

So I found the headband in my collection that I loved the least and sewed it to the front of my hat with a simple loop of thread (it probably won't stay there forever, but this was an experiment).

And when I put it on, I like to believe that it had a little more stability (and a little bit of that gravity-defying oomph that it needed to stay on the back of my head instead of on top as most hats are content to do).
The dog fur will be removed and the ribbon straightened
the next time this hat makes a public appearance!

The trailing bit of thread from the headband attachment
will also be trimmed off!
I have lots of headbands that I don't really wear much, and a couple of hats that are just waiting for a little sturdier attachment, so... Halo hats, here I come!

Sunday, June 19, 2016

What's new, Pegasus?


Galaxy-print clothing has kind of passed its peak, but since it was one of the trends of recent years that I loved the most, I have my fair share of holdovers from its more fashionable days (remember my King Cat tank top and my galaxy cat crop top?), including this Pegasus dress that I got on eBay for just 5$ early last year.


As you well know by now, skin-tight graphic minidresses are not my style, so whenever I wear this dress, I'm always searching for ways to change it up. I've discovered that the best trick for the Pegasus dress is to bunch it up on one side (secured with a safety pin), so that it's got an asymmetrical bottom hem, and then wear it with shorts or pants.

Today I took the asymmetry another step and, wearing my glitter-pocket cutoffs, tucked one pocket up inside while letting the other hang down as designed.

Visible-pocket cutoff shorts are also a bygone in the fashion world, so by this point I was looking especially out-of-touch, and I felt I had to do something to let people know that, no, my passé tank top and shorts do not mean my fashion sense died out three years ago.

So I decided to work in a trend that's so cutting-edge I have yet to see it on a real human being (i.e. not a blogger or a model on some fashion article)—the ribbon choker (worn slightly off-center to keep my asymmetrical theme going). Chokers are in. Chokers are so in, no celebrity could be seen at Coachella without one. But ribbon chokers? They are so of-the-future that no one except die-hard fashionistas have heard of them yet. When he first glimpsed mine, my boyfriend asked, "What happened to your neck?"

Well, whatever. The ignorant among us will always wonder stupid things like what happened to your neck, but the fashionable will just laugh and tell you to wait a few months, and you'll understand.

In any case, I have to say that the ribbon choker is the jewelry trend I've been waiting for all my life. No, chokers don't really flatter my rectangular jaw line, but when you can pull off the latest fashion for free by digging around in your sewing box for a total of one minute, you know you've found a winner.


I accessorized my winner with my aqua heart earrings, which I thought were just small enough that they could hide under my hair so as not to compete with the choker, but just fun and crazy enough that when someone does see them, combined with the purple neck-ribbon and the Pegasus dress and the sequined shorts and the mirrored purple sunglasses (not pictured), they'll know that this whole look is intentionally out-there—not just something I threw together because I haven't done laundry since 2013.
The moral of this story is a
Style Tip If you know your fashion is not fashionable, make the most of it! This is your opportunity to let your freak flag fly!

Epilogue: In case you missed the significance of today's clever title, the ribbon choker reminds me a little bit of another current trend – the pussycat bow – which of course reminds me of the title of a certain Tom Jones song!

Sunday, June 12, 2016

Bark Ball Dress Refashion

Here is a dress that I've owned for several years. Originally, the sides were completely open and only held together by corset lacing from armpit to mid-thigh. When I wore it, I felt like a teenager trying to show too much skin at the Homecoming dance.

For the sake of my modesty (but to the detriment of the dress' dramatic impact), I sewed a white ribbon into the sides.

However, after one wear, I wasn't happy with the effect. I tried a couple of times to sell the modified dress on eBay with no luck, so, rather than cut my losses, I modified it again!


What? No pictures!? Sorry, I was so focused on finishing this project that I neglected to document it.

I picked out the side seams, removed all the side lacing and all the loops it was threaded through, then sewed the sides back together. There were two layers to this dress, so I sewed together the open seams of the liner layer; then I did the same with the outer layer. 
I left the slits at approximately knee-height. The way the sides came together at this point looked a little strained, so I covered the join by attaching long dangling bows at the top of each slit, made from the original side lacing.

Now the dress felt a little more modest and classy, but something about the top half dated it by about a decade. Beading is timeless, but this round neck with spaghetti straps is just something you don't see much these days.

I decided that the best way to bring this dress into the 2010s would be to give it a V-neck, but cutting into the neckline would disturb the pattern of the beads and just wouldn't work with the existing curvature.

I experimented with pinching the neckline into a V with my fingers and found it surprisingly cute! So what to use to make the alteration hands-free? Well in the end, I took the simple route and just used a safety pin. One of my many mottos:

Style Tip Never make a permanent alteration if you can get by with a reversible one!
Here's how the neckline looks from the outside now.

Thusly finished, I wore my new creation to the Bark Ball, DC's "only black tie event where your furry friends are invited!"
Me, Al, and two furry friends in our official photograph!

Friday, June 10, 2016

Closing Clothes

Editor's Note - June 21, 2016: I originally titled this post, "I just had a crazy week; I don't have to invent a great title!" But now, after a week and some change to decompress and regenerate my creative energy, I have come up with the great title you now see above.

Today, I attended the closing for my first real estate purchase! Pause for oohs, ahhs, and applause. Thank you. While there were many concerns occupying my mind in the days leading up to the transaction, I'm not going to lie that one of the big ones was what to wear to my closing!?

A friend told me to just wear something that makes me happy, and my boyfriend told me I could wear anything (both of them have purchased houses in the past, so I value their insights on this matter), but I didn't feel like that was good enough. For this huge business transaction – where if anything were to go wrong, my professional appearance might be the one thing to make people believe that I could take care of it – I wanted to wear, as Cher Horowitz would say, "My most capable-looking outfit!"

However, my most capable-looking outfits (mostly typical business attire like suits, pencil skirts, and button-up blouses) generally don't make me feel happy; and since most of them come in dark shades of neutral, which I've been wearing entirely too much of over the past few days, I didn't really want to wear any of them.

So I settled on what I soon came to believe was an ingenious compromise, despite the fact that it might be dubbed the "mullet of outfits"—an ensemble that was business on the top, party on the bottom! To whit, I wore a really cute flirty dress and topped it with a more professional-looking blazer (which was still pretty cute and flirty, as far as blazers go).

I wanted to wear low-heeled shoes (this is, after all, the same dress that first inspired my complaint about short skirts and high heels giving me ostrich legs), but I just couldn't choose between kitten heels in almost the same shade of blue as the dress, or ballet flats in a darker teal. Ultimately I went with the teal, because I liked the way they stood out.


The closing went off without a hitch, and I think I can now qualify as the world's first home-owning Unfashionista! Here are Bubalou and I, showing off our new digs.

Wednesday, June 8, 2016

Island Girl


When we traveled to Hawaii a few weeks ago, the only thing I requested that we do is make a stop at Hilo Hattie, an iconic Hawaiian shop for Aloha shirts and other island apparel and goods. I remembered it fondly from my first and last visit to the islands at age 12, and I also remembered fondly the outlandish Hawaiian print dress that I'd gotten there but shortly outgrown.


This time, now being an adult, if I bought a Hawaiian dress, I'd be guaranteed to be able to wear it for years to come! So to Hilo Hattie we hied!

I was drawn to this particular dark red one with the white and gold plumerias on it because the pattern was bold yet simple, I don't have much clothing in the warmer end of the spectrum, and plumerias were a huge theme in the goods that I found throughout the Hawaiian shops, so it would be a pretty solid memento.

To go with it, I bought a pair of plumeria earrings in matching colors, and then I proudly wore the whole ensemble to work!

Now, even though I'd much rather be snorkeling on a beach than calling a bunch of prospective co-workers for interviews, at least my dress helps me hold onto that island vibe!

I'm also wearing one of the pairs of shoes that I bought over the winter. While I still kind of regret buying yet another pair of tall tan sandals, at least I found a pretty worthy use for them.

Tuesday, June 7, 2016

DIY Cropped Flares


I have a storied history of loving certain pairs of pants into the ground (Example 1. Example 2. And 3 — interestingly, the pink ones always seem to succumb to some kind of bloody accident). Let me tell you a tale about the most recent pair to meet their maker.
I can't remember when I got these flares, but I'm reasonably certain that I bought them used sometime between 5 and 10 years ago. They had plenty of spandex, and I loved how soft they were right from the outset! I wore them regularly for years, until I noticed they were starting to look a little too dingy and shabby for everyday use (not to mention that flared jeans had hit a low point in coolness). At that time, I designated them my official "hiking pants" and wore them exclusively for that purpose for another 2 years. 

While on my recent trip to Mexico, however, they breathed their last when a huge rip opened up in the knee. My brother happily spent the whole trip wearing a pair of jeans with 2 gaping holes in the legs, but as soon as my pants did the same, I felt conspicuously trashy. Not to mention that since the jeans were stretchy and relatively tight, they caused my knee to poke out weirdly and uncomfortably when I bent my leg.

I briefly considered converting the flares to skinny jeans and shredding them a bit more to bring them up to trend. Holey jeans have come into fashion at least twice before in my lifetime, and now they are having another big moment. But then I decided that no matter how cool destroyed jeans may be, it has never been unacceptable to wear your jeans clean and intact—and that's how I prefer them. So I sadly bid my beloved pants adieu and placed them in the donation bag.

And then, I kept looking at fashion websites, and one thing popped out at me: cropped flares. Cropped flares first hit my radar last summer, and it looks like they're still on the cutting edge of fashion. Best of all, some of the pairs that I've seen advertised have lots of distressing, so my holey jeans would be the perfect candidates to make into crops.

Are you thinking what I'm thinking? It's time for a DIY!

I marked a spot on the inside of one leg that I thought would make a good length, then I stacked the legs together and cut through all four layers of fabric at once. Nice. I was basically done.

However, the hole in the knee still needed attention. Parts of it were fraying in a very trendy way, but it was still basically just a slit that was almost invisible when my leg was straight. So I set out to make the hole bigger.

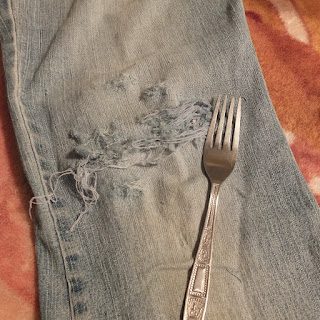
I've never tried to distress a pair of jeans before, so I used a tutorial I found that suggested using a cheese grater or fork. I had just finished my dinner, so a fork it was! 

I put a flattened cardboard box inside the leg to protect the back and provide a little support, and started scratching away. Horizontal strokes seemed to have the best results, as they broke the blue weft threads while leaving the heavier white warp threads intact. 

In a bit of overzealous distressing, I accidentally stabbed my thumb and scraped up my pointer finger, so reader beware! Jean-destroying is a dangerous venture!

After widening the hole around my knee, I scratched up a few spots on the other leg for balance, then I threw the whole thing in the washing machine, to accelerate the fraying process and wash away any orphaned threads.
Now I turned my attention to the bottom hem. I wanted a really mega-frayed look, almost like fringe, which I could not achieve with the natural fraying process. So I decided to use the bottoms of the legs that I had already cut off, fray them thoroughly, and attach them to the new bottom edge.

I discovered that the best way to get a nice even fringe is to turn the fabric sideways (so what was originally parallel to the side seam now forms  the bottom edge) and then pick out the blue weft threads one at a time with an unbent paper clip.
[Side note: the cardboard I'm using as a backdrop is the box that my compression stockings came in! And the orange bandage on my thumb is a direct consequence of my klutziness during the forking process]
After I'd peeled off several rows of blue threads, I finally had a nice fringe about a half-inch long.
I cut the fabric so the fringe was attached to a strip about 1 inch wide, then stitched several pieces of it together to form a long ribbon. 
Then I sewed it onto the inside of the new bottom edge of my pants! I left the edges raw, so that the main body of fabric might fray a little to add to my fringe. 
And when all was done, I had a fun pair of pants that I brought with me to New Orleans! In examining the pictures, I see that the pants almost look straight-legged, and they are a bit big on me, so I think in the future, I might tighten up the thigh area a little bit so that the bottom can look more flared!

Monday, June 6, 2016

Ready to romp


An evening that will certainly involve going out to the clubs, but may also involve walking around outside at a festival while the sun still shines, is a special sartorial challenge. The outfit that you pick can't be too dressy, but it can't be too casual either.

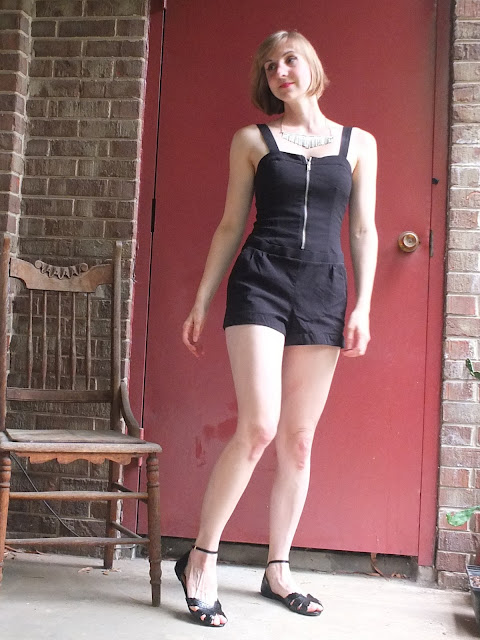
For this singular type of evening, I chose a black romper. Remember when I said I hated rompers? Well, those ugly baggy ones that I pictured still earn my disdain, but this little fitted one-piece with its saucy front zipper is a horse of a different color!

Speaking of color, such a simple black outfit calls for elaborate makeup, so I put my shaky hands to the test and drew on some double-winged black eyeliner (only screwed up once!), finishing off the look with rather bold pink lip gloss.


Shoes and accessories were a decision I saved for last. I couldn't decide whether I wanted to counter all the black with something colorful, or embrace the neutral hues in my outfit and let my makeup be the focal point. In the end, none of my colorful shoes looked quite right, so I narrowed the decision down to either beige espadrilles or black flat sandals with an ankle strap.

I decided to let my jewelry help me decide on a shoe, and after trying on numerous necklaces, I settled for the silver fringed one, mainly because, out of all the choices, it's hardest to find a use for (I've only worn it once since I got it a year ago).

With the fierce cat-eyes and the bold metallic jewelry, I was feeling a kind of tough-girl vibe, so I went with the black shoes. Convenient, since I still was expecting that the evening might involve a lot of walking. I'm learning to embrace flat dress shoes as a legitimate (and very practical) styling option!

Showing that tough-girl side of which I spoke.

Sunday, June 5, 2016

Butter(fly) Yellow


You should have seen the pile of clothes on the floor of my closet Friday. I had an outfit planned, but it wasn't that great, and in the morning, I noticed it tended to slide down and show too much bra, so 12 minutes before I was supposed to be at work, I decided to change.

Outfit after outfit hit the floor—mostly because (even though at this point, I should have just settled for anything that wasn't too revealing!) I couldn't stand to wear something so plain or dreary on a Friday. Especially on a slightly chilly and rainy Friday.

There was an outfit — this one — that I'd been wanting to wear a few days before, but had had to nix at the last minute because the dress' straps were too long. Thursday night, I sewed the straps to be shorter, so the outfit was wearable...but I had been reluctant to wear it because I felt it was too summery and cheery for a slightly chilly and rainy Friday. Go figure. No wonder I can never decide on what to wear.

But after rejecting so many of my other more subdued and warmer outfits, I was willing to give this one another chance. At least it would help lift my mood! To keep it warmer and more work-appropriate, I covered up the spaghetti straps with a white crocheted shrug.

I still feel like it's a great accomplishment when I accessorize with colors that aren't also found in my clothes, so wearing yellow shoes with this green and white dress is clearly cause for celebration. Bright yellow and kelly green are a natural pairing (in fact, the last time I wore these shoes, it was also with green), so it wasn't that daring, but still. I'm gonna give myself props because no one's going to stop me! Much like last time, I wore a (different) butterfly jewelry set to match the shoes.