Wednesday, April 29, 2015

Double Dots


I have grown a little disillusioned with my white polka-dotted dress. Both times I've worn it, I've had to wear leggings underneath because it's so short, and even then, the silhouette's been a little awkward. I think I'm going to cut it down into a more appropriate length for a shirt or tunic, but in the meantime, I found a way to wear it as it is—tuck it into a skirt!

This ragged hem black skirt has served me well over the years, but possibly never better than this time, when the polka-dotted underlayer finally got to be an asset rather than a liability. You see, polka dots on top combined with inversely colored, smaller polka dots on bottom has to be one of the cleverest fashion tricks in the book.

Another clever trick? Pinning the skirt to the dress. 

Hold it.

If you, like me, shy away from tucked-in shirts because they're always getting baggy or coming out completely whenever you move your arms, try using safety pins in a few strategic locations to keep them fixed to the inner waistband of your skirt. Note that this doesn't work with pants, unless you want to be unpinning and re-pinning them every time you go to the bathroom.

With all the black and white going on, I really burned with the desire to inject some color into my outfit. Usually I'd do this with jewelry, but in all my experiences with the dress, the polka dots totally drown out any kind of delicate necklace. The only necklace I had that was up to the challenge was this black one. Alas. At least I worked in some arbitrary color with the purple boots (first wear!), hair clip, and similarly colored earrings.

Monday, April 27, 2015

Peaceful green


Remember this skirt? I finally got bored with it (it's a bit too large these days, and there are only so many ways one can wear a green asymmetrical skirt), so I tried for weeks—months—to sell it on eBay without any takers. Normally, at this point, I'd send it off to the thrift store, but I've been on a budgeting, waste-nothing, buy-nothing kick, so I decided to see if there was any way I could infuse new life into it.

I have worn this skirt one more way (you can see why I might be getting tired of it!) and that's with this knotted bolero sweater. Since I distinctly remember the last outfit, I couldn't possibly wear it again with the same brown tank top, so I thought I'd resurrect the skirt's tried and true role as a dress.

This time. I safety-pinned it to my bra, since as its elastic slowly dies, it becomes much less interested in holding itself up. and tied the sweater extra-tightly to provide a little definition to the silhouette. I added a green jewelry set and some unobtrusive brown boots, and tada! One more look for the green skirt that I just can't let go.

I think this might be my favorite look for this skirt yet—at least, it was the first one I can remember getting a compliment. My coworker said, with its algae-esque shades and ripply shapes, it reminded him of a peaceful pond in a forest.


Tuesday, April 21, 2015

Red Pant Refresh (Or, how to fix a faded spot AND reposition a jeans button)

A few months ago, my favorite thrift store was having an 80%-off sale on all pants. So I got these red jeans for under 2 dollars. They were actually a girls' 14, but the length was perfect for today's ankle skimming trend, and they actually were a bit too loose around the waist.

I wore them once before realizing the knees were rather obviously faded.

For a while, I sadly thought about re-donating them or turning them into shorts, but then it occurred to me to search Google for ways to fix faded knees. Turns out there are all sorts of suggestions, including spraying them with dye—which I decided against because that would require me to open up my new packet of red fabric dye, and it would be quite a waste if unsuccessful. Another suggestion was to color them with crayons and then use an iron to set the pigment.

I gave that a try. Fortunately, I have an enormous box of crayons left over from my days as a camp counselor, containing every shade of red you can imagine.

I found a crayon that seemed to match the pants fairly well, and then began scribbling over the faded spot. I tried to graduate the color by using a cross-hatch technique near the edges.

After crayoning the fabric, it actually looked more faded than ever, but there was no turning back now!

I covered my artwork with a sheet of paper, set my iron onto "cotton" and started pressing.

At first, the pants turned disturbingly blotchy, but I remembered that many fabrics change color temporarily when they are hot, so I stayed calm and waited for the cloth to cool down.


When I was done, the faded spot was less noticeable than before.

But not quite unnoticeable enough. Although it took me several days, I ultimately decided that it was still too pale, so I did the whole process over again with a different crayon—this time selecting a shade that looked darker than the pants. This got the faded spot to being almost invisible.

Lessons learned: It is indeed possible to recolor a faded patch on fabric using a crayon and an iron (though I'm not sure how this holds up in the wash), as long as you use a darker crayon than the fabric you're trying to match!

Once my pants were a consistent color, I decided to get them to a more flattering fit, which basically just meant taking in the waist. The fastest and easiest no-sew way to do this is just to move the button. On these jeans, that would provide the added benefit of making the waistband look symmetrical, since the original location of the button was closer to one belt loop than to the other.

I had to consult an Internet tutorial for this task, too. I used the pliers method to remove the existing button, which got it off, but all the twisting and turning actually broke the rivet so it couldn't be reattached.

Fortunately, I had a spare button that I'd salvaged from something or other long ago, which I was able to take apart — also using the pliers method — without destroying.
I've replaced the buttons on jeans many a time with buttons I bought from the craft store, and using an old jeans button is no different.

You simply poke the pointed end through the cloth (from behind, so it's pointing outward) where you want the center of the button to be.

Then press the front of the button into it.
Hold the two pieces together while you turn the fabric upside-down so that the front of the button is facing down (preferably on top of a few layers of cloth, so it doesn't get damaged when you hammer it).

Then grab your hammer and tap the backside of the rivet until the two pieces are securely fastened together.


Done! Except...I did find that the process of taking the button apart had pried up a rather sharp edge on the back of the rivet, so I used my pliers to try and fold it back down, and filed it a bit smoother with an emery board.


Now I have a pair of perfectly red jeans with a much better fitted waist!

Look at that majestically symmetrical waistband!

Thursday, April 16, 2015

How to resize a reversible dress

Remember the chartreuse dress that I wore with all sorts of other greens a few days ago? Well, this is the the other side of it, and the long story of how I made it actually fit. I snagged it on eBay for $8.54. Reading the measurements, I suspected it would be a little big for me, but it was just too funky and unique for me to pass up, and by now I'm a pro at resizing dresses, so I wasn't worried. Of course, in my excitement, I neglected to consider exactly how I would resize a dress that's ... dum dum duuuuum! ... Reversible!

The normal technique of turning it inside out and taking in the side seams wouldn't work, because there is no inside-out! No matter where you put a seam in a reversible dress, it will be visible when you reverse it!

Fortunately for me, this particular reversible dress was made with two layers of fabric, so, after some thought, I realized I could take the dress partially apart and do my alterations on the real inside—the space between the two layers.

Adding to the challenge, the dress had a complex closure system, which was a series of fabric-covered toggle buttons running down one side. There was no way I could touch those without ruining them, so altering the side seams—even on the inside layers—was out of the question. Fortunately there were already darts running up the back, so I decided I would just take them in.

I checked the dress all over for an external seam—one that was sewn from the outside, so I could rip it out and then replace it when I was done.

I found one on the bottom hem.
I ripped out most of that bottom seam from the back panel.

Then I tried the dress on and marked where I needed to take in the back darts. I couldn't reach the back while wearing the dress, so I just pinched the sides and stuck in a few pins to mark the amount of fabric that would be removed. An inch between the pin and the side seam meant I'd add an inch to the back dart at that same height.

Then I flipped the newly-opened backside of the dress inside out, so the inside of the green layer was facing out towards the front, and the inside of the grey layer was facing out to the back.
Starting with the green layer, I replaced my pins to mark where to sew, and then I did so (pun intended).

I ended up lengthening the back darts by a good amount—in fact, extending them all the way to the top of the dress. I was worried this would create weird puckers in the top, but it didn't! Phew!

After taking in the back darts of the green layer, I turned the dress right-side out and tried it on, green side facing out. The fit was much better, but if I wanted to be able to wear the dress with the grey layer facing out, I'd have to resize that layer too.
So I flipped the backside inside out again.

This time just eyeballing the width of the darts I'd already modified, I matched up and sewed the darts on the grey layer.

The pictures only show how I pinned the yellow side, but the grey side was done in the same way.

Another try-on ensued.

OK! Everything was looking great.
Theoretically, this was all I would need to do to, plus restore the bottom seam, to have a resized reversible dress. But of course, real life is never that easy. I had noticed previously that one of the darts in the grey layer was longer than the other. Though I'd originally let it be, I knew I couldn't wear the dress with such an obvious flaw directly over my butt.

So, I lengthened the shorter of the darts until they were approximately equal.
Then another try-on ensued. This time, I noticed that the fabric of the grey side was bulging a bit right under my armpit.

The first time I tried to fix this, I simply tightened up the dart on that side, but after another try-on, I could see that I hadn't fixed anything.

Yet another flip inside out, a quick adjustment of the side seam, which had actually been sewn badly originally (look at all the overlapping seams!), and...

Yes... Another try-on. This time I was satisfied.
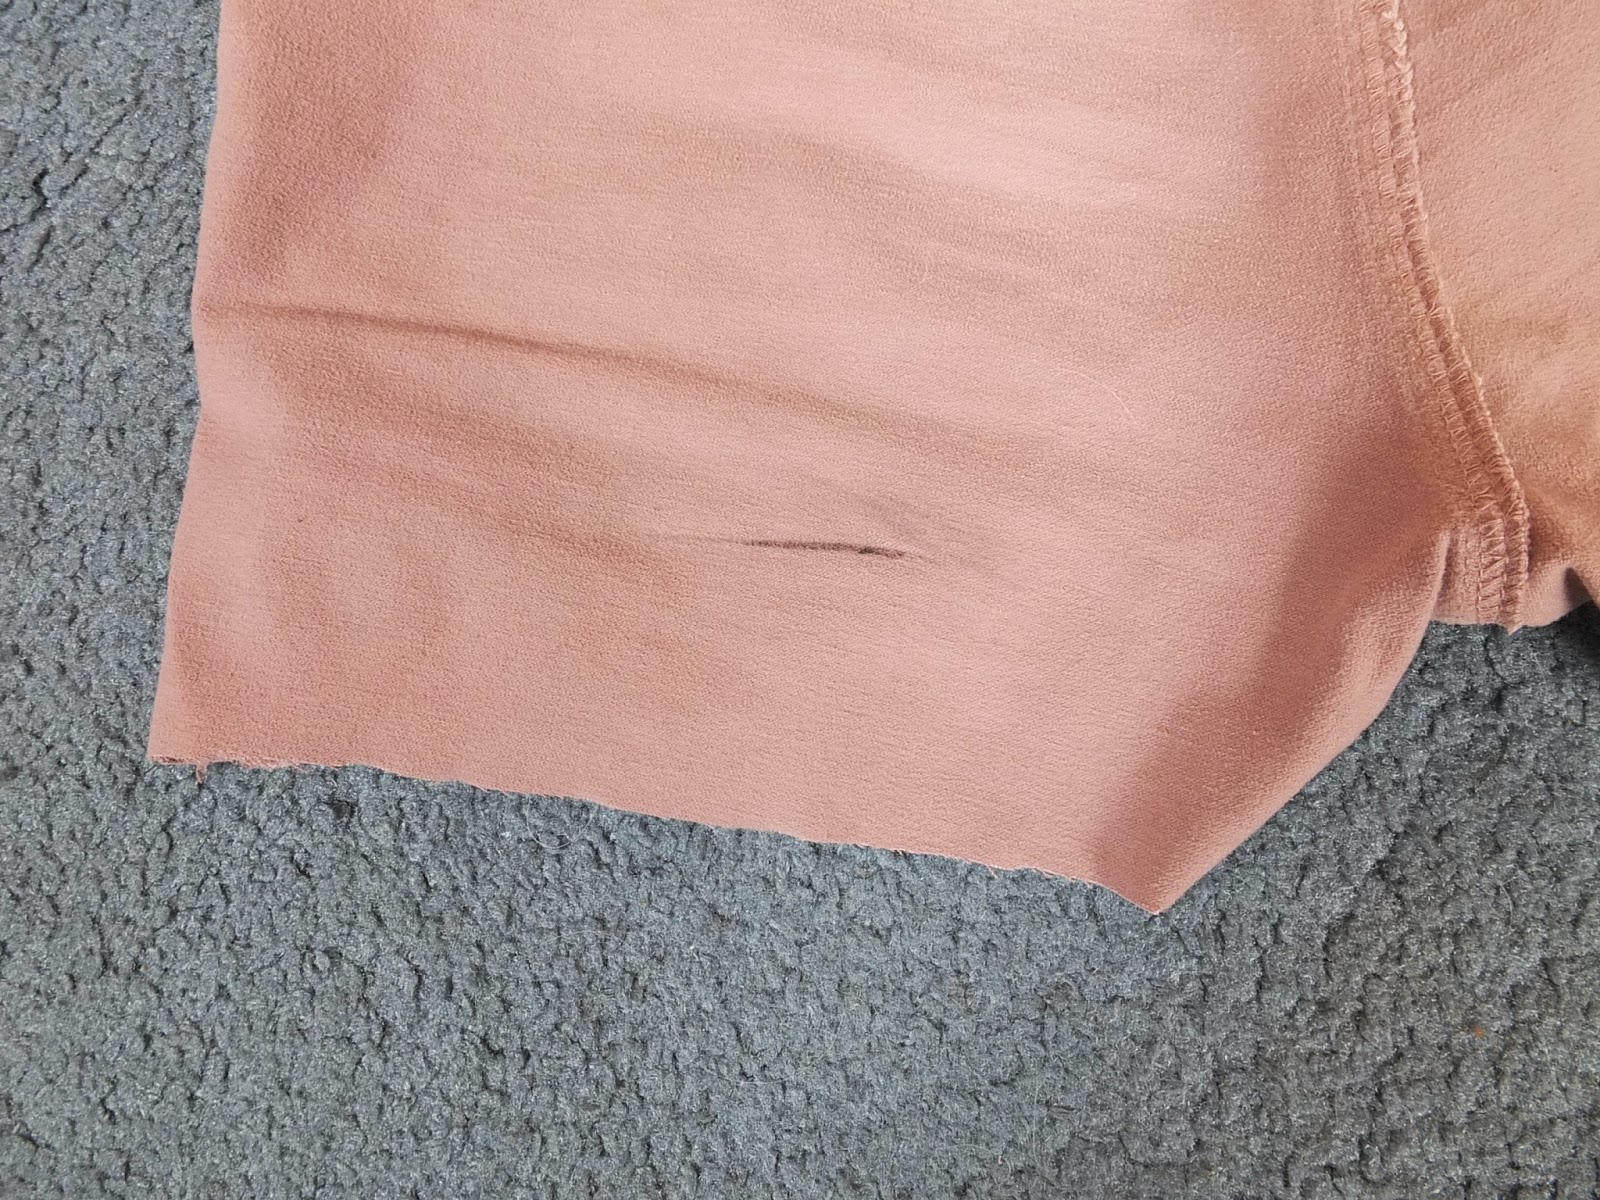
Another thing I had to fix before the dress was wearable were two small snags on the back of the grey side.

I solved this problem by poking the loose thread back into the hole it had created using a needle. As soon as a small loop of it was poked through, I grabbed it from the underside and pulled it the rest of the way.

This made the flaw almost unnoticeable. But it's there! In the picture! Near the bottom center.
Finally, I pinned the two halves of the bottom hem back together and sewed them up again. My thread doesn't quite match the fabric as well as the original did, so my seam is more noticeable than I had hoped, but still, at the bottom of a dress with so many other exciting features to catch one's eye, I'm sure it won't be a huge issue.

After: All fitted and extremely blurry. Sorry, but I'm sure I'll
be wearing this dress again in the future, and I'll be sure to take a better shot!
My favorite reaction to this dress? "You look like Chun li from Street Fighter." Which I guess is appropriate, because, if you're counting, I did something like 6 fittings in less than an hour. This dress has not even a centimeter of stretch, and I'd tightened it up so much that I felt like I was fighting my way out of it every time I slipped it on or off. I just about had to dislocate my shoulders like a fashion Houdini to remove it. All the exertion made me sweaty, and that made me sticky, and the last couple of times, I actually had to recruit my boyfriend to wrestle me out of the dress. A couple days later, I couldn't figure out why my shoulders were so sore, but now I remember! Not only did I get a new fabulous dress, but I actually got a workout while fitting it!

Wednesday, April 15, 2015

Speaking of spring....


Everyone in the fashion sphere is posting their outfits with captions about spring, and The Unfashionista is no exception! My first real springtimey outfit is a splash of pink and robin's-egg blue.

Yesterday, I had my hair up in double buns all day and night, so it came out this morning with a gorgeous (dare I say, springy?) wave that was too rare to bury in my usual workplace bun or single braid. So I left it free, just winding one side of it into a very loose braid that continued down my shoulder (mainly because the ends hadn't curled as much as the rest of it, and I wanted to hide them). Of course, by the time I took this picture, most of the bounce had succumbed to gravity, but I've still got spring on my mind and a spring in my step!

Tuesday, April 14, 2015

Rain / Boots


When it is a rainy day, I make a point of wearing waterproof shoes, even if I will be spending the whole day inside. That means lace monstrosities are out. Sueded materials are out. Real leather is out. Smooth synthetic is my one and only.

Today is a rainy day. I was originally planning to wear this outfit with the lace heels which apparently I only wear with shades of green, but alas, as indicated in the previous paragraph, the weather dictates that those are out. Late last evening, I whipped together a substitute outfit, but then I woke up early this morning, went to feed and medicate my injured rabbit, and noticed a mysterious package sitting on the cedar chest next to his cage. It was the forest green boots that I'd purchased on eBay last week!

Chartreuse green dress with forest green hem? Forest green blazer? Yes, forest green boots would be the perfect complement, and best of all, they are about as synthetic as they come! I pulled my neglected green outfit out of the closet, pulled my new shoes out of the box, and put them all on, ready to face the weather.

These boots remind me of a story. It's a story about shoe sizes and ignorance, and, I guess, getting old.

For most of my adult life, I believed I had huge feet that would only fit in size 9 shoes. Partly this belief was due to the fact that, at that time, I favored very thick athletic socks, which take up a lot of space in shoes. Partly it was just that I had never before worn a half size, and it never occurred to me to try to size down. I still remember the day (it was 2006) when I first tried on a pair of 8.5's and found them to fit perfectly! Wow! All of a sudden, I felt so small and dainty! As the years went on, I sometimes found I could even fit into an 8, which really gave me an ego boost. I began to wear the smallest shoes I could get my feet into, because that made my feet look smaller, and that made me feel prettier. But as the years continued to go on (and I started to develop corns, ugh!), I realized it was stupid to smash my toes into too-small footwear, and it really doesn't look that different whether you are waltzing around in an 8.5 or hobbling around with tingling toes in an 8. So I went back to sizing my shoes for comfort rather than vanity. I've even gone back to a size 9 for most of my high heels, because, well, I just prefer to have more space (Also, they say your feet get bigger as you age—do you think this is happening already?).

Concurrently, when I started buying shoes online, suddenly most of the shoes I acquired didn't quite fit—and typically exchanging them for a different size was either impossible or cost-prohibitive. So I learned to adapt...the shoes, that is! Shoes that are too small can sometimes be stretched—I shared a low-budget method of accomplishing this once, but now I have acquired a pair of shoe stretchers at the thrift store, and they do the job pretty well without all the pain of walking around in too-small shoes. Shoes that are too large can be outfitted with heel pads and cushioned insoles. So now I have a new philosophy.

Insoles are your friends!

Buy your shoes a half-size large, and then pad them out with gel insoles. This makes cheap shoes a lot more comfortable. If your ankles rub the tops of your shoes, insoles can sometimes raise your foot enough to stop the friction. If they are not self-adhesive, you can even use one pair of insoles for all your shoes, thus saving a ton of money!

Now, when buying shoes online, I always go for a size 9, knowing that if it fits too large, I can make it tighter and more comfortable with insoles. The reason these particular forest green shoes reminded me of this sizing tale is that I know this brand (C-Label) and know that it tends to run large. So I was pretty confident that even if I bought an 8.5, I would have wiggle room. Alas, buying on clearance means you don't always get the size you want, so I was stuck with 9 or nothing. I bought the 9's (for 13 dollars, in case you were wondering). Sure enough, they fit like boats. They even slide around a bit after adding high-heel insoles. This is not a problem I've ever encountered before, but I'm kind of looking forward to resolving it. It means I can probably get a new pair of extra-large, extra-cushy, full foot gel pads. These are probably going to be the most comfortable heels I own!

Now, one last note before I finish this post! The dress featured in this outfit underwent a complicated alteration that I would love to share with you, but considering how much I have rambled already, I think it's time for a break. So stay tuned for an upcoming feature on how I resized this challenging dress to fit me.

Thursday, April 9, 2015

Renaissance (a shirt gets born again)


The first re-imaging born out of my collection of too-short things is this ... interesting shirt.


With bell sleeves, floral paneling, velvet trim, and faux leather accents, it had all the look of something a fairytale maiden would wear. It also had bizarre layers dangling from the front and back of the bodice, and strings that must have been intended to tie it all together. I couldn't figure it out. I tried it in a number of ways, and it was just too weird for me. With a bib in the front, and a cape in the back, I felt like a toddler with a superhero/princess fixation. Besides, it was too short, so I decided to turn it into something I wouldn't feel freakish wearing.

I started by removing the cape from the back. This was a relatively simple matter of opening up the seam, removing the dangling fabric flap, and then sewing it back up again.

Removing the bib from the front was more of a challenge. With all the different layers sewn together there, I was leery of trying to do any seam ripping, because I was pretty sure I wouldn't be able to put it back together again. So I settled for cutting off the bib, deliberately leaving about a half-inch of raw fabric as a sort of fringe.

Then it was time to take care of the length issue. Ripping out the bottom hem (which took longer than I could have ever imagined!) gave me an extra half-inch, but I still wanted more.

I had all that fabric with the nifty faux-leather trim left over from the flaps I removed, so, after a couple of positioning tests, I decided I would sew them side-by-side onto the bottom hem to add a bit of length and ornamentation to the front.

The flap that had originally been in front was slightly wider than the other one, so to help even out their widths, I folded one end of it over and clamped it in place with a binder clip. I would decide what to do with it permanently later.

Because I already had that raw-edged fringey look going on at the bodice, I planned to create a similar effect at the bottom and just let the existing bottom edge overlap the top edges of the new panels.

That turned out to be harder than I imagined. The existing bottom edge kept trying to curl up, while the top edges of the flaps curled down. I had gaping holes in my seam when I was done with the first pass.

I kept going back in and sewing more seams, trying to get all the fabric actually attached together, so by the end, it was a mess of overlapping seams—made worse by the fact that I only had black thread, which was really obvious.

To top it all off, the spot in the front where the two flaps met was uneven—one hung down lower than the other, and there was a gap between them where I'd wanted the appearance of a continuous line. So more corrections ensued.

Now, while I still wasn't certain I loved the front, I knew the back needed some work, so I turned my attentions rearward. The back bottom hem had just a single raw edge, and the places on each side where the leather flaps abruptly ended looked unfinished.

I had run out of faux leather, but still had some knit fabric left over from the old flaps which already had a hem, so I sewed it underneath the existing edge, tapering from a high point in the center (which I actually measured, hence the ruler in the previous photo), to finally meet the edges of the leather at the left and right sides.


I learned my lesson when sewing the flaps to the front, and this time taped everything down as well as pinning it, so it would stay in place while I stitched. It worked—I had no holes this time, but it still didn't look good. In fact, the new underlayer was almost completely hidden, but fortunately I hadn't cut the newest panels before I sewed them in, so there was still more fabric hidden on the inside of the shirt.

I simply let that fabric fall down so it dangled below the new bottom hem, ultimately achieving a riot of intersecting lines and layers. It's not what I'd call neat or tidy, but it's good enough, I think, for the back of a shirt. The only pictures I have of the back all turned out crappy, so I'm not going to bother to try and fit one in here.


Speaking of crappy, in trying the shirt on one more time, I was convinced the front looked too sloppy to wear.

At that point, I got the idea of hiding some of my mistakes by stitching the string tie that I'd removed from the back flap over the front seam, and tying a bow in the front to cover the still-imperfect join between the two halves. That was an instant improvement, and I was satisfied enough to consider the work done.

You might be wondering about the part I folded with a binder clip. Well, after removing the clip, it still stayed folded, so I decided just to leave it as is until the need arises to change it.


My boyfriend suggested I could wear this shirt to a Renaissance fair, but I say, why save for tomorrow what you can wear today? So I paired it with a short tan skirt and some brown boots (leather + laces to reflect the materials on the shirt) and wore it to work.

Wednesday, April 8, 2015

Too many, too short

If one of my favorite fashion flaws is my propensity for buying formal dresses, one of my least favorite is my almost-equal propensity for buying clothes in large lots. I don't do it often, because it's rare to find any motley collection of used clothes that both fit you and suit your taste, but buying in bulk is basically the only way I can get tops and skirts online at my price point. Unfortunately, when I do buy a lot of clothes, it's almost always a waste of money.

For example, the last lot I purchased seemed like a great deal. After putting in an eBay best offer and getting a shipping discount, I was paying slightly less than 2 dollars per piece. Everything was my size, and from the photos, it looked like a lot of the items were just the kind of colorful, slightly quirky clothes I like to wear. But when the lot arrived and I tried everything on, I learned a sad truth. Although in good condition, almost all of the tops were old—from a time about 15 years ago when it was fashionable to wear shirts that were slightly cropped, in order to show a bit of skin above one's ultra-low-rise pants.

Funny story: when I was just starting to do my own shopping around that time (late high school to early college), I was just about the size I am now, but I was convinced I wore a large, because all the shirts were too short for me. I utterly failed to catch on that the peeking midriff was actually deliberate until years after it had gone out of style. Anyway, I obviously never cared for the ultra-short shirt, but now I have a collection of 15 of them.

Fortunately, I was able to wear one of them just this past weekend, at a fortuitously timed 80s/90s dance party. Since I completely failed to be fashionable when I lived through the 90's, it's only fair that I get to make up it 2 decades later.

How did I do? Am I a 90's chick?
As for the other clothes, none of them are quite as fabulous as an all-over sequined tank top, but still, some of them are just too awesome to let go of—or sit around waiting for more 90's parties. So it's time to get crafty.

Rather than just sadly getting rid of the clothes that are too short (e.g. by hawking them on eBay as "petite" wear as I usually do—because this isn't the first time I've unwittingly bought a lot of clothes left over from the midriff ages), I'm going to challenge myself to find new and aesthetically pleasing ways of lengthening them.
  • I now have a brown medieval-looking blouse that's just begging to be made into a tunic,
  • A green tank top with red contrast stripe that could use a little more red,
  • A sensible short sleeved blazer that I simply need in my nonexistent arsenal of "professional" summer clothes, and (not from this lot)
  • A pair of denim cutoffs that may be just a bit too cut off (or may not be—I still haven't decided).


What will I do with them? Well, you'll have to wait to find out all the details, but I can tell you one thing I'm going to do for sure: Be more discerning about what I purchase on eBay!

Sunday, April 5, 2015

Pink pants into shorts, again!

New Year's Eve is supposed to be a happy occasion, but tragedy struck when I realized I had forgotten to bring mascara to the hotel. Forgetting my mascara is actually something I do annoyingly often, but for NYE, the bar is set a little too high to rock the eyeliner-only look. So I decided to run (not walk; I needed my exercise) to the Safeway down the road and hope I could find a tube on the cheap. An even bigger tragedy struck when I failed to see a curb in the middle of the road, tripped over it, and tumbled to my doom. This was a fairly serious accident—my purse went flying (but miraculously stayed closed), I ripped a hole in the palm of my glove as I landed, and I really clobbered my left knee (weeks later, it still hurt when I moved it most ways), but the real victim here was my pants.

My beautiful pink pants! The gloriously comfortable ones that also happened to be such an unobtrusive shade that they went with almost everything while simultaneously not being a boring neutral! The flattering pink pants that happened to make my lower half look great! Let us take a moment to remember those pants, since I won't ever be wearing them again: Here they are with a brown sweater dress. Here they are paired ingeniously with purple and red.

When I arose from the asphalt, trying to get my bearings and avoid eye contact with a nearby driver, I saw, on the knee of my pants, a gaping hole bordered with streaks of tar.

Woe is me.
Thusly mangled, the pants were good for only one thing: refashioning. I considered trying to make them into a skirt, but I wasn't sure if I had enough undamaged fabric, and I had happened to retire my only pair of pink shorts this past summer, so I thought I might as well make them into some shorts. Here's how I did it.

First I tried them on in the mirror to get a feel for how short I wanted them. One of my favorite features of these pants was the angled pockets with the zippers. I wanted to make sure my new shorts really played up those features. I felt like the best way to do that would be to allow the pointed edge of the pockets hang down below the bottom hem of the shorts.
Then I cut them into the approximate shape.
I chalked a line on the inside where I thought the bottom hem should be—a place where it would intersect the pockets at a distinctive angle.
Then I chalked a similar line (just a really rough guide) on the backside.
Then I cut the shorts down so that I only had a centimeter of allowance for the bottom hem.

I never use pinking shears any more, and this project reminded me why. My shears are so old and dull, they were basically tearing the fabric instead of cutting it, so after struggling my way through a few inches, I went back to straight scissors.
At some point here I made a mistake (I think I misjudged the thickness of the crotch seam, or cut on a guideline without adding a seam allowance), so I had to shorten the legs, resulting in a pair of dangerously short shorts.

But, ignoring that minor issue, I went ahead and stitched the bottom hem. I did not stitch over the pockets, because the seams there were already so perfect, and I didn't have matching thread.
So I decided to glue down the excess fabric around the pocket area. This is something I've never tried before. I used some Loctite vinyl, fabric, & plastic glue I had from Home Depot.
The directions said to glue both pieces that are to be attached, so here's a close-up of the gluing process.

Warning! This stuff smells strongly like rum for some reason, so I don't recommend performing this activity if you have a hangover!
The directions also said to tape the two pieces together until the glue had set (after 2 hours), so I did that.

I used a binder clip at the tip of the pocket, where I needed extra strength to hold together several layers of folded fabric.

All done! I finished the project in January and waited anxiously (for 3 full months!) for the weather to be agreeable enough to wear a pair of shorts. I finally broke them out for the first time on Friday night, in this black and pink ensemble (also the first time I've taken the scarf out in public!).

After one wear and zero washes, the glue on the hems is already coming undone, so I do not recommend using Loctite fabric glue for all your Fashion DIY needs!