Tuesday, March 28, 2017

Daffodils

 
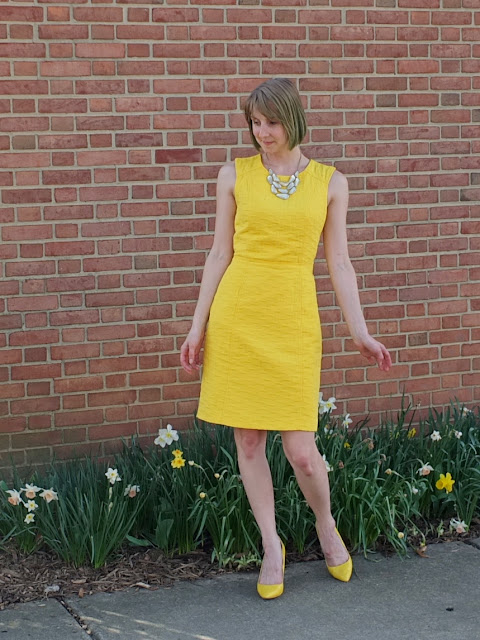
I wasn't planning on blogging this (extremely simple, quintessentially corporate) outfit until, near the end of the day, it occurred to me that it would look undeniably charming on a backdrop of bright spring flowers.

Although the weather threw the plant kingdom a curveball this spring (warming up to summery levels and tempting the spring flowers to peep from their winter sanctuaries a little early, then blasting them with snow and ice) at least a few daffodils have managed to retain their regal aspect.

I found a garden in the back of a church that was just perfect for a vernal photo shoot, where I posed with my brilliant yellow dress and matching high heels, sporting a classy but flashy necklace.

That's about all I have to say about today's look. It's the flowers that are the real stars of the show!

I say the flowers are the stars of the show, but....

Monday, March 27, 2017

Done with winter DIY!


The weather took a turn for the better this weekend, permitting me to wear this fantastical fish outfit! It was an unplanned last-minute DIY that made me really happy, even if the picture quality is kind of bad. Sorry, late night lighting combined with copious amounts of alcohol do not make for great photography!

I started with a fashion challenge. My mission was to come up with an outfit for a house party in the colors blue and red. The challenge was compounded by the fact that the weather forecast for the day was 74 degrees, but almost all my warm weather clothing is still in storage! Fortunately among the T-shirts that I kept out throughout the winter, I had thisT-shirt with a tattoo-style red koi fish on a blue background. I also had a pair of red pants.


When I tried on the shirt with the red pants, I wasn't impressed with the fit. The shirt had always been surprisingly big for a small and had an outrageously deep neckline. So I decided that, since I had a little time, I would lower the shoulder seam to bring up the neckline and shorten the sleeves.

I didn't think to take pictures of this quick and dirty alteration in progress, but essentially I just sewed a new shoulder seam and continued it down the sleeves so there is now a seam at the top of the sleeves.


This required me to remove part of the neckline binding, shorten it, and reattach the two parts of it at the new shoulder seam. It looks terribly messy from the inside, and not quite perfect from the outside, but beggars with a tomorrow-morning deadline can't be choosers!


In the morning, with about 2 hours before we were planning to leave the house for the rest of the day, I checked the forecast again—it had gone up to 77 degrees! The difference between 74 and 77, for me, is the difference between pants and shorts, so I was delighted to trade in my somewhat ill-fitting red pants for my sleek and shiny red satin shorts!

By a stroke of luck, I had, at the end of summer, decided to keep these shorts easily accessible, which I don't ordinarily do, usually reserving just a few plain black or denim pairs of shorts for my winter back-of-the-closet collection. I think I had planned to wear these red ones to a concert which I never actually attended. In any case, I was glad I'd kept them around, because I finally got to wear them, and turn my blue-and-red outfit from just an everyday frumpy getup to something much more flashy!

The problem was, the pants were too flashy. They outshone the rather muted fish and looked out of place. I decided I needed to bring the fish up to the level of the pants by adding some glitter!

I used Elmer's School Glue, so I could wash off the glitter if it turned out to be a total travesty, but fortunately it didn't! (Unfortunately, I still used Elmer's School Glue, so I can never wash this project!)

I put a plastic bag inside the shirt so I wouldn't accidentally glue the two halves of it together.

Then I put down glue on the curves of the fish's scales, along its back where it looked like light would reflect if it were 3-dimensional, then I sprinkled the shirt with glitter.

This photo is from a day later, after some of the glitter had had a chance to fall off

Then it was waiting time. Then it was time to leave, and still the glue wasn't dry enough. I brought the shirt with me, dangling it over the back of a car seat, while my boyfriend and I ran errands, and then finally, right before we arrived at the party, I changed into it.

The glitter was the perfect counterpoint to the shiny shorts!

I wore the outfit with red embroidered Chinese slippers, which, with the koi (favored subject of much traditional Chinese and Japanese art), ended up giving me a very Asian-inspired look. The Japanese chin sitting on the couch next to me certainly doesn't hurt.

Sunday, March 26, 2017

Do-It-"Ewe"rself Graphic Fuzzy Sweater


For a long while now, I've been thinking it would be nice to have a graphic sweater or two. Sweaters are pretty great. They're flexible and comfortable, but for whatever reason, they have an office-appropriate vibe (even when adorned with graphics) that other knitwear like sweatshirts and tees do not. The sad thing about sweaters (at least mine) is they are pretty much always a solid color or a simple repeating pattern, leaving very little in the way of visual interest. I have seen sweaters with pictures on them—just never in the price range of an Unfashionista!

Finally a few months ago, I had an idea that I should keep my old sweaters for crafting, instead of trying to sell them (very unsuccessfully, I might add—why didn't I think of this sooner?). The plain white one with the grey flecks would be the perfect neutral backdrop for an add-on graphic!

Drawing on supplies and knowledge passed down to me by my late grandparents (my grandma was an avid knitter, and it was her multicolored yarn that I used for this project; while my grandpa taught me how to make hooked rugs), I fashioned myself a 3-dimensional sheep sweater!

It came out so well that I think I can make a proper tutorial out of it! So without further ado, here's how to make a sheep sweater for "ewe!"

You will need:

  • A sweater
  • Yarn, in at least two colors
  • Scissors
  • A latch hook
  • A tapestry needle
Create a template for the sheep's body and place it on the sweater. I would share the one I made, but I ended up modifying it so much as I worked that it's basically an entirely different shape! 

You can hold it on with safety pins for the time being.

Next, you'll need to prepare your yarn for hooking. You can use pre-cut rug yarn, but I think that will produce a little too deep of a pile for a sweater. I just cut my yarn on the fly, and had to cut more a number of times as I worked. I found 4 cm to be a good length for each strand. Cut a lot of pieces—I estimate I used at least a couple hundred on my sheep.


Latch-hooking on a sweater

Now it's time to get latch-hooking!

Even if you have used a latch hook before, you might have to modify your technique a little since most hooked rugs use a grid as the backing rather than a thick sweater knit. Here's how to latch-hook on a sweater.
With the right side of the sweater facing up, poke your hook into the knit and back up on the other side, very close to the original entry point. Try to get two threads where they twist together. If you only get one, you might snag it and start unraveling the knit. If you get more, you'll capture too much fabric, making your knot poorly formed. This means you'll have to go in at a diagonal, rather than a vertical as you do in a traditional hooked rug.

Now take one of your cut pieces of yarn, and fold it in half over the bottom of your hook.


Grab the tail ends of the yarn and close the latch over them.
Pull the tool back through the sweater. This will bring the tail ends of the yarn through the loop made by the folded part, effectively tying the yarn into a knot with two trailing ends! I call these ends "tassels"—I don't know if there is a better term for them.


Tug on the ends of the tassels to tighten the knot.

And that's all there is to latch-hooking on a sweater!

If you've never used a latch hook before and you're having trouble figuring this out, it might be helpful to check out a latch-hooking tutorial with a simple canvas backing, so you can better see how it works. Here's a nice written tutorial with pictures, or if you prefer, a video one!

Now you'll just want to do that same trick over and over and over again, forming the shape of your sheep's body!

Start by marking the sheep's outline. Instead of marking the fabric permanently with ink or chalk, I used knots of yarn to mark key points on the body.

Then fill in with more knots...so many knots! This stage took me about 4 days of working an hour or two at a time! You can use your own judgment as to how far apart to space the knots. I tried to work in staggered rows, with one knot sitting just above the space between the two knots below it, but in the end, the positioning wasn't very important, and I had to go in and fill in a few sparse spots later anyway.

As you can see, I started with blue, yellow, white, and pink knots. But I felt the blue stood out a little too strongly, so about this far into the project, I took out all the blue knots and replaced them with knots of the paler colors.

Fixing mistakes

When I had finished the body, I found that my sheep looked much more elongated than the original template. I'm not sure how it happened, but I had to make a few adjustments to get a fatter, fluffier looking sheep.

First I laid the template back on top of my work, noting that there were some definite areas of overflow on the left and right.

I stuck some pins into the pile at intervals around the outline of the template.

Upon removing the template, the pins marked where the sheep's body should be. I trimmed then removed the knots that were outside the intended borders. Then, for good measure, I added a little more volume to the belly area.


Embroidering the details


Once the body is done, the hardest (or at least the most tedious) part is over. Now you move on to the face and legs!
Use cut-out pieces of your paper template to position these elements, and pin them on temporarily.

Once you've decided where they go, it will be necessary to mark the sweater, because the borders of these smaller parts must be accurately defined. I used a yellow highlighter so it wouldn't be too noticeable. You can just barely see the markings of the face on the picture at left!

Thread your contrasting shade of yarn onto the tapestry needle and pull it through the sweater from the back.


Embroider the shape of the face in parallel lines. Make sure to keep your stitches very loose, because any pulling on the knit might deform it.

Use the same process to create the legs.

When you're finished, be sure to knot off all the loose ends in the back! I had a lot of loose ends because I only had very short lengths of blue yarn. Hopefully your sweater's backside will look a little neater!

Now you're done!


My sheep sweater made it out into the field for the first time with a pair of plain grey pants (so as not to steal the sheep's thunder!) and my new denim shoes.

In an homage to my latest vacation destination, New Zealand, where flocks of sheep dotted the hillside everywhere you turned, I also wore a pair of kiwi earrings!

Saturday, March 18, 2017

Dublin Dress


One of my many favorite holidays for fashion is St. Patrick's Day, when I get to go all out in my favorite color—green!

For this year's festivities, I had to get creative, because the only green tops in my current wardrobe were frumpy sweaters entirely unsuitable for a night out on the town. Fortunately I have this green dress, which I've had for years, but worn only once or twice.

It was a little cold out for a sleeveless short dress, so I put some bootcut jeans under it, making it into a sort of funky tunic. My kelly green pumps did their duty on my feet, while the literal crowning glory of the whole ensemble was my hat.

I found the brilliant green fedora a few months ago at the thrift store for 1.99 (minus a 50% discount!), and I knew as soon as I saw it that it would make its first appearance on St. Patrick's Day. My hair is still green, so that was appropriate, but I'm not sure most people noticed, since it was surrounded by much brighter greens.

When you think about St. Patrick's Day, here are the things you think about: Leprechauns, shamrocks, beer, everything green, and, of course rainbows ending in pots of gold! I couldn't work a rainbow into my green-heavy look, but I could at least incorporate some gold...which I did in a subtle way on my eyelids. I'm really getting into glittery eye makeup.


Last but not least, I put on a green, orange, and white floral necklace which I'd also bought months ago and decided to save for the Irish celebration.

Bonus dog picture

Wednesday, March 15, 2017

Do the Duotone


I'm back to my old tricks again; decking myself out in my favorite purple and green color scheme!

Today I'm wearing the green skirt that I just can't seem to let go of no matter how many times I decide I'm bored of it, the green boots that I will never get bored of – never!– the purple shirt that was once a dress, a green cuff bracelet, and a conveniently coordinating set of purple and green butterfly jewelry.


When you commit to a color scheme, you have to really commit!


Someone at Costco today commented that she liked my style, so apparently all that commitment pays off!

Monday, March 13, 2017

DIY Denim Shoes

These white patent pumps were a favorite of mine...I wore them here, and here, and even under my Bridezilla costume...but after 5 years of being my go-to white shoe, they were getting more shabby than chic.

Before parting ways with them forever, I thought I might be able to squeeze a little more life out of them by covering them with fabric. I'd kind of been wanting denim shoes to wear as a not-quite neutral, these seemed the perfect candidates!
I had a few strips of denim from some prior project I no longer remember, and I wanted to use them up, but there wasn't enough of that material to cover both shoes...so I got the idea of doing a kind of graduated color scheme with three different shades of blue!

So I also grabbed a pair of old jeans I was tossing, and some choice fabric originally cut from my DIY cropped flares, and cut them out into wedge-shaped strips. I placed each strip into position as I cut it out, so I could get the shape just right to fit around the different contours of different parts of the shoe.

At this point, I thought it would be a good idea to rough up the shiny surface of the shoes to make the glue adhere better. So I grabbed some sandpaper I had lying around and had at it!


Then I began gluing down the strips one at a time, starting at the toes and working my way to the heels. I used Aleene's Tacky Glue, which worked great! I have to say that using stretch denim was a good (entirely accidental) choice as well because I could stretch it to fit around the shoe without any lumps or bumps.


I folded strips over the top and glued them to the insides, and used an X-acto knife to trim the edges at the sole and edge of the heel.


I cut one large strip to finish off the heel, wrapping the raw edges to meet on the inside. 


Here's the finished product (and here's how I wore them the first time!). The shoes look a little rough around the edges, but that's by design. I hope that as they age, the fabric will begin to fray and show that classic denim cutoff look.

Thursday, March 9, 2017

Denim Day


As with a great many of my outfits, the focal point of this one is the shoes, which I made out of a tired-out pair of old pumps and strips of denim from some tired-out pairs of old jeans. More on that later.


For now, let's talk about the clothes!

I decided a while ago that I needed denim shoes because blue jeans are the world's least boring neutral, and I felt like a pair of jean shoes would be able to be worn in a variety of situations as a more interesting replacement for plain old tan pumps. Of course, the first day that I wore them, I completely ignored their unique versatility, combining them with a bunch of other neutral pieces.

On top, a faux-chambray button-down, which has an interesting story of its own. Last summer, the weather turned unexpectedly cold while my boyfriend and I were on a beach vacation, leaving me shivering in my shorts. We made an emergency trip to a discount retailer (Ross or Marshall's or some such), where I supplemented my warm-weather clothes with 2 pairs of workout leggings and this top. Normally button-down shirts aren't much my style—too stuffy, too stiff, generally tailored all wrong for my shape—but this one was extra long (perfect for covering up the aforementioned leggings), soft and flowy, and, of course, one of the cheapest long-sleeve shirts in the store (still above my price range, but desperate times call for desperate measures!). Although I'm not usually a huge fan of the borrowed-from-the-boys aesthetic, this shirt has proved to be a real workhorse (appropriate, since it looks like a work shirt)!

Today, it seemed just the thing to wear with my new denim shoes. 

I paired it with my light brown skinny jeans for an all-round casual workplace look. Another interesting thing I've noticed: when I first started working at the university, I used every day as an opportunity to dress to the nines in my prettiest skirts and frocks. Five years later, now that the novelty of dressing up for work has worn off, I equally enjoy pushing our casual dress code to the limits. I felt happier about slouching off to the office in this comfy top and jeans than I ever feel about my most lovely workplace dresses.

The brass buttons on my blouse inspired me to round out the look with brass-based jewelry: a new dried-flower necklace, and some dangle earrings in a coordinating shade of pink.
 

Tuesday, March 7, 2017

Deer Me


The bottom half of today's outfit is a midi skirt that I purchased on Swap.com. It features cute fawns frolicking amongst sequin-studded shrubs and flowers, and an orange-and-brown color scheme that's quite the challenge to coordinate! Don't worry; I still found an excellent top to wear with it—the brown Renaissance-inspired one that I turned from a bizarre bib into an ever-flattering wardrobe staple. Combining that top with the print on the skirt (deer = a common motif in Medieval artwork), I had all sorts of old-fashioned themes going on. I describe today's look as Middle Ages meets Millennial.

Friday, March 3, 2017

Desperately in need of butterflies


The day I returned from a vacation in warm and sunny New Zealand, Maryland obligingly provided me with a warm and sunny day to welcome me back. The daffodils had bloomed, spring was in the air, and I was feeling pretty good about returning to real life in the Northern hemisphere.

But apparently Maryland decided that I was through being mollycoddled, because by a day later, the temperature had dropped 30 degrees, and I woke up this morning to snow on the ground! Talk about a disappointment! I needed cheering up in the worst way!

Fortunately, I had a pair of pants ready for the challenge. I got them a few weeks before my trip in a bulk order from Swap.com. In this order, I went kind of crazy with the wide-leg pants, buying three pairs in different colors and styles. The one I was most excited about was this black one with yellow and blue butterflies flowing most of the way up the legs.

I had an initial shock when I realized that they were so flimsy you could see right through them, but ultimately I decided that was an asset, as I could wear them with leggings underneath for winter, and shorts underneath for summer, and thus be comfortable in my cheery butterfly pants all year round.

So today I put on a pair of leggings, topped them off with some butterfly pants, then covered up my top half with a yellow camisole and a blue (slightly different hue than the butterflies, but I think it works) cardigan. Of course, one can't wear butterfly pants without wearing butterfly earrings, and I just happened to have the perfect pair of yellow ones!

Between the springtime pastels, the frothy flowery trim on my sweater, and the abundance of butterflies, my outfit says springtime, even if Maryland's weather disagrees.