Showing posts with label Costumes. Show all posts

Monday, February 11, 2019

I'm with the Lonely Hearts Club Band


On Saturday, I was invited to a 1960's/Sergeant-Pepper's-Lonely-Hearts-Club-Band-themed party. That's a mouthful, but more importantly, it's a challenge! How to dress to meet the theme and to do it well enough to win a contest (which I'd heard would be happening)? I didn't know, but I was going to try!

I knew my friend, who was hosting, was planning to dress as Paul McCartney from the cover of said Beatles album, and she was encouraging attendees to dress as other band members. I came very close to going that route, until I noticed this quite 1960's minidress in my closet. Yes, I do wear 60's minidresses as regular clothes. When I wear this one, I usually pair it with pants—it's very mini.

But for a 60's party, I felt I could get away with wearing it over opaque tights, which are another classic look of the decade. I was very fortunate that all the essentials for this costume/outfit were already in my wardrobe. I had my pick of tights in several shades of pink, or white, or ivory. For footwear, I figured I'd wear a pair of pink Mary Jane shoes, which seemed fairly period-appropriate. Fairly, but not quite. When I'm doing retro fashion interpretations, I am really hard on myself if I feel my look isn't historically accurate, and the 3.5-inch heel on my Mary Janes just felt too high for the vibe of the sixties.

So I decided I should look into buying a pair of go go boots (so mod!). The lowest prices were in the high 20's, and those were for eBay auctions that were likely to end at a higher price. If I wanted some go go boots, I was probably going to have to fork over at least 35 dollars—way above my usual budget!  I wrestled with myself for a while, but then I decided to take the plunge. A splurge is worth it if it means winning a costume contest, right? Fortunately, I never did have to justify a splurge to myself. Right before I was about to bid on a 30$-plus auction for some white boots, I ran my search one more time. This time, I hit the jackpot—a silver pair of go go boots with free shipping, for only $6.47! Yeah, baby, yeah!

These boots also have a 3-inch heel, but since the style is otherwise quintessentially 60's, I felt better about the overall look.

Now on to hair and accessories! For earrings and makeup, I looked to Twiggy, fashion icon of the era, as my literal model. Her signature look back in her heyday was huge, overly made-up eyes with multiple pairs of false lashes, plus painted-on lashes on the lower lid. I only have one pair of false lashes, but I did my best, and managed to paint on a decent set of lower lashes after only four attempts!

Huge, glossy dangle earrings seemed like the best jewelry choice, but I didn't really have any in my collection that fit the bill. What I did have, was a sizable collection of Sculpey. I made my own pair of huge heart earrings (another nod to the theme!) and then painted them with silver nail polish, to match the boots. I hung them from extra-long hooks so they would be visible below the bottom of my hair.


Speaking of hair, I was going to attempt it: the big, voluminous, 1960's bouffant with flipped ends! This was of course a bad idea, since my hair does only one thing well: hang straight down. Even after spending the whole day in giant curlers, teasing the roots to within an inch of their life, and spraying it with more hairspray than I have ever employed, I could only manage a limp approximation of the oversized 'do. Well, at least I got the flipped ends halfway decent.

Here we are in a very retro Polaroid!
With that, my costume was done, but I still had time to help my boyfriend with his. I suggested he go for a John Lennon look, since I happen to have a pair of round-lens glasses. To go with it, I suggested he wear a shiny red Indonesian shirt, because it looks vaguely Indian, and the Beatles went through an Indian phase at some point. He originally picked out a wig that I called a "collapsed Afro," (it was period-appropriate enough, albeit in a more Jimi Hendrix way than a Beatles way), but as we were about to leave the house, I remembered he has a messy brown wig that I thought would look a little more like John Lennon's hair.

I'm glad I thought of that, because he got nothing but compliments about his costume. I did too, so I consider all the effort well worth it...even though I didn't win a prize. I don't think anyone got a prize, because by the time we left, the party was winding down, and no costume contest had been had. So I'll have to consider myself a winner in my own eyes.

Monday, October 29, 2018

Dogzilla vs. Mothra


I grew up in a household steeped in Godzilla. My dad was a huge (big? moderate?) fan, and had several Godzilla figurines that were fun to play with when I was a kid. Beyond that, however, and a theater viewing of Godzilla 2000, I didn't develop much interest of my own in the movie monster.

Until I decided to do a Bridezilla costume for Halloween in 2013. I watched a couple of Godzilla films to help me get into character, and once I saw Mothra vs. Godzilla, I fell in love. With Mothra, that is! A giant monster, who also happens to be a moth, who is in a team with twin singing fairies, who also happens to save the earth? What more could a wannabe geek girl want?

Later that year, I tried to make a T-shirt with Mothra's likeness, using the last of my opaque T-shirt transfer paper and some permanent markers, but the effort was a failure, and I was forced to leave my public declarations of love for Mothra unspoken. Until, several years later, I thought to make her into a Halloween costume. A way better option than a tiny image on a shirt!

I started construction of my Mothra costume last September, but it was becoming clear to me that despite my infatuation with the greatest movie monster ever invented, not many other people even know who Mothra is. I hesitated to bring her to a party where she would not be recognized. 
 
 
So I finished painting the wings (laboriously, on both sides of an old shower curtain, which I do not recommend as the paint flakes right off), sealed them with a clear rubber coating to hopefully keep the flaking to a minimum, and rolled them up, never to be seen again until the next year.
 
 
It was sometime in between last Halloween and this one that I realized Mothra might have a higher recognition rate if she appeared with her nemesis, Godzilla. But since I'd stupidly thrown away my human-sized Godzilla spines, I really wasn't keen on making another version of them. Maybe in a smaller scale it would be OK. Maybe in a dog-sized scale. Maybe, my companion in Halloween tomfoolery would have to be Dogzilla.

It was settled. When October rolled around this year, and I learned that the annual Sugarloaf Mountain Vineyard Howl-O-Wine party (the one where Jack Jack and I won a prize for our spider/web costume!) was three days away, I decided (rather belatedly!) to get cracking on a couples costume for me and Kodiak.

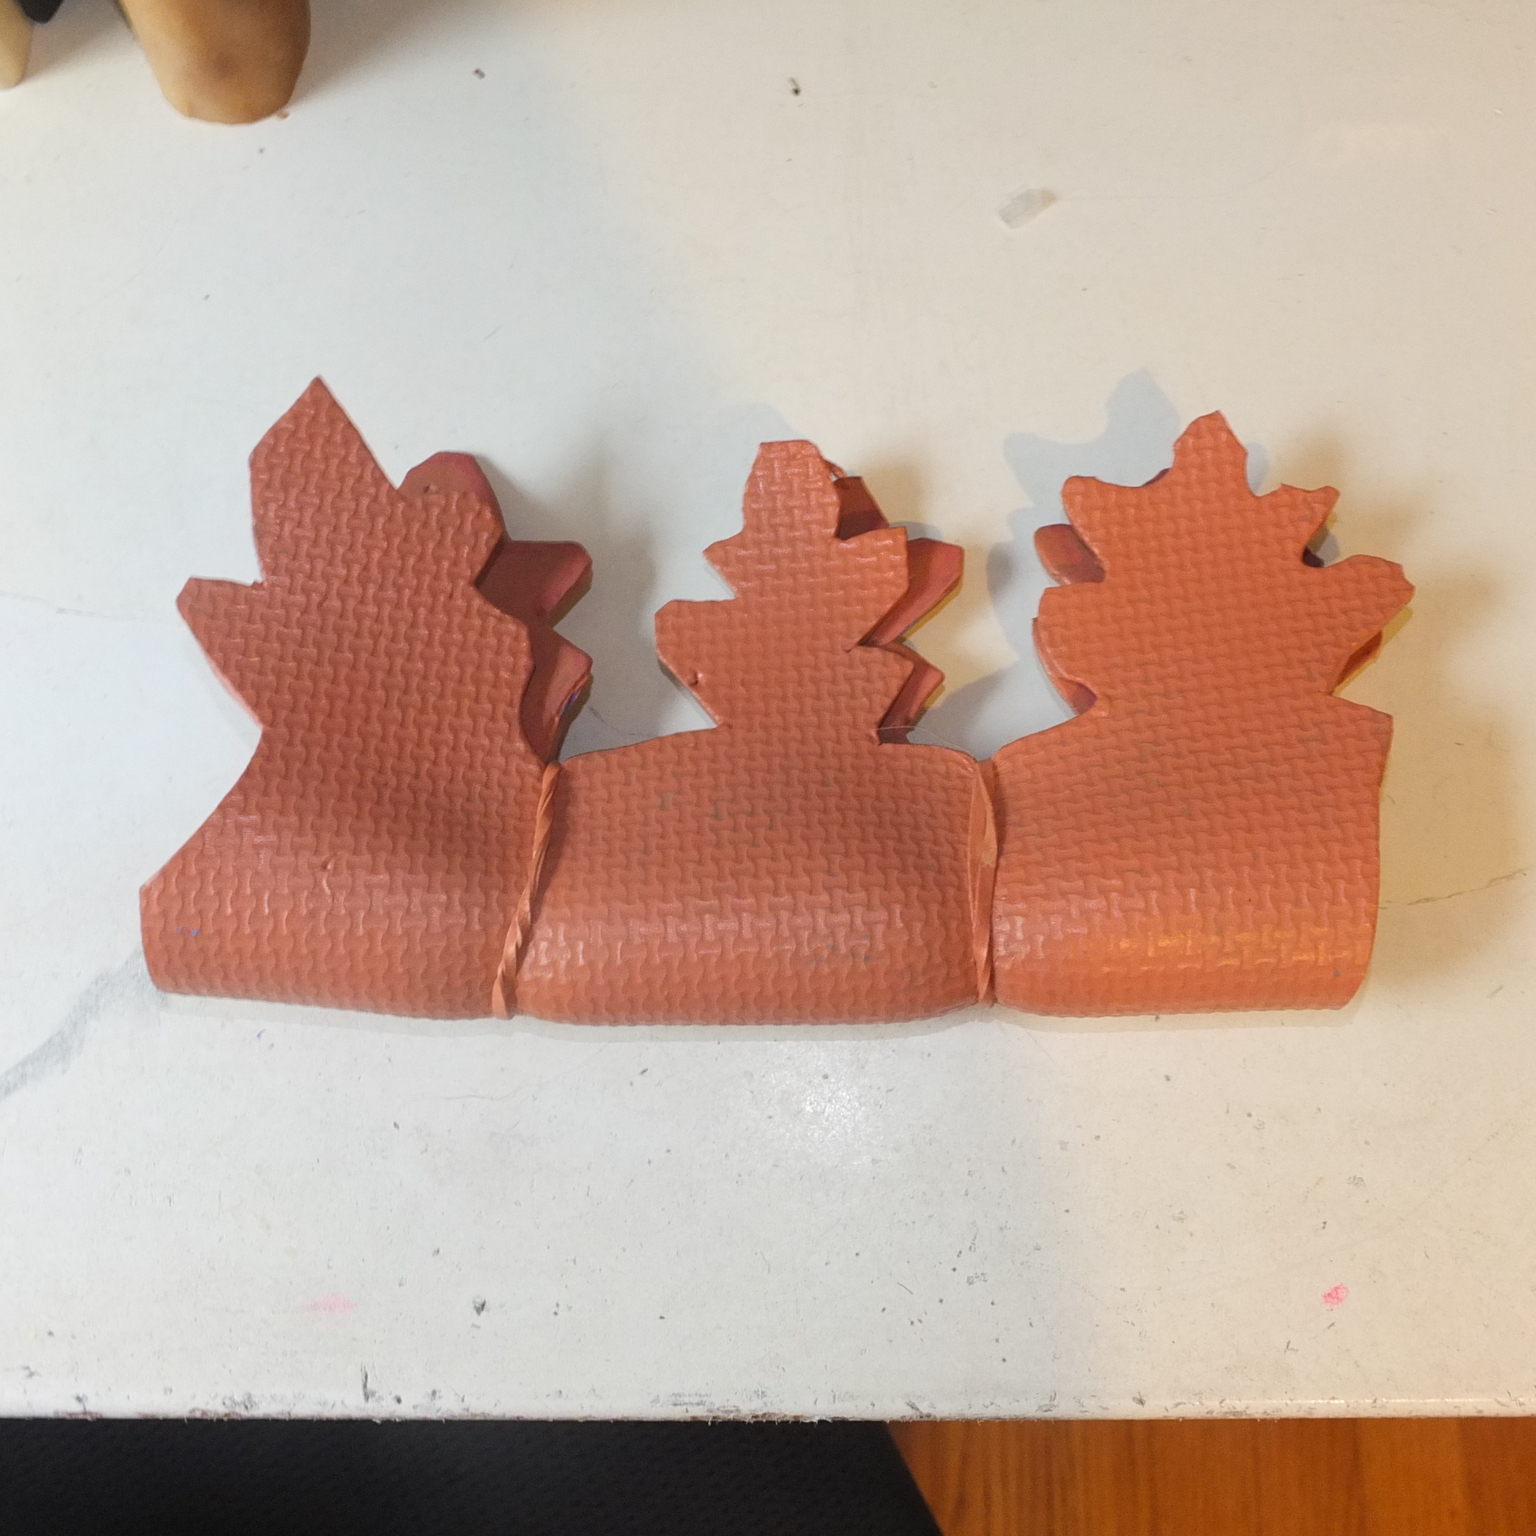
I made his spines out of a yoga mat that he himself had conveniently torn to shreds, and painted them with some rust-colored paint I had lying around that almost matched his coat.
 
I found an old T-shirt that I'd partially destroyed already for another sewing project, which happened to fit the dog fairly well, so I dyed it with a watered-down mixture of the same paint, and made a jacket to which the spines could be attached.
 
I sewed the spines on in alternating rows, bracing them against each other so they would stand up straight (spoiler! They didn't!)
 
I also made Kodiak a Dogzilla tail with more of the yoga mat, which I attached around his own tail using a couple of rubber bands (word to the wise: a dog who likes to wag his tail is not going to be wearing a tail accessory for very long!)


With Dogzilla finished and just one day to go until the festival, I set out to make my Mothra costume more complete, starting with the furry antennae. I have a few fur scraps left over from my Rabbit in a Hat costume, so I wrapped two of those around lengths of wire and attached them to a headband. They are removable and reusable!
 
A pair of blue sunglasses look remarkably like Mothra's glowing eyes.

I had to find some way of supporting the wings, so I made some elastic bands for my fingers and wrists and carefully threaded them through slits I cut in the shower curtain. I used a metal snap to hold the center of the wings to the back of my shirt.

Mothra has legs sticking out of her chest, but I am not that crafty, so I ignored that rather important feature and focused on getting the general color scheme right. A black underside with a furry back could be accomplished with a white fur-textured sweater (it happened to be one I bought but didn't use for my rabbit in a hat costume) with a black strip glued to the front (black strip being another part of a previously cannibalized T-shirt). 
 
Black shorts, because it was a gloriously warm day for October, and orange sandals just because I could, and I was done, ready to save the world from my adorable foe!


This was a complicated costume, but it cost me nothing except the paints I used on the wings, which probably totaled around 16 dollars. Sadly, it won me no prizes, but I guess defeating Dogzilla is accomplishment enough.

Until he comes back from the dead...

Monday, February 26, 2018

Modern Gatsby


The dress code for the D.C. Distillers' Festival was "Modern Gatsby." What does that mean?, I mused. I'm sure it meant that I should dress with a nod to the 1920's, but how much of a nod? How much modern and how much Gatsby would be right for this party?

Fortunately, unlike many of my night-out decisions, this one didn't take me very long. I have a 1920's-inspired dress that I bought last spring, planning to wear it to Repeal Day, which we have gone to every year since 2014. We did not go this year. Consequently, my fringed sequined dress has been sitting in bag in my closet for months. Rather than let it sit any longer, I decided to go as full-on Gatsby as possible.

To go with the dress, I had a similar sequined headband, which I'd bought on clearance and which had also been waiting in the closet for months.

My handsome mobster in the background
I didn't have any appropriate Prohibition-era shoes, so I went with my low-heeled silver glitter ones, because one can never go wrong with glitter, and I liked the idea of actually being able to walk around without pain!

I couldn't do much to make my growing-out hair look much like a proper flapper bob, so I tried to make up for it with my makeup. Darkly shadowed eyes with as much underline as I could dare, and my best approximation of a cupid's-bow lip.

Yes, by this time the eyeshadow has smudged,
and I've put too much lipstick on the outer
edges of my lower lip, but I tried!

I think the outfit was a good choice. Most of the attendees were wearing similar getups, and I even got a compliment from the burlesque dancer. That's how you know you've succeeded—when someone who gets paid to wear a costume has something nice to say about yours!

Tuesday, October 31, 2017

Just another witch costume


Today's outfit is one of those last-minute projects that started out simple and just kind of snowballed into a fairly elaborate costume.

Normally, if Halloween falls on a workday, I wear one of my two Halloween-themed graphic T-shirts and call it a day. I was planning to do nothing more than that this year, when a marketing email from Etsy (yesterday, the day before Halloween) got me to thinking about Halloween hats. For many years, I have been toying with the idea of buying a witch's hat, which I was sure I could deck out in all kinds of embellishments to make a fun centerpiece of a witch costume. So far, the cost (even for post-Halloween sale hats!) has been prohibitive. But the offerings on Etsy, combined with my recent positive experience making a fascinator, reminded me that a hat doesn't need to be full-sized to be effective. The T-shirt I was planning to wear had a fairly witchy theme. Could I make myself a mini witch hat to go with it, in one evening, from things lying around the house?

I thought on it for a while. Did I have any cone-shaped objects? Did I have any fabric stiff enough to form into a pointy hat and brim? All of a sudden, I knew what I would use—and it was perfect!  I had recently refashioned a pair of boots into shoes. I had almost thrown away the boot shafts I had removed, but had decided instead to keep them, thinking I might use the faux leather to embellish other shoes. The semi-glossy purple pleather boot shafts would almost certainly be perfect for making into a tiny witch hat!

No sooner had I had that idea, than I received an email from my office manager, announcing that anyone not in costume the next day would be fined five dollars! Well, I like to dress up, but I don't like being forced to dress up, so I was a little miffed...but then I realized that if everyone in the office was dressing up, I wouldn't look too out of place if I wore a real costume instead of just a token graphic tee and a headband. So I could afford to go all-out.

Maybe I'd pair my graphic tee with that raggedy-hem skirt that would look equally appropriate on a pirate or a witch. Maybe I'd wear my black-and-white striped knee socks and – oh! – perhaps the very same shoes that had sourced the material for my future hat! I wasn't quite finished converting them from boots into shoes, but I thought I could get it done in one evening, and they were quite the witchy looking shoe...it's something about giant buckles.

Well, I hadn't followed that train of thought very far, when it led me to another thought: If my outfit had already morphed from a casual ensemble to a proper costume, why bother with the T-shirt at all? Why not go more traditionally witchy from head to toe? It didn't take my thoughts long to alight on my black corset-laced dress. I'd had it for about three years, worn it in public about twice, and was presently trying to sell it. While its dramatically gothic look had never been very versatile in my wardrobe, I'd thought it would sell in no time flat as a Halloween costume...but it hadn't. It was the day before Halloween, and my poor dress hadn't even had an offer or comment. I guessed I'd take it off the market and wear it instead.

So when I got home, I had my work cut out for me: I had to finish my shoes (basically find a way of fastening the buckle), create a mini-hat from scratch, and decide on any additional accessories. As you have probably guessed, I succeeded, but it took me right up until bedtime. In a future post, I'll share exactly how I turned my pair of falling-apart boots into a matched set of shoes and hat, but today, let's just focus on the costume.

The witch dress originally had black satin lacing, which was all well and good, but I figured I could take it up a notch into campy territory by replacing the black ribbon with orange. So I did.

My go-to motif for scary Halloween costumes is spiders. So I dug out my spider earrings (putting them on longer loops so they could be seen below my hair), my furry spider, and my elbow-length spiderweb arm warmers (all of which have been worn on previous Halloweens). I also wore my giant mesh choker, because it vaguely resembles a spiderweb, and chokers are classic Victorian-gothic attire. I also brought a large plush tarantula, to keep on my desk just for kicks.

In spite of our costume mandate, I was still the most dressed-up person at the office on Halloween, but I didn't mind, because my outrageous getup received enough compliments to make it worth the embarrassment of walking around all day in spaghetti straps and a pointy hat.

Sunday, October 29, 2017

How to be an anemone


There is something magical about wearing a Halloween costume that people both recognize and appreciate. I think my Halloween costume this year may have been my greatest success to date. Turns out people love Nemo. Not only were most people able to guess what I was, there seemed to be a lot of entertainment value in the word itself:

Anemone.

Apparently everyone knows what it is, but no one can pronounce it!

I got my idea for a sea anemone costume shortly after Halloween last year, when I realized I'd had a clownfish-shaped Air Swimmer lying around in its box for over a year, and that I should use it for something. Imagine being a sea anemone for Halloween, with a real remote-controlled fish swimming around your tentacles!

So for the past year, I'd been contemplating how to create realistic-looking tentacles. At some point, I thought of that springy stuff that people sometimes use in their "raver wigs."  

This is what I meant by raver wigs, if you are not familiar with the concept.
I didn't even know what to call those wigs, let alone what that stuff was that made it up! So the first challenge of this costume was in trying to figure out how to call the material I wanted, so I could actually shop for it. I figured it out eventually, although I can no longer remember how. It's called tubular crin, or sometimes Cyberlox, and I discovered in September that I could obtain 90 yards of it for $12.40 on AliExpress

Learning to use AliExpress was the second challenge of this project, because I had a very hard time getting my account set up, getting back into my account after I got locked out, and getting the website to accept my credit card. Whatever—all in the name of discounted bulk purchasing! I ordered three colors—two shades of green and one neon pink, and waited. My tubular crin was on its way from China, and all I had to do was hope it arrived in time to actually make it into a costume.

While I was waiting, I happened across a pair of neon yellow-green pants on Swap.com [referral link, ho!], and then a yellow tank top that looked amazingly similar to the pants. This decided me. I would be a green anemone, not a pink one, and I would wear these two items as my base.

The tubular crin arrived about two weeks before my big Halloween party. It was everything I could have imagined...except for one small issue. As it had been folded up and crammed into a box for several weeks, it was kinked and crimped in some spots, which caused it to bend at strange, un-tentacular ways. I looked online for techniques to un-crimp your tubular crin, but couldn't find any. So, Internet, allow me to teach you one!


How to straighten bent tubular crin

You will need the following:
  • Tubular crin, in any sad kinky condition
  • A hair dryer
  • A straight rod narrow enough to fit inside your tubular crin. I used a 3/8-inch dowel rod.
Take your sad, kinky tubular crin.


Insert the straight rod inside it to straighten the bent parts.

I tried just holding the tubular crin straight during this process, but I found that stretched it out too much (which makes it narrower), and caused it to flop around unhelpfully during the straightening process. So yes, use a rod. It is essential!

Using your hair dryer on high heat, slowly run the dryer up and down the length of the rod.

Remove the straightening rod. The bends in the crin should be much less pronounced, if not completely gone!

One thing the Internet was able to help me with was how to keep the ends of tubular crin from fraying. Essentially, you fold the raw ends inside. It took me a few tries to figure out an effective technique for this, but eventually I got it.

The next question was how to attach the tubular crin to myself, in order to make it convincingly reminiscent of an anemone's tentacles. I figured I would attach it to the shirt in some way.

I wanted each tentacle to kind of point upwards and then arch back down. In order to give it a certain amount of rigidity at its base (so it would stand up) as well as effectively halve the number of pieces I'd have to attach, I decided to fold each length of tubular crin in half so both open ends were facing the same direction.

Hot glue turned out to be my best friend for this project. For each tentacle, I simply folded it in half, pinched the two halves together as close to the fold as I could, and put a drop of hot glue over the join. It took a few seconds to dry, but eventually I made some U-shaped pieces of wire that neatly held the crin in place so I could put it down and work on the next one before the glue was hardened.

Originally I planned on sewing the tentacles to the shirt, so I could remove them after Halloween and still have an undamaged shirt to wear. Alas, after a few attempts at hand-stitching the floppy, uncooperative crin to an equally floppy shirt, I gave up and just used hot glue for this process as well.

Here's how it looked after I had attached one row of tentacles all the way around the shirt.

I thought I was done at this point, but then after looking at a few more photos of sea anemones, I decided I needed more tentacles! Good thing I had gotten 90 fricking yards of the stuff! I made some 14 more tentacles in record time, and attached them under or above the existing tentacles, wherever they fit best.

Woohoo! Body of the costume was basically done, but now there were new challenges.

In all the years that I'd owned it, I had never taken my flying clownfish out of its box. But 6 days before the party, I finally got around to it...and discovered to my intense dismay that it was  far too big! I had envisioned a fish maybe the length of my arm, but what I got was basically the length of my entire body! A clownfish that big could not take refuge in an anemone my size. My costume idea no longer made any sense! Furthermore, I didn't even know if the fish would fit anywhere! It would practically take up a whole room at the party! The flying fish was a no-go!

And so, a last-minute clownfish search ensued! Yes, I was trying to find Nemo.

I went to all the discount and dollar stores at my local mall, but came up empty. Then, reluctantly, I borrowed my boyfriend's Amazon Prime account and found a couple of stuffed clownfish toys that I thought would do a decent job. I take pride in making cheap Halloween costumes out of basically what I have lying around, so I was disappointed that I'd need to incur this extra expense, but we have to do what we have to do. An anemone without fish is like a summer without sunshine!

My clownfish came on Tuesday as expected...to the wrong address! I admit to having a meltdown at this point. All I was trying to do was make the coolest Halloween costume ever, and nothing was working out! Fortunately, this issue only took a day to rectify. My boyfriend's mom hand-delivered my box of fish the next day, leaving me plenty of time to find a way to work them into my costume.

They came with plastic hangers, so I hung one from the underside of my tentacles, and made a bracelet out of ribbon so I could carry the other one on my wrist and make it "swim."

As a finishing touch, something which had occurred to me the prior week, I had ordered some temporary tattoos with a clownfish motif. They were only a few cents each, but I had to pay three dollars for shipping. I cut them out (laboriously) and positioned them meticulously upon my cheeks.


With all these clownfish covering me, there should  be no question what my costume represented, so the rest was just details. I wore brown flat shoes (to resemble sand), wore a wavy blue headband, and put a lot of blue-green makeup on my eyes (to resemble water).

And lastly, since these things are important to me, some costs.
Tubular Crin:  12.40 (though I could probably get some of that back if I sell the leftovers)
Temporary Tattoos:  3.69
Pants: 2.40
Shirt: 2.70
Two clownfish: 9.68
Total: 30.87
In conclusion, while this is possibly my most successful Halloween costume to date, it is probably my most expensive one as well. It did, however, garner third prize in the costume contest, so I guess you lose some, you win some.

"Sea" you next year!

Sunday, October 22, 2017

Last-Minute Mrs. Peacock

 
One of the best things about Halloween season is it usually provides plenty of opportunities for an Unfashionista to dress in costume. I have been planning various Halloween costumes since mid-September (and ideating them for years!) but a group costume as characters from Clue never crossed my mind...until around 10am on Friday. I was one of three people going to a murder-themed event that evening, and with only 10 hours until the doors opened, I suddenly realized that we could all dress as characters from the game!

My friend took Miss Scarlet, I assigned my boyfriend Mrs. White (since he already has a French maid costume), and I took Mrs. Peacock. (See what they wore in our Photobooth pics!)

I did a little research so I could make my costume as authentic as possible, and found that there are many variations of the game Clue as well as a couple of movie adaptations, and several less-than-consistent descriptions of the characters.

But here is what I was able to glean about Mrs. Peacock from various sources. She is a wealthy widow; some sources say she has had many husbands who all met their untimely demise. In one of the descriptions I read, her character raises birds. Her appearance evolved over several versions of the game, back and forth between elderly and stuffy and young(er) and stylish, but she almost always dresses in blue and wears a hat (naturally I went with the young and stylish variation!).

This is the picture that I used
as inspiration for my costume
I was thrilled with what I learned about my character, because I have a wealth of blues and greens in my wardrobe, never miss an opportunity to dress like I'm rich, and also happen to really appreciate birds. Since Mrs. Peacock usually seems to be wearing some sort of ostentatious hat in almost all of her forms, I decided this would be the perfect opportunity to make myself a fascinator! In case you weren't up on wealthy-woman headwear, a fascinator is basically a hat, but instead of covering the whole head, it only covers part of it, and it usually has lots of frills and feathers and things sticking out of it. Fascinators are commonly seen on the Royal Family and at horse races.

How I was going to make a fascinator, I really didn't know...but I guessed I was going to find out! As it turned out, I did find out, and it actually worked out well. But the process was so long and involved, that I think it is worthy of another post all its own. So let's leave the talk of fascinators for a while, and get back to the rest of the details of the outfit.

Obviously, you can't be Mrs. Peacock without wearing blue. As it so happens, I have a blue satin dress that I've been saving (in an admirable display of patience, if I do say so myself) since I last wore it in 2014 (I wanted to give it one more chance and wear it with a particular pair of shoes...but now that it's had its second wear, it's off to eBay for this dress!).

Since we were traveling on Metro and likely to be walking around in a museum all evening (and who knows where the night might take us afterwards), I decided to wear flat shoes even though they hindered the glam quotient slightly. As long as they were blue, that's what really mattered!

The finishing touch was a pair of peacock feather earrings and some blue and green eye makeup.


But the real star of this outfit was definitely the fascinator. Stay tuned for the full story on how I learned to make a fascinator in under 2 hours!

Tuesday, November 1, 2016

Rabbit in a Hat

 
I am one of those people who plans their Halloween costume years in advance (I already have 3 ideas for next year, plus a bonus or two for the dogs!). If I can wear multiple costumes in one season, I consider it a year well done.

Anyway, I'd been ruminating on this year's costume for so long that I can't remember where I got the idea from, but I wanted to be a rabbit...in a hat!

I've been accumulating materials for this costume for months. Early this year, I found two furry vests at the thrift store, which I thought would be perfect for my costume—plus, in the off-season, they could serve as cheap-o substitutes for the shaggy faux fur stuff I'd been coveting. They ended up being too short and short-haired for that latter purpose, but I was able to make use of both in my costume. A few months before Halloween, I went to Home Depot and bought some plastic tubing that I thought might serve as boning (I got this idea from a couple of tutorials I read online suggesting it as a cheap alternative to real boning).

The first week of October, I started work. The whole project took me almost a month, putting in a few minutes to an hour almost every day. I was going to share every little detail about how I made the hat, but I realized that that might be a tad boring, so I'll give you the short version, and if you have any questions, I'm happy to answer them!


I used my tubing from Home Depot to support the inner and outer edges of the brim, in concentric circles kind of like the picture above (this was an early approximation of how big I wanted the hat to be). I later added boning to the bottom edge (what would be the top of the hat if it were on a head) as well.

A previous roommate had left behind a few sheets of black fabric, and one was a glittery floral I thought would be perfect for this purpose.

I sewed most of the parts of the hat together, creating casings for the boning, turning all the strips of fabric into tubes, and adding a lot of darts along the brim to convert it from a rectangle to a circle.

However, I also used a good bit of hot glue for some of the more awkward spots, such as attaching the brim to the crown.

As it turned out, aquarium or electrical or whatever kind of vinyl tubing this was is not rigid enough to support the weight of a 3-foot-wide hat brim, so I had to use coat hanger wire inside it to give it a bit more support.


I found a wooden dowel that just happened to be an almost perfect fit inside the tubing. I cut it to about two inches in length and inserted it into both ends of the tubing to join them.

To suspend the hat from my shoulders, I was going to use wire. I fortuitously found the wire lying in the road on my way home from work one day shortly after I'd put picture-hanging wire on my shopping list. So with traffic whizzing past me, I retrieved the mass of wire and took it home with me—at least one part of this costume was absolutely free!

Originally I tried just making big loops of wire and draping them over my shoulders, but I found they dug in a little uncomfortably, so I decided I needed to make a harness out of fabric to distribute the weight. The fabric I chose was a canvas apron that had come with my house (another free costume element!)
I cut it into a couple of strips, awkwardly sewed some loops at the end to hold the wire, and then connected the two strips with another strip that would rest over the back of my neck.

It was quite a labor of love getting the suspension wires attached to the hat, because I had to poke them through the fabric and then twist them closed in such a way that the pokey ends of the wire wouldn't injure anyone. Eventually, though, I had this:


Once the hat was done, I was ready to focus my attention on the slightly easier bunny costume.

By this time, I had acquired a fuzzy sweater from another trip to the thrift store, and I had a hard time deciding which garment (vest, vest, or sweater) to wear on top. I finally settled on the fur-lined knit vest with a hood, mainly because the hood would help disguise my green hair, which could be confusing in the context of a bunny costume. 

To make the vest look more like a mammalian body and less like an article of clothing, I removed all the leather and wood toggle closures and sewed it shut with the right side wrapped over the left side. Since the left edge was now covered, I was able to remove the fur from that side, to use for other parts of the costume—primarily, the ears!

I made wire frames for the ears out of my free salvaged wire.

I folded the raw edges of fabric over so that the frames were completely covered.

I left a few inches of wire poking out the bottom of each ear, so I could wrap it around a metal headband. Somehow one of my ears was noticeably smaller than the other, but rather than make the other one even shorter, I opted to just mount the smaller one higher off the headband. The ears also ended up being a little off-center. Both problems are visible if you look closely, but I was banking on no one looking too closely.

To keep the wire from poking me during use, I then covered the headband and wire with a white ribbon (the string tie from the apron). Here you can see it being held in place by binder clips while the glue dries.

Hat: check! Ears: check! I had enough of a costume now that I could be reasonably recognizable, but I still had one fur vest and a fuzzy sweater...so I decided to make arm- and leg-warmers to add to my furry appearance.


To begin with, I completely deconstructed the fur vest. Had I known that this would be its fate, I probably could have saved money by just buying fur fabric, but the thrift store only has a 7-day return window, and I was about 7 months too late, so I figured I might as well use what I had.
I decided to use the front portion of the vest to make arm warmers, and the back portion to make leg warmers. I wore these to look more like a white rabbit when I wasn't wearing the hat, as it was too bulky to carry around all the time, but I didn't get any pictures of my "naked" rabbit costume.

To make appendage warmers, you wrap a strip of material around your forearm or lower leg, inside-out. [Note: for optimum realism, make sure that the "grain" of the hairs points downward, toward your hand or foot]. Then you use pins to mark where a seam should go, approximately following the line of your arm or leg. Be sure to leave about a 2-inch slit for your thumb to poke through on the arm warmer. Two inches seems like a lot for a thumbhole, but you need that space for full articulation of the joint. Sew a seam along the line of the pins.


While doing this, I learned a trick for cutting fur fabric: Fold it in half so the hairs are all pointing straight up or down, then cut along the "part." This will help you avoid cutting too many hairs short.

The last part of my costume, the tail, was  an afterthought, completed the night before I was to wear it. I grabbed a piece of leftover fabric and bunched it up into some semblance of a rabbit tail, stitching it to a safety pin to hold it all together.


I attached the safety pin to a white skirt, and I was done! Finally! Can you believe that was the short version of this story?

As with most of my costumes, I constructed it almost entirely from salvaged items. My only expenses were:
  • Two rolls of aquarium tubing (at something like 4$ each), 
  • Three shirts I bought from the thrift store (which probably totaled about 12$)—even though I only used two of them, I don't think I'm going to be able to return the third.
  • The negligible cost of crafting materials I already had, such as glue and thread.
So overall, my rabbit in a hat probably cost me 20$. I was aiming for a costume contest prize that would earn it all back, but this year, that was not to be. While I didn't earn any cash prizes, I did enjoy a wealth of compliments while I wore my creation.
 
It had its debut (and probably final appearance as well!) at Nightmare Festival, a Halloween extravaganza of dance music. The outdoor venue (a campground) even had a small ropes course, so I showed my athleticism by playing on the tire swing in full costume!


Hoppy Halloween!