Thursday, December 6, 2018

Fursday


Ah, the theme that made me push this whole Fashion Challenge back by half a year—it's Fursday!

Obviously, you can't have a Fursday without fur, and you'd be crazy to wear fur in the summer. So, after coming up with the theme no later than July, I bided my time, ruminating for months about exactly what furry pieces I would wear when that distant Thursday finally rolled around.

As luck would have it, the furry piece of my dreams practically fell into my lap on my most recent Swap.com [referral link] run. I finally found one of those faux-fur vests that I'd been coveting for so long that I'd basically given up on the idea. This one was not quite as shaggy as the original inspiration, but it was only $3.60, and since I knew I'd be able to use it for this upcoming themed outfit, it seemed a sensible enough investment.

As even more luck would have it, the faux fur on the vest happened to very nicely complement a pair of fur-lined boots I have in my collection. I never loved these boots as much as I thought I would when I bought them, and since I acquired quite a few pairs of brown boots over the past year, I was ready to kick these kicks to the curb. But not before they get to play their role as the second titular piece in my Fursday outfit!

The clothes I wore to complete my fur boots and vest were simple and unobtrusive. I wanted to go with colors that can naturally be found on animals' coats. Black was prohibited, as I've worn black pants almost every day this week, but dark brown worked, and the ivory sweater provided a nice pale contrast to the darker shades of the rest of my clothing.

The final touch in today's look has no fur itself, but does picture a furry animal. When I was looking around for mammal-themed jewelry, I was pretty astonished at how little I actually have. My collection is chock-full of birds, sea creatures of all types, and even the occasional arthropod...but the representation of fuzzy land mammals is almost nonexistent...and almost exclusively limited to cats. Last night I made a note to self, to scour eBay for new and exciting animal accessories, but in the meantime, I did find one unworn cloisonné pendant in the patchwork form of (of course!) a cat.

Wednesday, December 5, 2018

Weddingsday


It's finally here, the concept that started it all! It was earlier this summer (May 22, to be exact,) when it occurred to me that "Weddin'sday," would be a splendid punny title for a blog post. Before long, I had constructed the bones of an outfit to go with the theme, and before much longer, I had realized that a whole week of day-name homophones would make for a fun Fashion Challenge! One of the homophones I had devised would work much better with winter clothes (telling you why would spoil the surprise, since it's coming up tomorrow!), so I actually postponed the challenge for several months, refining my ideas until I'd come up with the multi-day masterpiece you're in the middle of witnessing!

But it all began with a simple lace dress. I've been searching for a pure white dress for ages (just in case I ever get invited to an all-white party, which is my dream), but they're apparently hard to come by—and more so when you insist on your dress being an appropriate length for work (because if I never get invited to an all-white party, which I probably won't, I still want to be able to wear the dress somewhere!). When I saw this dress on eBay, I thought I'd found the one. Unfortunately, a trick of photography made me think it was much longer than it actually was—when it arrived, I could see I was never going to be able to wear this dress in the office unless I put pants under it.

So put pants under it I did! With a white lace dress on top and black pants on the bottom, I looked like I was trying to be both a bride and a groom at the same time. That was a rather bizarre notion, and I ran with it!

I wore a black blazer (er, "suit jacket") and ornamented my lapel with a floral brooch (we'll call that a "boutonnière"). I wore off-white lace bridal shoes, which were just a tad darker than the dress. I topped off my hair with a white headband (about as close as I can get to a veil at work without raising eyebrows) and my ears with blue chandeliearrings. Nothing particularly nuptial about those, but I just really didn't want to repeat my austere ears of yesterday! In any case, they can count as my "something blue."
 
 
This Fashion Challenge would not exist if it weren't for Weddingsday, but I don't feel this outfit is my best showing. I think the real winners of this week are going to be tomorrow and Friday, so let's just say I'm glad the wedding is over and it's time for the honeymoon to begin!

Tuesday, December 4, 2018

Twistday


For the Tuesday of my Week of Wordplay, I could have gone for the low-hanging fruit and employed a "Twos" theme, with two of everything. But that might get too "two," if you know what I mean...and if you don't, I mean I'd probably get hot wearing two layers on every part of my body. Fortunately, I came up with a much better word that not only puts a twist on the normal pronunciation of Tuesday, but also, plain and simple, is a twist. It's Twistday!

I have several garments that feature twists in their construction, but the one I chose for today was this dark jade green sheath dress with a twisted neckline. This was one of the many frocks I purchased in my Great Wedding Dress Hunt of 2018. When I hadn't worn it by the end of the summer, I decided it would make a great layering dress for the fall, so I kept it around even though it was sleeveless.

That made it the perfect choice for today's outfit, because I was conducting a training session at work and needed to wear something suitable. A classic sheath dress, in my opinion, is the ideal silhouette for looking professional at a meeting. The fact that it had no sleeves would also enable me to layer up with a cardigan—not only one more potential source of thematic twists, but also something that I could jettison easily mid-day. Since I tend to get hot while public speaking, and the climate in our conference room is notoriously fickle, it would be a good day to come prepared for a wide range of thermal possibilities.

Unfortunately, my cardigan collection, while it now takes up a full fourth of my huge wardrobe, was entirely lacking in twisty things. I had to get creative with one of my waterfall cardigans, folding the front portion around to just under the armpit twice and sewing it in place. This not only produced the requisite twist, but also made the sweater look more appropriately sized for my body.


With two twists in my look, I could have called it quits, but I still had more ideas! I donned a pair of tiny gold twisted wreath earrings (Style Tip One of my many rules of dressing for meetings is to not wear any jewelry that will jiggle around your face distractingly while you're talking, so I had to forgo my signature giant dangle earrings and stick to the basics today), and, last but not least, clipped up my hair in two side twists.

There's so much blur, you can't really see the detail in the earrings,
but trust me; the twist is there!
Why I chose such a high-maintenance 'do when I knew I was going to spend 2 hours in the public eye with no chance to adjust it, I'll never know, but I got compliments on both the style and the color, so I guess it didn't turn out too bad (even though I needed to correct it two times to get it presentable for my 10:00 training!)

I wasn't crazy about the black leggings and boots that finished off my look, but with such a short dress, plus highs in the low 40's, I wasn't about to leave my legs uncovered. At least I can say that the boots kind of represent a twist with their lace-up detail. You can't have laces without twisting them a little, right?

Monday, December 3, 2018

Moonday


For the Monday of my fashion challenge this week, I had to wear an outfit that evoked "the moon." That was easy to take pretty literally, since I happen to have this brand new dress embroidered with an image of a fox contemplating the moon!

The dress is my birthday present to myself this year. Although I usually buy myself Birthday Shoes, this year when that special day rolled around, I still had two unworn pairs of Birthday Shoes from last year, so I felt it was time to take a break from footwear. Instead, I chose to gift myself some clothing, and the clothing I selected was The Fox and The Moon Embellished Cotton Knit Dress from eShakti. I was able to stack a couple discounts to get it relatively cheaply, so I decided to treat myself to custom sizing for an extra $9.95. 
 
The thought! Having a long-sleeved dress that actually accommodates my oversized shoulders! I was pumped! I sent them my measurements and got the dress in a few weeks, and then dutifully squirreled it away for the arrival of cold weather.

I have to say that I'm not sure the custom sizing was worth the price. My shape is pretty close to standard in every respect but the shoulders, but even after giving them my measurements, my shoulders stick out into the sleeves farther than the model's do.

The fit on the model
The fit on me after customization

Ongoing problems with my enormous shoulders notwithstanding, I am otherwise happy with the dress. For my $9.95 customization fee, I was able to request a wider neckline, which always does help minimize my shoulders a little, so I guess I shouldn't complain. The dress is warm and comfy and well made, and super cute!

For "Moonday," I wore it for the first time, pairing it with some star earrings (I tried moon earrings, but then decided one moon was enough) and the same light brown boots I wore the last time I had a fox on my clothes. Some things never change!

Sunday, December 2, 2018

Sewnday

 
These dark days just before the official beginning of winter always fill my heart with sadness...but they also inspire me to work extra-hard to cheer myself up...sometimes resulting in an exciting fashion challenge!

This time around, the challenge is thus: to come up with an outfit to represent each day of the week—like those days-of-the-week-themed socks / underwear you had as a kid (you did have some, right?) but with a literary twist. Since wearing clothes emblazoned with the days of the week wouldn't be much of a challenge (and would probably read a little juvenile, even for my taste), I'm taking a more subtle route and injecting my fashion challenge with some good old wordplay. Each day, I'll wear an outfit that represents the calendar day, but with the word altered just enough to make it fun!

So today, Sunday, becomes "Sewnday"—a day to wear something I've sewn!

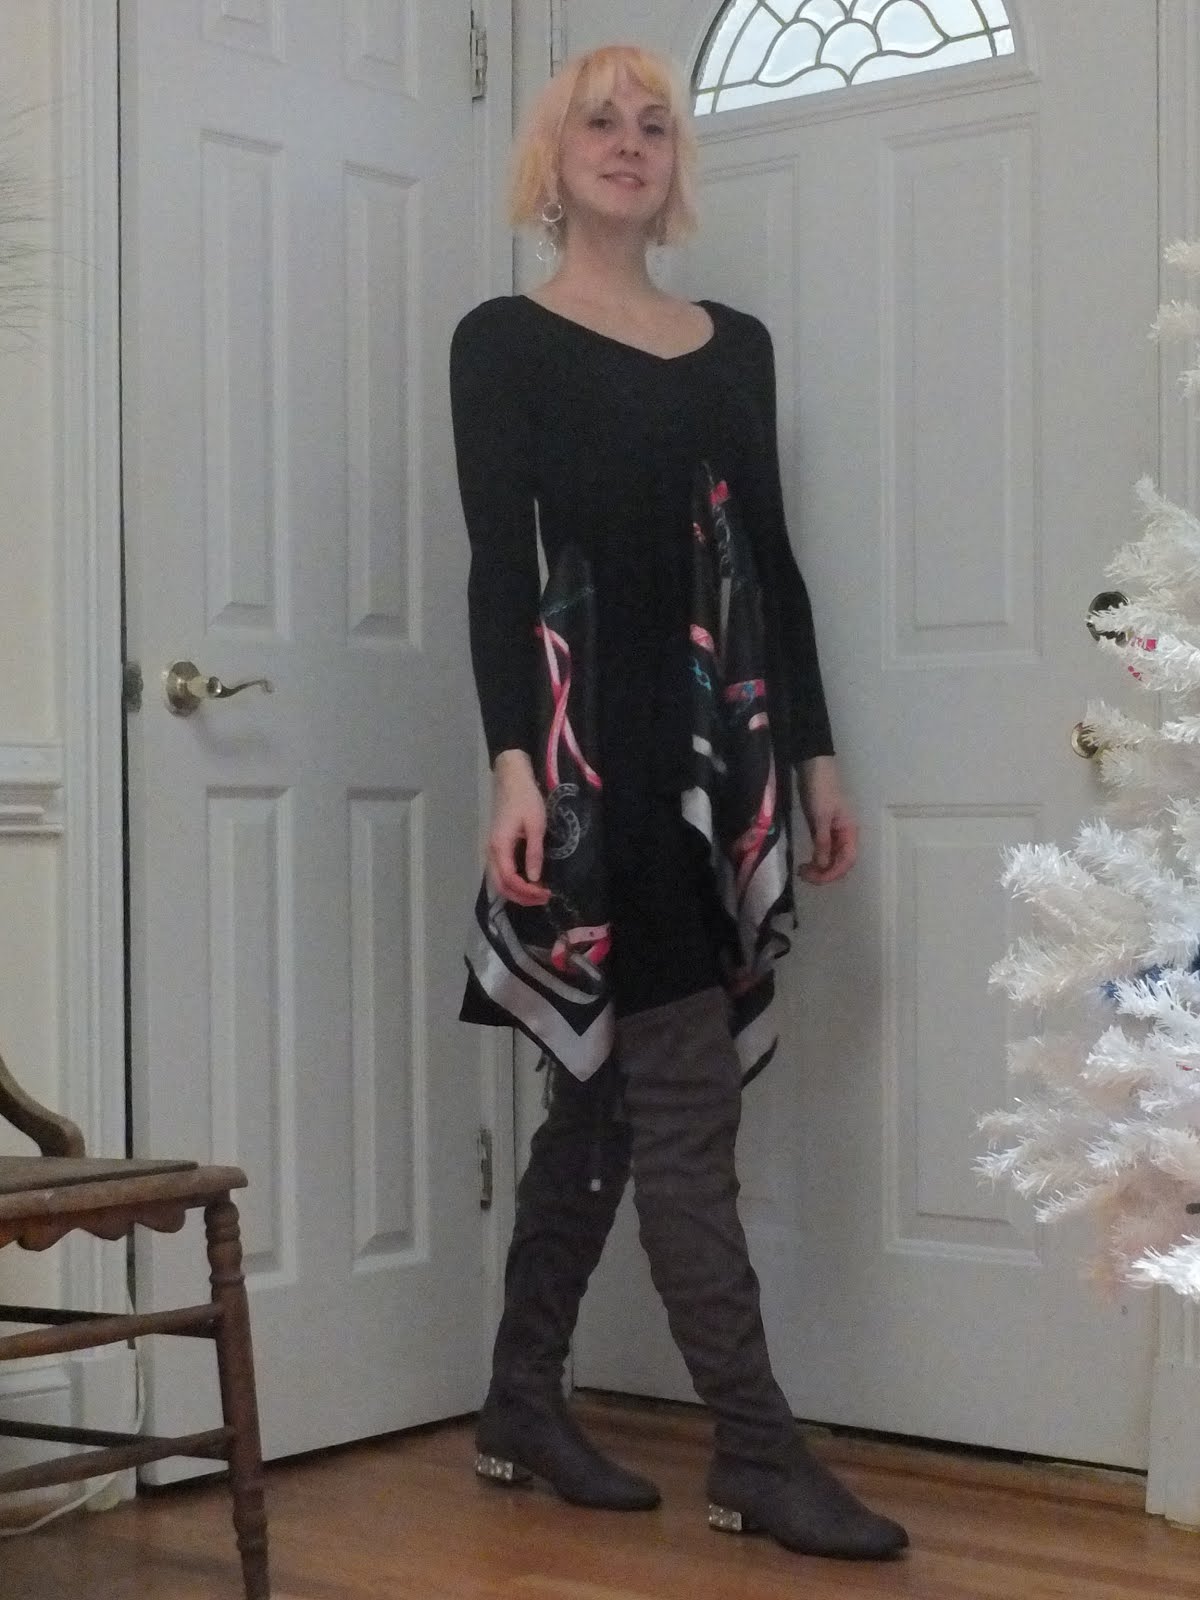
That something is a tunic which has its own rather convoluted story to tell. It started out as a black dress which I got in one of my earliest Swap.com orders. When it arrived, I found that one of the sleeves was torn halfway around the wrist (you can even see it in the picture!), so they refunded me and let me keep the dress! I cut off both sleeves at the same length so they would match up, and it helped, but more was still needed.

The skirt had that goofy low-high shape I dislike so much, so I opted to cut the front in a reversed curve—to make it into a high-low shape where the center was the highest part. I made the mistake of not measuring first, and I ended up cutting it a little too short. I couldn't wear it with leggings as I'd planned. Some people are OK with putting their crotch on display, but I am not!

So next, I used a roll of black lace I had purchased specifically for cases like this to get the skirt to a decent length. Unfortunately, the cheap polyester lace was very stiff, so it looked silly, and clung to my leggings like glue, causing the skirt to bunch up with every step.

I removed the lace and let the skirt rest all summer, trying to think of alternative strategies for lengthening the skirt at the front.

Somewhere, possibly Refashion co-op, I had once seen a pretty neat trick wherein a square piece of fabric was inserted into a side seam to add some length, volume, and allover flowiness to a top.

I could do that with this tunic, adding a panel like that to the front to make it more modest and more flashy at the same time.

But what to use for the panel? I had a scarf I'd been trying to sell for a while on eBay with no success. It was a huge satiny square with a motif of pink and blue chains and Chanel logos and...leashes? I wasn't sure what straps and chains were supposed to be, only that I wasn't a huge fan (not a big lover of logomania, me). I have to assume the scarf was a knockoff, given its cheap polyester feel and failure to sell, but if it wasn't, I just sliced up a valuable brand-name item to make into a tacky dress! Call me a rebel.

I ripped out the side seams  of the dress to one-half the width of the scarf. Then I pinned the whole scarf into the gap, just to check that I liked the look. It was a go!

From there, it was just a matter of cutting the scarf into quarters (gasp! The point of no return!) and sewing them into place on the dress (harder than it sounds, figuring out how to get the right sides all facing out!)

The next scary part was cutting up the center of the front to make the home for the final scarf panel. I measured it out to start at the same height as the other two side panels. Because the skirt was shorter in front, this meant that the front slit was shorter than the side ones...which meant the scarf piece didn't fit exactly as the others had.

I positioned it multiple times before I got the bottom edges to line up (I was using No-Sew glue to baste it in place, which was immensely helpful!)

The next part was cleanup. All of the panels had a tiny gap at the top point, which I had to sew shut. The front panel, because it was shorter, also had some excess scarf fabric hiding out at the top, which required sewing down so it didn't reverse itself and pooch out at the front. I also zigzag-stitched over the raw edges of the scarf panels to keep the very fragile fabric from fraying.

I wasn't really happy with the way the front panel lay – it tended to collapse to the inside of the dress – so I tacked it down a few inches from each side seam. It only took a few stitches, but it effectively held the scarf on the outside where it belonged.
I finished the dress yesterday afternoon—just in time for the planned first day of my newest fashion challenge!


Fortunately, my boyfriend and I actually had somewhere to go today (some Sundays, I don't even leave the house!), so my scarf dress got to see some action. Not much, because the restaurant we had lunch at was so cold, I kept my coat on the whole time. But enough.

And, just to make this blog post longer than it is already, I have to mention that the boots I wore with the dress are one of my favorite recent purchases! I almost didn't buy them (because they were grey, and I already had grey boots), but I'm so glad I did. They have low heels, so they are eminently practical to walk in, but they also have gems embedded in them!


The first time I wore these boots, I got so many compliments, I knew I'd made the right decision. Sometimes, blingy neutrals are better than brights!

Thursday, November 29, 2018

Shoeing the hooves


Last year, I spotted these pink boots at the thrift store for $3.70 (after a 50% discount). It was love at first sight. I could not believe no one else wanted such gems of footwear, at such a low price! I snapped them up, and soon learned why no one else wanted them.

The fabric on the outside was separating from the structure on the inside, and in some places, the upper was crushed, resulting in a lumpy bumpy exterior. Age-related problems aside, there was also the fact that the shoes themselves simply weren't flattering. They were just too pink! Every surface on them, even down to the laces, was the same shade of it. From ankle to heel to toe, they presented an unbroken mass of the gaudy color. When I was wearing them, I felt like my feet had morphed into giant magenta hooves.

What made these boots so ugly while other boots pass unremarked? I think it was the complete lack of distinction between the upper and the sole. I've never been a fan of the hidden platform. It's what makes your "toes look 4 inches thick" in platform pumps, as I complained back in 2016. When you can't tell the difference between the part of the shoe surrounding the foot, and the part that's holding it off the ground, they all just merge together to make your foot appear to be gigantic! On the other hand, when the sole (or platform) is visually separated from the rest of the shoe, then you achieve a more pleasing effect that hearkens to the dainty humanity of the foot within.
Cute wedge boot with just enough pink.
Whoa, way too much pink!

So what these boots clearly needed was visual separation of the upper and lower halves.

How to do it? Well, it took an entire summer of the shoes sitting on top of my bookcase before I committed to a solution—I would paint the wedge.

But before I got into that artsy part of the project, I had to do something about the deteriorated condition of the uppers.

The collapsing portion was easy enough to fix—it just needed to be reshaped, which I did by stuffing it with newspaper and letting it sit for a few weeks. While that was happening, I set to fixing the loosened fabric covering.

Fortunately, the rubber soles were already starting to peel away, so I just levered them a little farther with a screwdriver to get at the spot where the fabric was folded underneath. A little more peeling opened up the fabric far enough that I could stick the screwdriver between it and the stiffer portion of the shoe it covered.

I spread a little outdoor Mod Podge glue on a knife and smeared it around inside the fabric. Then I stuck the fabric back down and hoped for the best. In one place, the glue was too heavy and showed through the other side. I cursed myself for my clumsiness, but it was too late to go back! I just hoped it wouldn't be too obvious when finished.

Now for the exciting part: the new paint job! For this, I decided against anything too crazy or colorful, because – while that makes for a fun shoe – the more colors on an accessory, the fewer outfits it will go with. And I wanted these to serve as all-purpose boots that I could bust out whenever I needed a pink shoe. So that meant I'd have to use a single color of paint that was either a shade or two lighter or darker than the rest of the shoe. Ultimately I decided to go darker, because that would be more grounding (appropriate for the heel of a shoe!) and would probably appear more neutral, thus more likely to complement my clothing.

As for the pattern, I used my "Art Nouveau" sandals as inspiration. I wanted something that seemed light and airy, as though a breeze could pass between the painted areas. I wanted to do a sort of damask floral theme, but my painting skills aren't quite that refined, so I settled on a simpler design of organic curlicues.

I drew the rough sketch onto the shoes with a sliver of soap. I have never before used soap as a fashion marking tool, but I decided to try it for this project because I knew it would wash right out, while I didn't have the same confidence in my black tailor's chalk. It worked like a dream!

I didn't have a real plan—just a few principles to guide me: 1) to follow the line of stitching from the top of the heel to the midpoint of the upper 2) to cover the shape of the wedge as much as possible with a balanced collection of vining curlicues. 3) To fill the gaps where the curlicues left too much white space with little half-asterisks (or daisies, if you prefer).

Once I had a design sketched out on one shoe, I was fairly certain that this was going to work out, and it was time to get some paint! I actually went to the craft store and bought supplies for this project, which is something I rarely do. I paid a whopping 70 cents for a jar of "cherry cobbler" colored acrylic craft paint. I had been hoping for a dark burgundy, but this was the best I could find. I mixed it with a little of my black paint to achieve the darker hue. It still did not give me the burgundy I'd been desiring, but rather a very faintly pink-tinged brown. Well enough would have to do—I went ahead with the painting.
Painting on flocked fabric was more challenging than I expected, as the paint didn't really go on evenly. I had to do a "rough" coat, and then fill in the gaps with a watered-down mixture of the same paint to get smooth edges. I should have taken pictures of this part, but it did not occur to me!

After one side of one shoe was done, I had the challenge of trying to mirror the design exactly on the other shoe. Whereas the first sketch had basically been a free-flowing exercise in creativity, I now had to be precise and match up the lines' positions accurately. It went OK.

I repeated the sketching and painting process for each side of each shoe (with time for drying in between!)

My original vision had called for another asterisk to fill the space at the back of the heel, but that space ended up being bigger than I expected. Instead, I decided to mix things up and finish the heel with a heart-shaped design, and I'm glad I did! It adds a subtle something extra that you might not notice at first glance—a reward for the observant, as I like to call it!


My final steps were to reattach the soles with E-6000 glue and remove the remains of the soap sketches with water and a gentle scrub brush.


Although the first outfit I wore with these boots wasn't really anything special (that's kind of the point—not to detract any attention from the shoes!), I decided, at the last moment, to wear lace-trimmed socks (rather than my first choice of no-show socks), and I'm pleased with the effect! They add a little touch of the baroque, which is right in line with the style of the shoes' artwork.

Unfortunately, after a day of wearing the shoes, I have to say they didn't live up to my expectations. From a distance, the painted portion is hardly distinguishable from the rest, meaning my shoes still look like oversized hooves! And from up close, it is clear that my attempts at gluing down the fabric layer were unsuccessful. I still have some of the paint left, so maybe if I get motivated, I'll have another pass at the glue, and make the painting heavier while I'm at it.

Friday, November 23, 2018

These Boots


Boots with stars are quite overrepresented in my wardrobe, but my newest pair is special, because they're last year's second pair of birthday shoes! Yes, last year. Somehow I managed to wait a year and a couple months between buying these shoes and wearing them, because that perfect occasion I'm always dreaming of took so long to come.

Speaking of taking a long time, I'd been coveting these shoes without taking action for so long that when I finally decided to make my purchase, they were no longer for sale anywhere! After a brief period of mourning, I bought the Mojitos as a consolation prize. Shortly thereafter, I found a used pair on Poshmark, which I explains why I bought myself two birthday presents in 2018. I got these for 85 dollars (plus shipping), making them my cheapest pair of birthday shoes yet!

So anyway, cut to this past Wednesday, the day I finally decided to take these shoes out of hiding. Earlier in the day, I had made a theme out of "darkness," so in the evening, it was a total about-face when I returned to my much more typical M.O. of colors and sparkles galore. The reason for the reversal was karaoke.

I bet you didn't know this, but it's basically an unwritten rule in my book: if you're planning to sing karaoke, you should always plan to wear boots with stars on them!

The last time I blogged an outfit I planned for karaoke, it featured the star boots that I hand-painted.  Of course, that night, I never did sing karaoke, and the boots met their demise very shortly afterwards (lesson learned over the course of many crafting projects, including my Mothra wings: paint on a flexible nonporous surface does not last very long!).

But Friday night was a chance to try again. I was going to a pre-Thanksgiving live karaoke show, and the moment was finally right for glitter-coated boots with metallic shimmering pink stars all over them!


I matched the one non-pink star on the boots with an equally sparkly aqua tank top, donned a pair of white jeans, and topped everything off with some huge star earrings as well. I poofed out my hair like I only do for special occasions, and hit the road!


With all these stars all over me, it was time to act like a star as well as wearing them. It was time for karaoke!

And can you guess what song I sang?

"These Boots Are Made for Walkin'," of course!