Sunday, December 2, 2018

Sewnday

 
These dark days just before the official beginning of winter always fill my heart with sadness...but they also inspire me to work extra-hard to cheer myself up...sometimes resulting in an exciting fashion challenge!

This time around, the challenge is thus: to come up with an outfit to represent each day of the week—like those days-of-the-week-themed socks / underwear you had as a kid (you did have some, right?) but with a literary twist. Since wearing clothes emblazoned with the days of the week wouldn't be much of a challenge (and would probably read a little juvenile, even for my taste), I'm taking a more subtle route and injecting my fashion challenge with some good old wordplay. Each day, I'll wear an outfit that represents the calendar day, but with the word altered just enough to make it fun!

So today, Sunday, becomes "Sewnday"—a day to wear something I've sewn!

That something is a tunic which has its own rather convoluted story to tell. It started out as a black dress which I got in one of my earliest Swap.com orders. When it arrived, I found that one of the sleeves was torn halfway around the wrist (you can even see it in the picture!), so they refunded me and let me keep the dress! I cut off both sleeves at the same length so they would match up, and it helped, but more was still needed.

The skirt had that goofy low-high shape I dislike so much, so I opted to cut the front in a reversed curve—to make it into a high-low shape where the center was the highest part. I made the mistake of not measuring first, and I ended up cutting it a little too short. I couldn't wear it with leggings as I'd planned. Some people are OK with putting their crotch on display, but I am not!

So next, I used a roll of black lace I had purchased specifically for cases like this to get the skirt to a decent length. Unfortunately, the cheap polyester lace was very stiff, so it looked silly, and clung to my leggings like glue, causing the skirt to bunch up with every step.

I removed the lace and let the skirt rest all summer, trying to think of alternative strategies for lengthening the skirt at the front.

Somewhere, possibly Refashion co-op, I had once seen a pretty neat trick wherein a square piece of fabric was inserted into a side seam to add some length, volume, and allover flowiness to a top.

I could do that with this tunic, adding a panel like that to the front to make it more modest and more flashy at the same time.

But what to use for the panel? I had a scarf I'd been trying to sell for a while on eBay with no success. It was a huge satiny square with a motif of pink and blue chains and Chanel logos and...leashes? I wasn't sure what straps and chains were supposed to be, only that I wasn't a huge fan (not a big lover of logomania, me). I have to assume the scarf was a knockoff, given its cheap polyester feel and failure to sell, but if it wasn't, I just sliced up a valuable brand-name item to make into a tacky dress! Call me a rebel.

I ripped out the side seams  of the dress to one-half the width of the scarf. Then I pinned the whole scarf into the gap, just to check that I liked the look. It was a go!

From there, it was just a matter of cutting the scarf into quarters (gasp! The point of no return!) and sewing them into place on the dress (harder than it sounds, figuring out how to get the right sides all facing out!)

The next scary part was cutting up the center of the front to make the home for the final scarf panel. I measured it out to start at the same height as the other two side panels. Because the skirt was shorter in front, this meant that the front slit was shorter than the side ones...which meant the scarf piece didn't fit exactly as the others had.

I positioned it multiple times before I got the bottom edges to line up (I was using No-Sew glue to baste it in place, which was immensely helpful!)

The next part was cleanup. All of the panels had a tiny gap at the top point, which I had to sew shut. The front panel, because it was shorter, also had some excess scarf fabric hiding out at the top, which required sewing down so it didn't reverse itself and pooch out at the front. I also zigzag-stitched over the raw edges of the scarf panels to keep the very fragile fabric from fraying.

I wasn't really happy with the way the front panel lay – it tended to collapse to the inside of the dress – so I tacked it down a few inches from each side seam. It only took a few stitches, but it effectively held the scarf on the outside where it belonged.
I finished the dress yesterday afternoon—just in time for the planned first day of my newest fashion challenge!
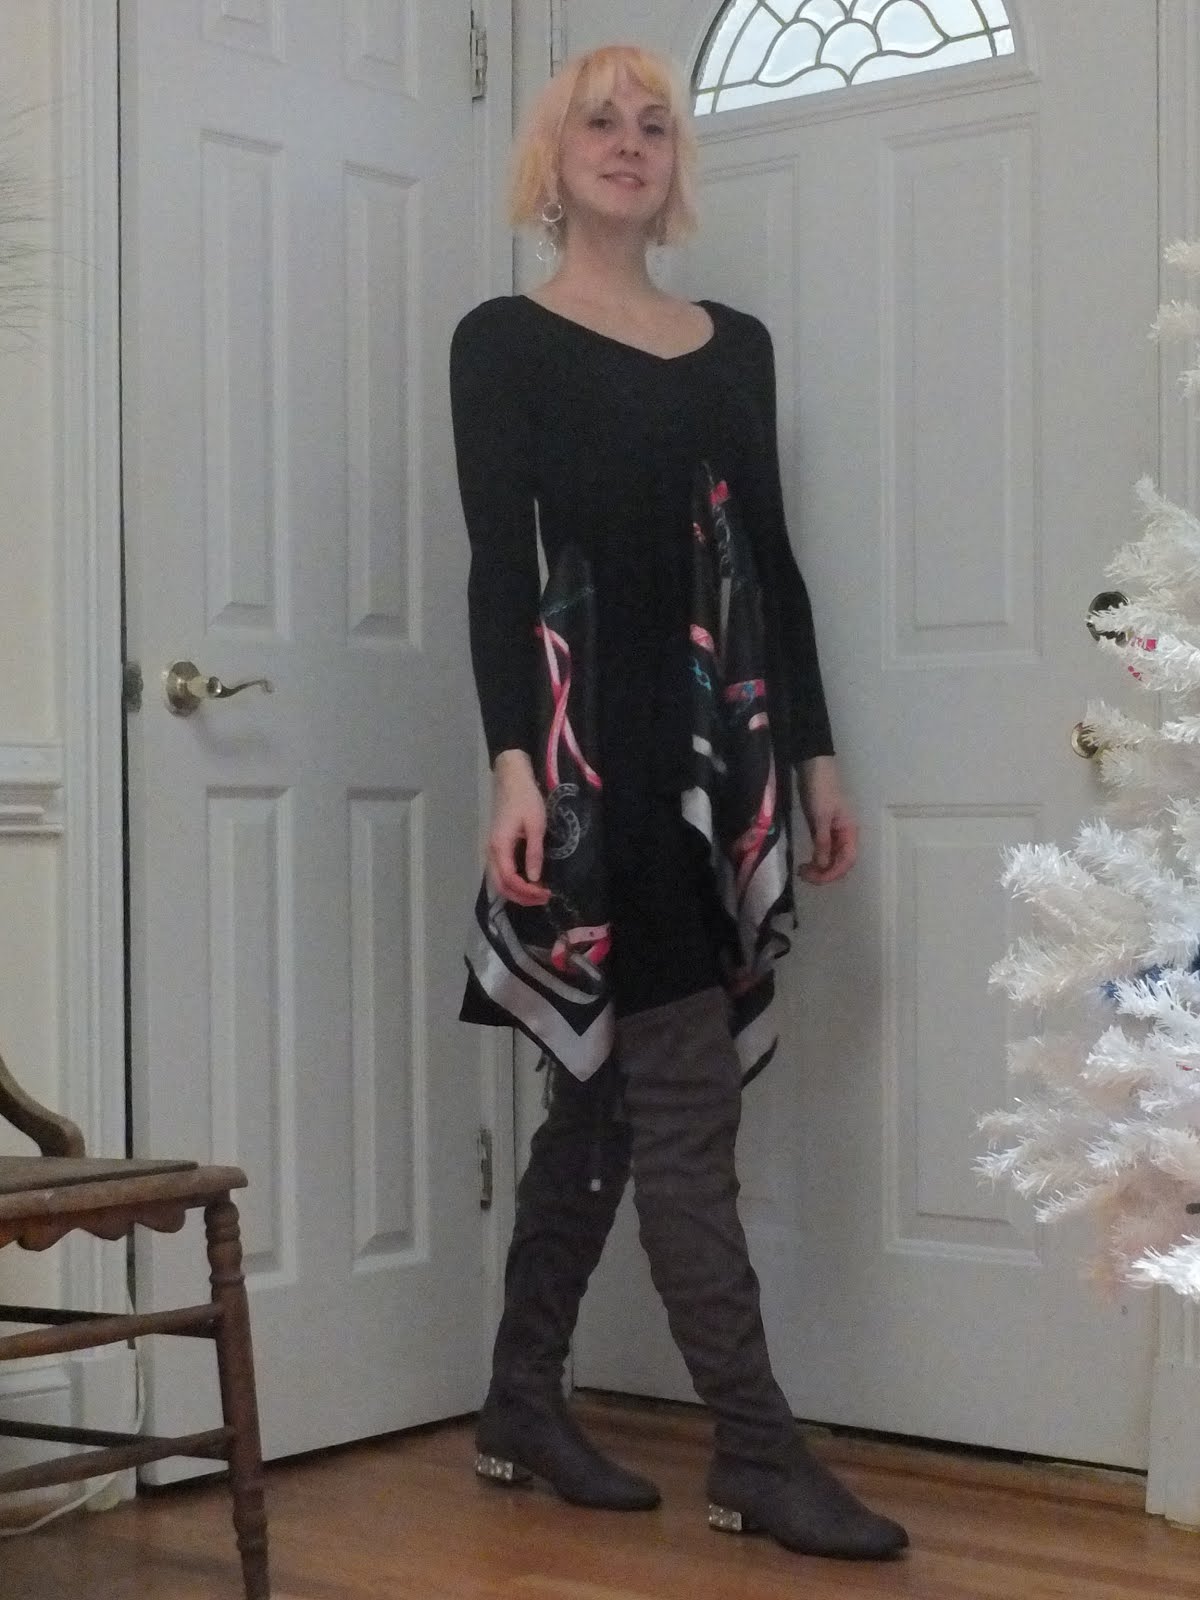


Fortunately, my boyfriend and I actually had somewhere to go today (some Sundays, I don't even leave the house!), so my scarf dress got to see some action. Not much, because the restaurant we had lunch at was so cold, I kept my coat on the whole time. But enough.

And, just to make this blog post longer than it is already, I have to mention that the boots I wore with the dress are one of my favorite recent purchases! I almost didn't buy them (because they were grey, and I already had grey boots), but I'm so glad I did. They have low heels, so they are eminently practical to walk in, but they also have gems embedded in them!


The first time I wore these boots, I got so many compliments, I knew I'd made the right decision. Sometimes, blingy neutrals are better than brights!

Thursday, November 29, 2018

Shoeing the hooves


Last year, I spotted these pink boots at the thrift store for $3.70 (after a 50% discount). It was love at first sight. I could not believe no one else wanted such gems of footwear, at such a low price! I snapped them up, and soon learned why no one else wanted them.

The fabric on the outside was separating from the structure on the inside, and in some places, the upper was crushed, resulting in a lumpy bumpy exterior. Age-related problems aside, there was also the fact that the shoes themselves simply weren't flattering. They were just too pink! Every surface on them, even down to the laces, was the same shade of it. From ankle to heel to toe, they presented an unbroken mass of the gaudy color. When I was wearing them, I felt like my feet had morphed into giant magenta hooves.

What made these boots so ugly while other boots pass unremarked? I think it was the complete lack of distinction between the upper and the sole. I've never been a fan of the hidden platform. It's what makes your "toes look 4 inches thick" in platform pumps, as I complained back in 2016. When you can't tell the difference between the part of the shoe surrounding the foot, and the part that's holding it off the ground, they all just merge together to make your foot appear to be gigantic! On the other hand, when the sole (or platform) is visually separated from the rest of the shoe, then you achieve a more pleasing effect that hearkens to the dainty humanity of the foot within.
Cute wedge boot with just enough pink.
Whoa, way too much pink!

So what these boots clearly needed was visual separation of the upper and lower halves.

How to do it? Well, it took an entire summer of the shoes sitting on top of my bookcase before I committed to a solution—I would paint the wedge.

But before I got into that artsy part of the project, I had to do something about the deteriorated condition of the uppers.

The collapsing portion was easy enough to fix—it just needed to be reshaped, which I did by stuffing it with newspaper and letting it sit for a few weeks. While that was happening, I set to fixing the loosened fabric covering.

Fortunately, the rubber soles were already starting to peel away, so I just levered them a little farther with a screwdriver to get at the spot where the fabric was folded underneath. A little more peeling opened up the fabric far enough that I could stick the screwdriver between it and the stiffer portion of the shoe it covered.

I spread a little outdoor Mod Podge glue on a knife and smeared it around inside the fabric. Then I stuck the fabric back down and hoped for the best. In one place, the glue was too heavy and showed through the other side. I cursed myself for my clumsiness, but it was too late to go back! I just hoped it wouldn't be too obvious when finished.

Now for the exciting part: the new paint job! For this, I decided against anything too crazy or colorful, because – while that makes for a fun shoe – the more colors on an accessory, the fewer outfits it will go with. And I wanted these to serve as all-purpose boots that I could bust out whenever I needed a pink shoe. So that meant I'd have to use a single color of paint that was either a shade or two lighter or darker than the rest of the shoe. Ultimately I decided to go darker, because that would be more grounding (appropriate for the heel of a shoe!) and would probably appear more neutral, thus more likely to complement my clothing.

As for the pattern, I used my "Art Nouveau" sandals as inspiration. I wanted something that seemed light and airy, as though a breeze could pass between the painted areas. I wanted to do a sort of damask floral theme, but my painting skills aren't quite that refined, so I settled on a simpler design of organic curlicues.

I drew the rough sketch onto the shoes with a sliver of soap. I have never before used soap as a fashion marking tool, but I decided to try it for this project because I knew it would wash right out, while I didn't have the same confidence in my black tailor's chalk. It worked like a dream!

I didn't have a real plan—just a few principles to guide me: 1) to follow the line of stitching from the top of the heel to the midpoint of the upper 2) to cover the shape of the wedge as much as possible with a balanced collection of vining curlicues. 3) To fill the gaps where the curlicues left too much white space with little half-asterisks (or daisies, if you prefer).

Once I had a design sketched out on one shoe, I was fairly certain that this was going to work out, and it was time to get some paint! I actually went to the craft store and bought supplies for this project, which is something I rarely do. I paid a whopping 70 cents for a jar of "cherry cobbler" colored acrylic craft paint. I had been hoping for a dark burgundy, but this was the best I could find. I mixed it with a little of my black paint to achieve the darker hue. It still did not give me the burgundy I'd been desiring, but rather a very faintly pink-tinged brown. Well enough would have to do—I went ahead with the painting.
Painting on flocked fabric was more challenging than I expected, as the paint didn't really go on evenly. I had to do a "rough" coat, and then fill in the gaps with a watered-down mixture of the same paint to get smooth edges. I should have taken pictures of this part, but it did not occur to me!

After one side of one shoe was done, I had the challenge of trying to mirror the design exactly on the other shoe. Whereas the first sketch had basically been a free-flowing exercise in creativity, I now had to be precise and match up the lines' positions accurately. It went OK.

I repeated the sketching and painting process for each side of each shoe (with time for drying in between!)

My original vision had called for another asterisk to fill the space at the back of the heel, but that space ended up being bigger than I expected. Instead, I decided to mix things up and finish the heel with a heart-shaped design, and I'm glad I did! It adds a subtle something extra that you might not notice at first glance—a reward for the observant, as I like to call it!


My final steps were to reattach the soles with E-6000 glue and remove the remains of the soap sketches with water and a gentle scrub brush.


Although the first outfit I wore with these boots wasn't really anything special (that's kind of the point—not to detract any attention from the shoes!), I decided, at the last moment, to wear lace-trimmed socks (rather than my first choice of no-show socks), and I'm pleased with the effect! They add a little touch of the baroque, which is right in line with the style of the shoes' artwork.

Unfortunately, after a day of wearing the shoes, I have to say they didn't live up to my expectations. From a distance, the painted portion is hardly distinguishable from the rest, meaning my shoes still look like oversized hooves! And from up close, it is clear that my attempts at gluing down the fabric layer were unsuccessful. I still have some of the paint left, so maybe if I get motivated, I'll have another pass at the glue, and make the painting heavier while I'm at it.

Friday, November 23, 2018

These Boots


Boots with stars are quite overrepresented in my wardrobe, but my newest pair is special, because they're last year's second pair of birthday shoes! Yes, last year. Somehow I managed to wait a year and a couple months between buying these shoes and wearing them, because that perfect occasion I'm always dreaming of took so long to come.

Speaking of taking a long time, I'd been coveting these shoes without taking action for so long that when I finally decided to make my purchase, they were no longer for sale anywhere! After a brief period of mourning, I bought the Mojitos as a consolation prize. Shortly thereafter, I found a used pair on Poshmark, which I explains why I bought myself two birthday presents in 2018. I got these for 85 dollars (plus shipping), making them my cheapest pair of birthday shoes yet!

So anyway, cut to this past Wednesday, the day I finally decided to take these shoes out of hiding. Earlier in the day, I had made a theme out of "darkness," so in the evening, it was a total about-face when I returned to my much more typical M.O. of colors and sparkles galore. The reason for the reversal was karaoke.

I bet you didn't know this, but it's basically an unwritten rule in my book: if you're planning to sing karaoke, you should always plan to wear boots with stars on them!

The last time I blogged an outfit I planned for karaoke, it featured the star boots that I hand-painted.  Of course, that night, I never did sing karaoke, and the boots met their demise very shortly afterwards (lesson learned over the course of many crafting projects, including my Mothra wings: paint on a flexible nonporous surface does not last very long!).

But Friday night was a chance to try again. I was going to a pre-Thanksgiving live karaoke show, and the moment was finally right for glitter-coated boots with metallic shimmering pink stars all over them!


I matched the one non-pink star on the boots with an equally sparkly aqua tank top, donned a pair of white jeans, and topped everything off with some huge star earrings as well. I poofed out my hair like I only do for special occasions, and hit the road!


With all these stars all over me, it was time to act like a star as well as wearing them. It was time for karaoke!

And can you guess what song I sang?

"These Boots Are Made for Walkin'," of course!

Thursday, November 22, 2018

Into the darkness


One of the hallmarks of my style is "all bright colors, all the time." Even on those rare occasions when I anchor my outfit with something dark, I almost always use splashy accent colors to balance the look. Case in point: When I decided to build yesterday's outfit around my navy blue palazzo pants, my first instinct was to look for a pale neutral sweater to wear on top. However, as I was pulling a few tan and ecru candidates out of the closet, I began to feel the inexorable pull towards the dark side.

When my eyes lit on this forest green blouse, I knew my fate was sealed. I was descending into the shadows, and there was no hope of returning!

You might remember this blouse from its debut appearance two years ago. Back then, I had recently purchased it from Swap.com, and the tag had contained detailed instructions on how to preserve its "crinkled" look. Well, it was definitely wrinkly, but I wouldn't go so far as to say it was crinkled, and I decided I'd much rather have a nice smooth surface than an imperfectly crinkled one, so I ironed it into near-submission for its first few wears. Since then, though, I've decided near-submission wasn't good enough. If it was going to have any texture at all (as it did), it would be better to have a ton of it! I made an effort to re-crinkle it (the challenge is in avoiding strangely angled creases in the armpit region), and the result is what you see today.

 
It also happens to perfectly match this new pair of sparkly green high heels that I just bought. I already wore them once this week, so you know that I really felt that the combination had promise, if it was enough to make me re-wear a pair of shoes after just one day!

My moody theme was going along swimmingly, except that I didn't have any earrings that really spoke to me (a necklace was out of the question, given the embellished neckline of the blouse). But not to fear! When I opened my bracelet box to see if I could find something appropriately somber, what I found was even better: something sinister!


I've had this snake-shaped bracelet for years. I bought it because I thought it might make a good addition to a Halloween costume, but I never did use it that way. I think I might have worn it once or twice, as an insignificant part of some inconsequential outfit,* but never has it served such a role as it does here! The slithering serpent with its evil emerald eyes was the perfect add-on to my emo ensemble...and also the perfect storm of alliteration and assonance, thank you very much!


* Digressive side note: The bracelet almost featured big in my Garden of Eden outfit, but I decided I really wanted to wear the snake earrings, which I had only recently bought because I thought they would go well with the bracelet. In the end, I did not wear the bracelet with them because I figured two serpents were already technically too many to be true to the story.

Monday, November 12, 2018

Going sleeveless in November


Yesterday, my boyfriend and I went to Emporiyum, a food vendor fair in DC. I knew I wanted to wear something a little more exciting than my usual Sunday uniform of jeans and boots, but I didn't know what to expect from the climate at the event. It was supposed to be indoors, but it was also supposed to be pretty cold outdoors. Vendor fairs are often held in cavernous drafty halls, and if people were allowed to come in and out at will, it could get quite chilly! On the other hand, it could also be very crowded, and the combined body heat of hundreds of attendees could make it quite toasty!

How to prepare for the equal possibilities of too much heat and too much cold? Well, how about this interesting garment?


When I found it on Swap.com (for 2$), it was described as a "sweater," so I expected it to be hip length or shorter. I thought it would be loosely knit, and the perfect tool to achieve a boho vibe on summer days.

Wrong! The solid portion cleanly covered my butt, and the fringe extended down to mid-thigh. It was clearly more of a dress than a top, and it was way too thick and heavy for a summer outfit. But with huge armholes and no sleeves, it didn't seem very practical for winter either. The one thing it might be ideal for was the uncertain temperatures at Emporiyum. The heavy fabric would keep (most of) me warm if it proved to be cold, but the lack of sleeves could be a saving grace if it proved to be hot.

I layered the dress over a brown camisole, to cover up under the gaping armholes. For my legs, I went full-on winter with heavy knit tights and some brown flat boots (the "story for another time" I promised isn't really much of a story, but in case you were wondering, these are the boots I bought at the thrift store in Nashville).

To accommodate for colder temperatures, I wore a pair of floral arm warmers my mom got me for Christmas last year (one of my all-time favorite gifts, even though they were both left-handed, and I had to detach and reattach the thumb of one of them before it was wearable!) My outrageously large teal dangle earrings just happen to match the leaves on the gloves!


For the final removable layer of warmth, I picked a light denim jacket. It wouldn't be enough to keep me warm if I ended up standing outside for long periods (so I kept a wool coat in the car just in case), but it ended up being just right for the event. The fair was held in a building, but one of the two rooms was semi-outside (enclosed in the heavy clear plastic walls that are common at winter events). When we arrived, it was crowded but not too crowded, and cold but not too cold, and my jacket and arm warmers were just right to keep me warm. By the time we'd been there for 20 minutes, it was packed, and I was quite comfortable removing my jacket and stuffing it into a bag.

I noticed almost everyone else in the fair was dressed to the nines in their winter gear, so I'm actually astonished I was able to stay comfortable in a sleeveless dress. But then again, my thermoregulation has always been unpredictable, and maybe, when my body wants to be free of confining sleeves, it finds its own way to make it work!

Friday, November 2, 2018

No Repeats


One of the principles that guide  my fashion life is that of consistent inconsistency. I won't wear the same main color two days in a row, I won't wear the same main garment type two days in a row, I won't wear the same shoes two days in a row. Anything that is more noticeable than a basic staple has to have a rest period (varying from a week to a couple months, depending on just how noticeable it is) before I wear it again. If I can remember ever wearing a certain combination of clothes, I really, strongly hesitate to wear them together again. Ever.

Fortunately, I don't have great recall (Usually I struggle to remember what I wore one day prior), so I can happily re-wear a lot of outfits since I forget them in the meantime...but once I blog one of my outfits, it's game over. The photographic evidence is out in public, proving that it's been done before. Which makes me even less likely to forget other non-blogged outfits, featuring the same primary items. Even this usually isn't a problem, because I tend to retire most of my clothes after 2-3 years, so then I don't need to worry about re-wearing them any more. But there are some garments that I am loath to part with.

One example is this blue and white caftan top. It's a funny thing for me to want to keep, as it's not really terribly flattering on my body (tending to accentuate my broad shoulders and make me appear top-heavy), but I just can't resist its inherent versatility! It's got the perfect sleeve style for a transitional-weather-day like today, where it's too cool for summer clothes, but anything too wintry would make me feel stifled. It's loose and breathable, but provides ample coverage against a chill in the still air. And also, I really just like the pattern!

The problem is that since I've had it for 3 summers and some change, I've basically run out of new ways to style it. I've worn it with black leggings; I've worn it with white pants; I've worn it with navy blue pants; I've worn it outside my color comfort zone and paired it with yellow shoes. Since I'm incurably matchy-matchy in my personal style, you know that once I start adding bold accent colors, I'm running out of ideas.

But today I wanted to wear it again. And I needed a novel color pairing for it.

To choose this color, I used a technique that I might as well give a name—we'll call it Stare & Pair.

Stare & Pair—the catchy name for a technique that probably doesn't need one!

Simply take the piece that you want to find a mate for (in this case, it was my blue & white sweater), and set it down as close as possible to the collection of candidates for pairing with it (in this example, my stack of colored skinny jeans). Then allow yourself to take in the whole picture, all the colors and possibilities, and just gaze unfocusedly. At some point, your eyes should be drawn to one candidate in particular. In this example, it was my purple jeans. There's really no difference between this technique and just trying on tons of outfits in sequence, except it takes a lot less time!

So I'd selected a new and untried color of pants to wear with the sweater. Great!

The next step was finding the third piece—the accessory or shoe or jewelry to finish everything off. I used the Stare & Pair method to narrow my options down to a couple pieces of lavender jewelry. That was a rather exciting development, because it introduced a new layer of complexity into my color palette! If I were to wear lavender jewelry, that meant I could also wear lavender shoes, which would be much more interesting than the white or blue I almost always combine with this shirt.

By the time the outfit was completely assembled, I was pretty delighted. Usually my first wear of an article of clothing is also the most inspired, and all my subsequent outfits go downhill from there. But in all the years I've been wearing this caftan top, this new combination of clothing is probably my favorite! Sometimes, refusing to allow yourself an outfit repeat can really have unexpected benefits!

Monday, October 29, 2018

Dogzilla vs. Mothra


I grew up in a household steeped in Godzilla. My dad was a huge (big? moderate?) fan, and had several Godzilla figurines that were fun to play with when I was a kid. Beyond that, however, and a theater viewing of Godzilla 2000, I didn't develop much interest of my own in the movie monster.

Until I decided to do a Bridezilla costume for Halloween in 2013. I watched a couple of Godzilla films to help me get into character, and once I saw Mothra vs. Godzilla, I fell in love. With Mothra, that is! A giant monster, who also happens to be a moth, who is in a team with twin singing fairies, who also happens to save the earth? What more could a wannabe geek girl want?

Later that year, I tried to make a T-shirt with Mothra's likeness, using the last of my opaque T-shirt transfer paper and some permanent markers, but the effort was a failure, and I was forced to leave my public declarations of love for Mothra unspoken. Until, several years later, I thought to make her into a Halloween costume. A way better option than a tiny image on a shirt!

I started construction of my Mothra costume last September, but it was becoming clear to me that despite my infatuation with the greatest movie monster ever invented, not many other people even know who Mothra is. I hesitated to bring her to a party where she would not be recognized. 
 
 
So I finished painting the wings (laboriously, on both sides of an old shower curtain, which I do not recommend as the paint flakes right off), sealed them with a clear rubber coating to hopefully keep the flaking to a minimum, and rolled them up, never to be seen again until the next year.
 
 
It was sometime in between last Halloween and this one that I realized Mothra might have a higher recognition rate if she appeared with her nemesis, Godzilla. But since I'd stupidly thrown away my human-sized Godzilla spines, I really wasn't keen on making another version of them. Maybe in a smaller scale it would be OK. Maybe in a dog-sized scale. Maybe, my companion in Halloween tomfoolery would have to be Dogzilla.

It was settled. When October rolled around this year, and I learned that the annual Sugarloaf Mountain Vineyard Howl-O-Wine party (the one where Jack Jack and I won a prize for our spider/web costume!) was three days away, I decided (rather belatedly!) to get cracking on a couples costume for me and Kodiak.

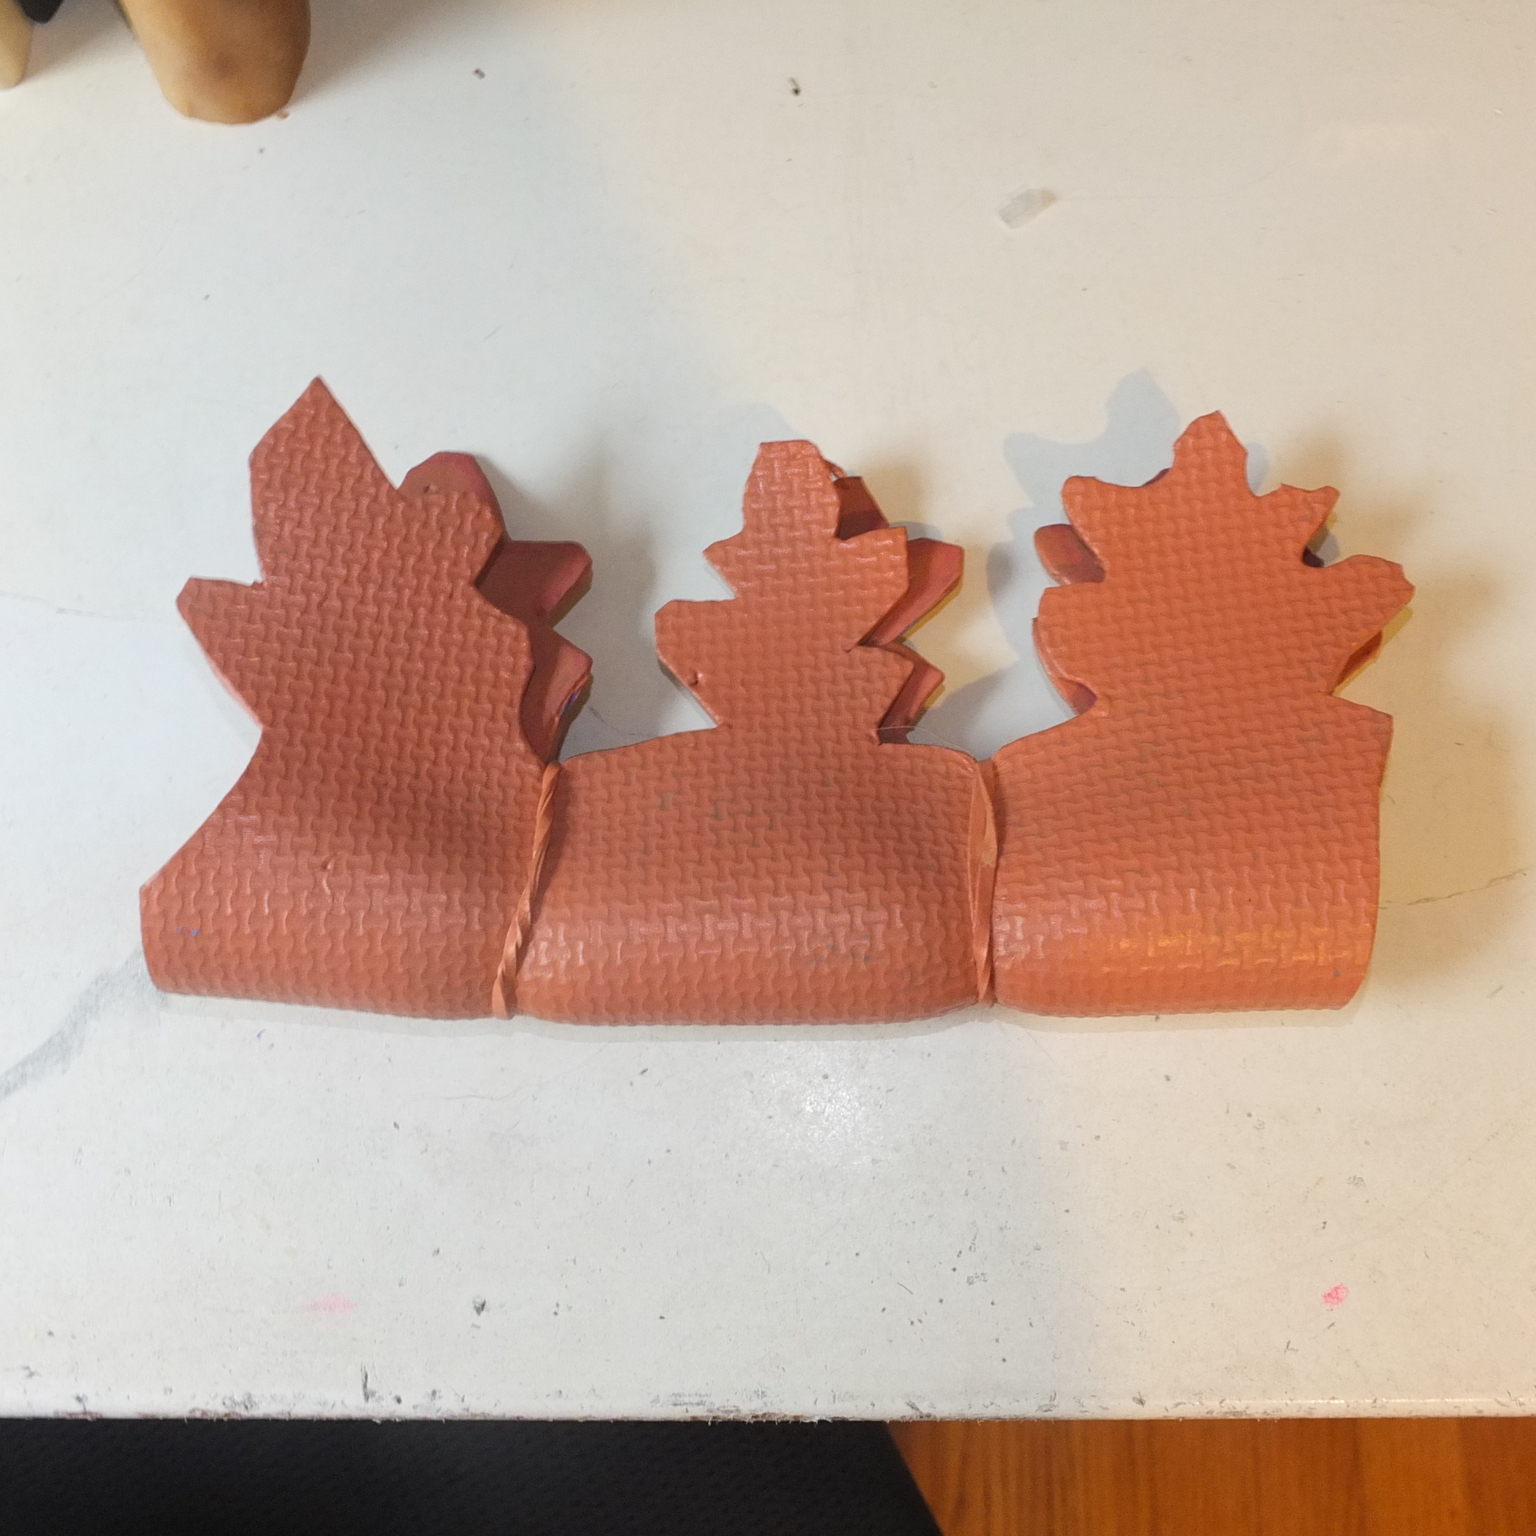
I made his spines out of a yoga mat that he himself had conveniently torn to shreds, and painted them with some rust-colored paint I had lying around that almost matched his coat.
 
I found an old T-shirt that I'd partially destroyed already for another sewing project, which happened to fit the dog fairly well, so I dyed it with a watered-down mixture of the same paint, and made a jacket to which the spines could be attached.
 
I sewed the spines on in alternating rows, bracing them against each other so they would stand up straight (spoiler! They didn't!)
 
I also made Kodiak a Dogzilla tail with more of the yoga mat, which I attached around his own tail using a couple of rubber bands (word to the wise: a dog who likes to wag his tail is not going to be wearing a tail accessory for very long!)


With Dogzilla finished and just one day to go until the festival, I set out to make my Mothra costume more complete, starting with the furry antennae. I have a few fur scraps left over from my Rabbit in a Hat costume, so I wrapped two of those around lengths of wire and attached them to a headband. They are removable and reusable!
 
A pair of blue sunglasses look remarkably like Mothra's glowing eyes.

I had to find some way of supporting the wings, so I made some elastic bands for my fingers and wrists and carefully threaded them through slits I cut in the shower curtain. I used a metal snap to hold the center of the wings to the back of my shirt.

Mothra has legs sticking out of her chest, but I am not that crafty, so I ignored that rather important feature and focused on getting the general color scheme right. A black underside with a furry back could be accomplished with a white fur-textured sweater (it happened to be one I bought but didn't use for my rabbit in a hat costume) with a black strip glued to the front (black strip being another part of a previously cannibalized T-shirt). 
 
Black shorts, because it was a gloriously warm day for October, and orange sandals just because I could, and I was done, ready to save the world from my adorable foe!


This was a complicated costume, but it cost me nothing except the paints I used on the wings, which probably totaled around 16 dollars. Sadly, it won me no prizes, but I guess defeating Dogzilla is accomplishment enough.

Until he comes back from the dead...