Tuesday, August 30, 2016

Vegetable Valerie

 
It's been almost 2 and a half years, but I finally got around to dyeing my hair a new unnatural color again!

I did it on Friday, and, while I had an plan for incrementally changing the color to something less dramatic in time for work on Monday, I loved the green so much I had to let it be. The color may be already fading, but I felt like a green goddess for the first few days of my new look... and you know what you put green goddess on? Salads! So what better place to snap my style than in the produce section of my local supermarket?

Actually, I'm stretching my associations a little here, and the weird fluorescent backlighting doesn't do the colors justice...so here's another picture taken in more natural light.


Normally when sporting dramatic hair colors, I don't try very hard to coordinate my hair to my outfit (or I'd basically be limited to the same 3 or four colors for the entire tenure of my dye job!) but for my first day of work with the hair, I made an effort, wearing a neutral dark brown dress and perfectly matching green shoes. The shoes feature pink and black beads, so I felt like I had to work some pink in somewhere else, in the form of my necklace.

Sunday, August 28, 2016

Converting clip-on earrings to dangle earrings

The last time I shared a DIY for modifying clip-on earrings for pierced ears, I used a pair of rose-shaped earrings. Thus it is only appropriate that for my second post on the subject, I am also using rose earrings!
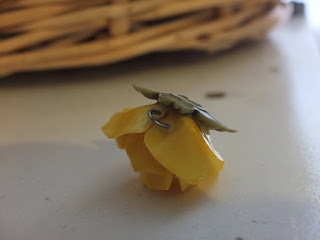
The matched set I inherited from my grandmother was probably made in the 1950's (the golden age of clip-on earrings). The resin flowers were in excellent condition, but the brass findings were tarnished and sorry-looking. I've had them for going on 20 years, and I might have worn them once in all that time. I'm sometimes hesitant to defile an antique, but I figure earrings are made to be worn, and if they weren't getting worn as clip-ons, I could do them better honor by converting them to a style I would actually use.

A pair of needle-nosed pliers handily removed the backings from the plastic with just a little twist and no damage to the flowers!

I decided that I would dangle the flowers from chains, much like my homemade wire-wrapped geode earrings, but how to attach them to the chains?

It seemed like they would balance best if I just attached the chain to the back of one of the rear petals, but unless I wanted to punch a hole in the flower (I didn't) I would have to use glue to make a new attachment point.

It was time for me to try, for the first time, my 5-Second-Fix adhesive!

From the posts of a couple of retired stud earrings, I formed arches with the aid of my round-nose pliers, then I cut off the excess.

Then, I dabbed a tiny amount of 5SF onto the back of the flower, dropped the arch into position, and cured it using the UV light.

Unfortunately, my shaky hands were not up to the task of holding the arch in place, even for 5 seconds, while the resin cured, so it kind of collapsed against the petal instead of standing up as I would have liked.

Fortunately, the coating of 5SF was light enough that I could tilt the wire back where I needed it, and then it stayed there long enough for me to apply one more coat of the adhesive to lock it into place. This was my first experiment with 5-Second-Fix, and, while I wouldn't try to make these earring hooks pull a truck, I feel reasonably certain that they'll hold up to everyday use.

I followed the same steps on the other flower, and then I was ready to make them dangle.

Originally, I used bits of chain (salvaged from previous necklace-shortening projects), but after wearing them a day, I found that the flowers spun around too much and were facing backwards as often as they were facing forwards, so I decided to replace the chain with something a bit more structured.

Enter the oval earring pendant hoops! These came in a beading kit I got ages ago (seriously, I think I was like 10), and it took me until now (age 33, thanks) to realize what they are good for: hanging a dangling bauble from your ear and ensuring it will consistently face the same direction!
With my yellow roses duly suspended from their new supportive hooks, I can wear them with confidence, secure in the knowledge that their backs will never be facing forward! 

I also think they are a great complement to my new green hair!

Saturday, August 27, 2016

DIY wire-wrapped pendant earrings

Since I cut my hair short, I've been making a push to acquire earrings that dangle beyond the edge of my hair, so that they can actually be seen! That process has forced me to learn a new art: making pendant earrings. What is a pendant earring? Well, to be honest, I just decided on that term, but in my book, it is a dangle earring in which the point of interest is a gem or charm that is hung from the ear by a wire or chain.

The very first pendant earrings I ever made were these asymmetrical wire-wrapped crystal earrings. Here's the story of how I made them!

The story begins last September, when I returned from a trip to the West with a crack-your-own geode in my bag. It took months before I was ready to break it, because I promised a travel buddy that I wouldn't break it open without him present. When the geode finally cracked (it was quite an effort, and I probably should have scored it first to create a more even break), it was a spectacular sight, and I was loath to throw away even the smallest pieces of beautiful sparkly quartz. 
 
The three largest pieces took up a place of honor on my crystal windowsill (it has been in 4 different houses now, but I always have one window in which I display my crystals), while the smaller ones took up residence with my jewelry-making supplies, while I pondered what to do with them.

Since none of the pieces were similar in size, I decided I'd have to play up their asymmetry, so I made a plan to use three of them: one big one for one ear, and two smaller ones for the other ear. And I decided the only suitable way to prepare them for making into jewelry was to wire-wrap them.

I adore wire-wrapped crystals, but my last effort at making one didn't turn out that beautiful (I ultimately un-wrapped it, and it remains in my jewelry supplies to this day!). This time, I had to do better, so I consulted a few tutorials before beginning my journey.

Of course I can't find most of the ones that I originally looked at, but here is one of them, and a tutorial I just found today which looks pretty helpful:
Though in the end, I pretty much winged it, I did learn a couple of valuable things from the tutorials. You know when you see those wire-wrapped crystals in the store, and they frequently have randomly-placed zigzags in some of the wires? I always thought that was just for visual effect (and kind of a cool one), but it turns out they actually serve a purpose—they serve to tighten the wire around the stone! 

The other thing I learned was that it can help to start with the bail (the loop that jewel actually hangs from) before beginning to wrap the wire.

Armed with my new knowledge of functional zigzags and where to start, I had another go at wire-wrapping my crystals. I wasn't intending to blog this process, so I took no photos (sometimes when you're learning a new skill, you don't want to be bothered with taking pictures, too!). Sorry!

To get the crystals to actually dangle, I had specifically chosen gold wire because I was going to suspend the pendants from chains, and I only had gold chain. I cut three differing lengths of gold chain (with my handy-dandy wire cutters) and meticulously threaded them onto earring hooks.

When all was said and done, I had some flashy yet earthy jewelry that nicely complements some of my more bohemian attire.
Sadly, the "gold" chain blackened after just one wear—that's what you get for using free chain that you cannibalized from a free promotional product!


I didn't intend for the two stones on the one earring to end up at the same length, but somehow they did (one of them also broke). So later on I might revise this piece with better chain and more asymmetry.

Wednesday, August 17, 2016

Match Making


Two years after its purchase, I still like my burgundy sleeveless tunic, but I still have trouble finding ways to wear it. We've been having a heat wave, with temperatures hitting 90° almost every day for the past 2 weeks, and I have no interest in wearing tight pants—my usual companion to an extra-long blouse. The other way I usually wear this top is over a short ecru skirt, but I'm tired of that look.

Today, I decided to step out of my comfort zone and try it tucked into my blue paisley skirt. The skirt originally came with an ornamental waist tie, but over several wears, I found that I usually layered the skirt under a shirt, and the waist tie just created unnecessary bulging. So I removed the tie, but kept it around because you never know when you might need something like that again. Today, I needed it!

The blue of the skirt and the wine-red of the shirt were similar enough that they complemented each other, but the large blocks of color didn't really create a cohesive whole. So I attached the tie to the collar of my shirt to help create unity between the two disparate elements.

Repeat It Again.

Wearing a solid-color top and a different-solid-color bottom can make your outfit look incomplete. It can help to replace one of the solids with a neutral or a pattern—even if it is a monochromatic pattern. But it helps even more to repeat the color somewhere else in your outfit! This is similar to one of my oldest style tips – break it up, tie it together – but, since it's all about the virtues of repetition, I don't feel bad mentioning it again.

I paired it with navy blue boat shoes (I tried beige ones first, but all the dark colors in the outfit called for dark-colored footwear) and blue earrings to continue my efforts at color matching.

Sunday, August 14, 2016

'Twas the night before a party


The obligatory "before" pic
'Twas the night before a party, and all through the house,
The Unfashionista was quite freaking out!
She was trying to act like she just didn't care...
But it was her birthday, and she had nothing to wear!
She had lots of old dresses, a tank top or two,
But she wanted to wear something special—and new!
Through her closet she rifled, awash with dejection,
And sadly was scanning her Projects collection,
When what to her wondering eyes should appear,
But an abandoned refashion from sometime last year!
A star-covered dress that she'd taken apart,
Then stopped because she'd just not known how to start.
By now it was past time for going to bed,
But ideas were forming inside of her head.
That old unloved dress...she'd make use of it yet,
Making something she'd wanted—a crop top matched set!
From her sewing machine, there arose such a clatter,
It was late, she was tired, but none of that mattered!
With just a few zippers, some hems and some seams,
She converted that frock to the dress of her dreams!
Her eyes—how they twinkled! She even felt merry!
She'd succeeded in something she once had thought scary!
She smiled as she put her equipment away,
Relieved that she'd be looking great the next day.
She thought to herself as she turned out the light,
Happy birthday to me, and to me a good night!

Editor's note: In the interest of a readable poem, some facts were omitted. This dress was not made for the Unfashionista's birthday (that was last week), but it was her birthday party. The dress was also not 100% finished when our protagonist went to bed, but she had reached a good stopping point, and only needed to tweak the fit a little bit the next morning.

Another interesting wrinkle in this fabric yarn (if you can't tell, I'm in the mood for fun with words today!) is that when I was finished writing the poem and was ready to upload pictures, all of a sudden my computer started acting so weird I had to shut it down. When I returned, I found that my poem had been lost! I had to rewrite the whole thing from memory, but I think the second version might be even better than the first (I added a verse that I think ties the whole thing together, but we'll never know for sure!)

Monday, August 8, 2016

Boxer Shorts and Baggy Blouse

 
Over the winter, I bought a lot of 5 pairs of shorts for $10.53 on eBay...not because I really needed any more shorts, but because I was suckered in by the one colorful pair in the bunch—a red satin one with the tags still on! Sadly, when the lot arrived, I found all 5 pairs too big, even the ones that were nominally my size. I sold the one that I thought was beyond hope (not only too big, but too short), and kept the others for re-fitting. 

Resizing pants is no fun, but shorts are fairly forgiving in fit, and fortunately these ones were all a fairly thin material for sewing (no heavy denim, thank goodness!), so I found it easy enough to modify them with a couple of darts at the waistband.

I simply measured how much I wanted to take off at the top, pinched, pinned, and sewed, trying to end my dart at the bottom of the waistband. The red satin shorts were now wearable!

I call them boxer shorts because they remind me of the red satin shorts that boxers wear in movies.

But in my case, I didn't wear them for an athletic event, I paired them with even more satin for a glam Sunday dinner!

It was another appearance of my yellow floral one-shoulder top! Featuring huge splashes of red, it was a natural companion to the red shorts...but I found that the red was all getting hidden within the folds of the shoulder. Fortunately there was a simple fix that required only a little bit of outside-the-box thinking—I turned the shirt backward! With a big baggy sack of a top like this, there's no real difference between front and back (other than where the tag happens to be), so it's an easy trick to pull off. The print on the backside was slightly different, featuring a big red flower front and off-center!

Astonishingly, as I was departing my dinner and tugging the hem into place for the 50th time of the day, I realized I'm getting bored with this shirt. Although last year, I sang its praises with my whole heart, after 4 years of ownership, I've now worn it in every possible combination—with black pants, with jeans, with shorts, with yellow heels, with blue heels, with pink wedges, with flat black sandals. It no longer holds the strange allure that it did when it was new. It might be finally time to retire it, so consider this blog post a fond farewell!

Saturday, August 6, 2016

Valerie can be bought


One of the interesting things about fashion is that manufacturers often give their styles arbitrary female names. I guess it's a good way for companies to keep stock of their inventory; lest they be titling all their shoes with tongue-twisters like "that blue stiletto with the black lace overlay and the velvet lace-up ties"—a recent purchase of mine that also goes by the much simpler "Meka." Another practical benefit for the sellers? It just might encourage shoppers to buy a shoe with their name on it. It worked on me!

I found the outrageously bright-colored floral shoe called Valarie while browsing a sale on ShoeDazzle, placed it in my cart, and then failed to check out because, "Really, is it really worth paying 20 dollars just to have a shoe with your name on it? It's not even spelled right!" But I'm glad I waited because,  a few months later, ShoeDazzle held an even better sale, and I was able to get Valarie and 3 other pairs of shoes, for an average 10.19$ each!

Now, as a general rule, I avoid shoes with wild prints because they aren't very versatile—only looking good with really plain clothing. But, but, this one had my name on it!

The elusive "Valerie" dress
So there you have it. I was compelled to purchase a shoe I wouldn't have otherwise, simply because it happened to share my name. That's marketing for you. On a related note, I once found a dress named Valerie at eShakti. Unlike the dubious floral shoes, this dress was right up my alley – green and nature-y and asymmetrically embellished – but I chose not to buy it because of its price. Then I regretted it forever after. It's no longer sold on eShakti, so I keep an ongoing search for it on eBay, in the hopes that I'll one day find it in my size.

But back to the shoes. What better day to wear a shoe bearing your name than on your name day (I assume that that's the Game of Thrones equivalent to a birthday)? Yesterday was Valerie's day, and the day I wore Valarie on my feet!

I paired the shoes with the only thing in my closet that looked good with them—an all-black two-piece ensemble (unrelated separates that just happened to look like they were made to be together! Until I looked at them in bright sunlight and found they were actually two shades of black.)
But all-black is too somber for a day of celebration, so I popped on a set of yellow rose jewelry! You may remember the brooch from my grandma's collection, but I've never blogged about the earrings...to be honest, I don't remember if I've ever actually worn them. They were originally clip-ons, and they looked comically huge attached to my lobes, not to mention that clip-on earrings are a special form of torture! I converted them to dangle earrings just in time to accessorize my birthday suit!